Lesson 8: Crossfading RGB LEDs
Table of Contents
In this lesson, you will learn how to fade between RGB colors using analogWrite, how to use the HSL colorspace to more easily (and independently) control hue and brightness, and how to use and load local C/C++ libraries.
NOTE:
This is our most complex lesson yet. From a circuit standpoint, things are easy—it’s the same circuit as before (yay!). From a coding standpoint, things are more complicated. If you don’t have a coding background, it’s OK if the code doesn’t (fully) make sense. Try to read it and understand it given your current abilities. Regardless of your comprehension level, try copying the code and playing with it on your own!
Materials
You’ll need the same materials as the previous RGB LED lesson. Recall that there are two types of RGB LEDs: a common cathode design and a common anode design, so make sure you know which one you have as it will affect the circuit you make and the code you write.
| Breadboard | Arduino | RGB LED | Resistors |
|---|---|---|---|
 |  |  |  |
| Breadboard | Arduino Uno, Leonardo, or similar | RGB LED (Either Common Cathode or Common Anode) | Three 220Ω Resistors |
Making the circuit
The circuit is the same as the previous RGB LED lesson. Make sure you follow the appropriate wiring based on whether you are using a common cathode or common anode RGB LED.
| RGB Common Cathode Wiring | RGB Common Anode Wiring |
|---|---|
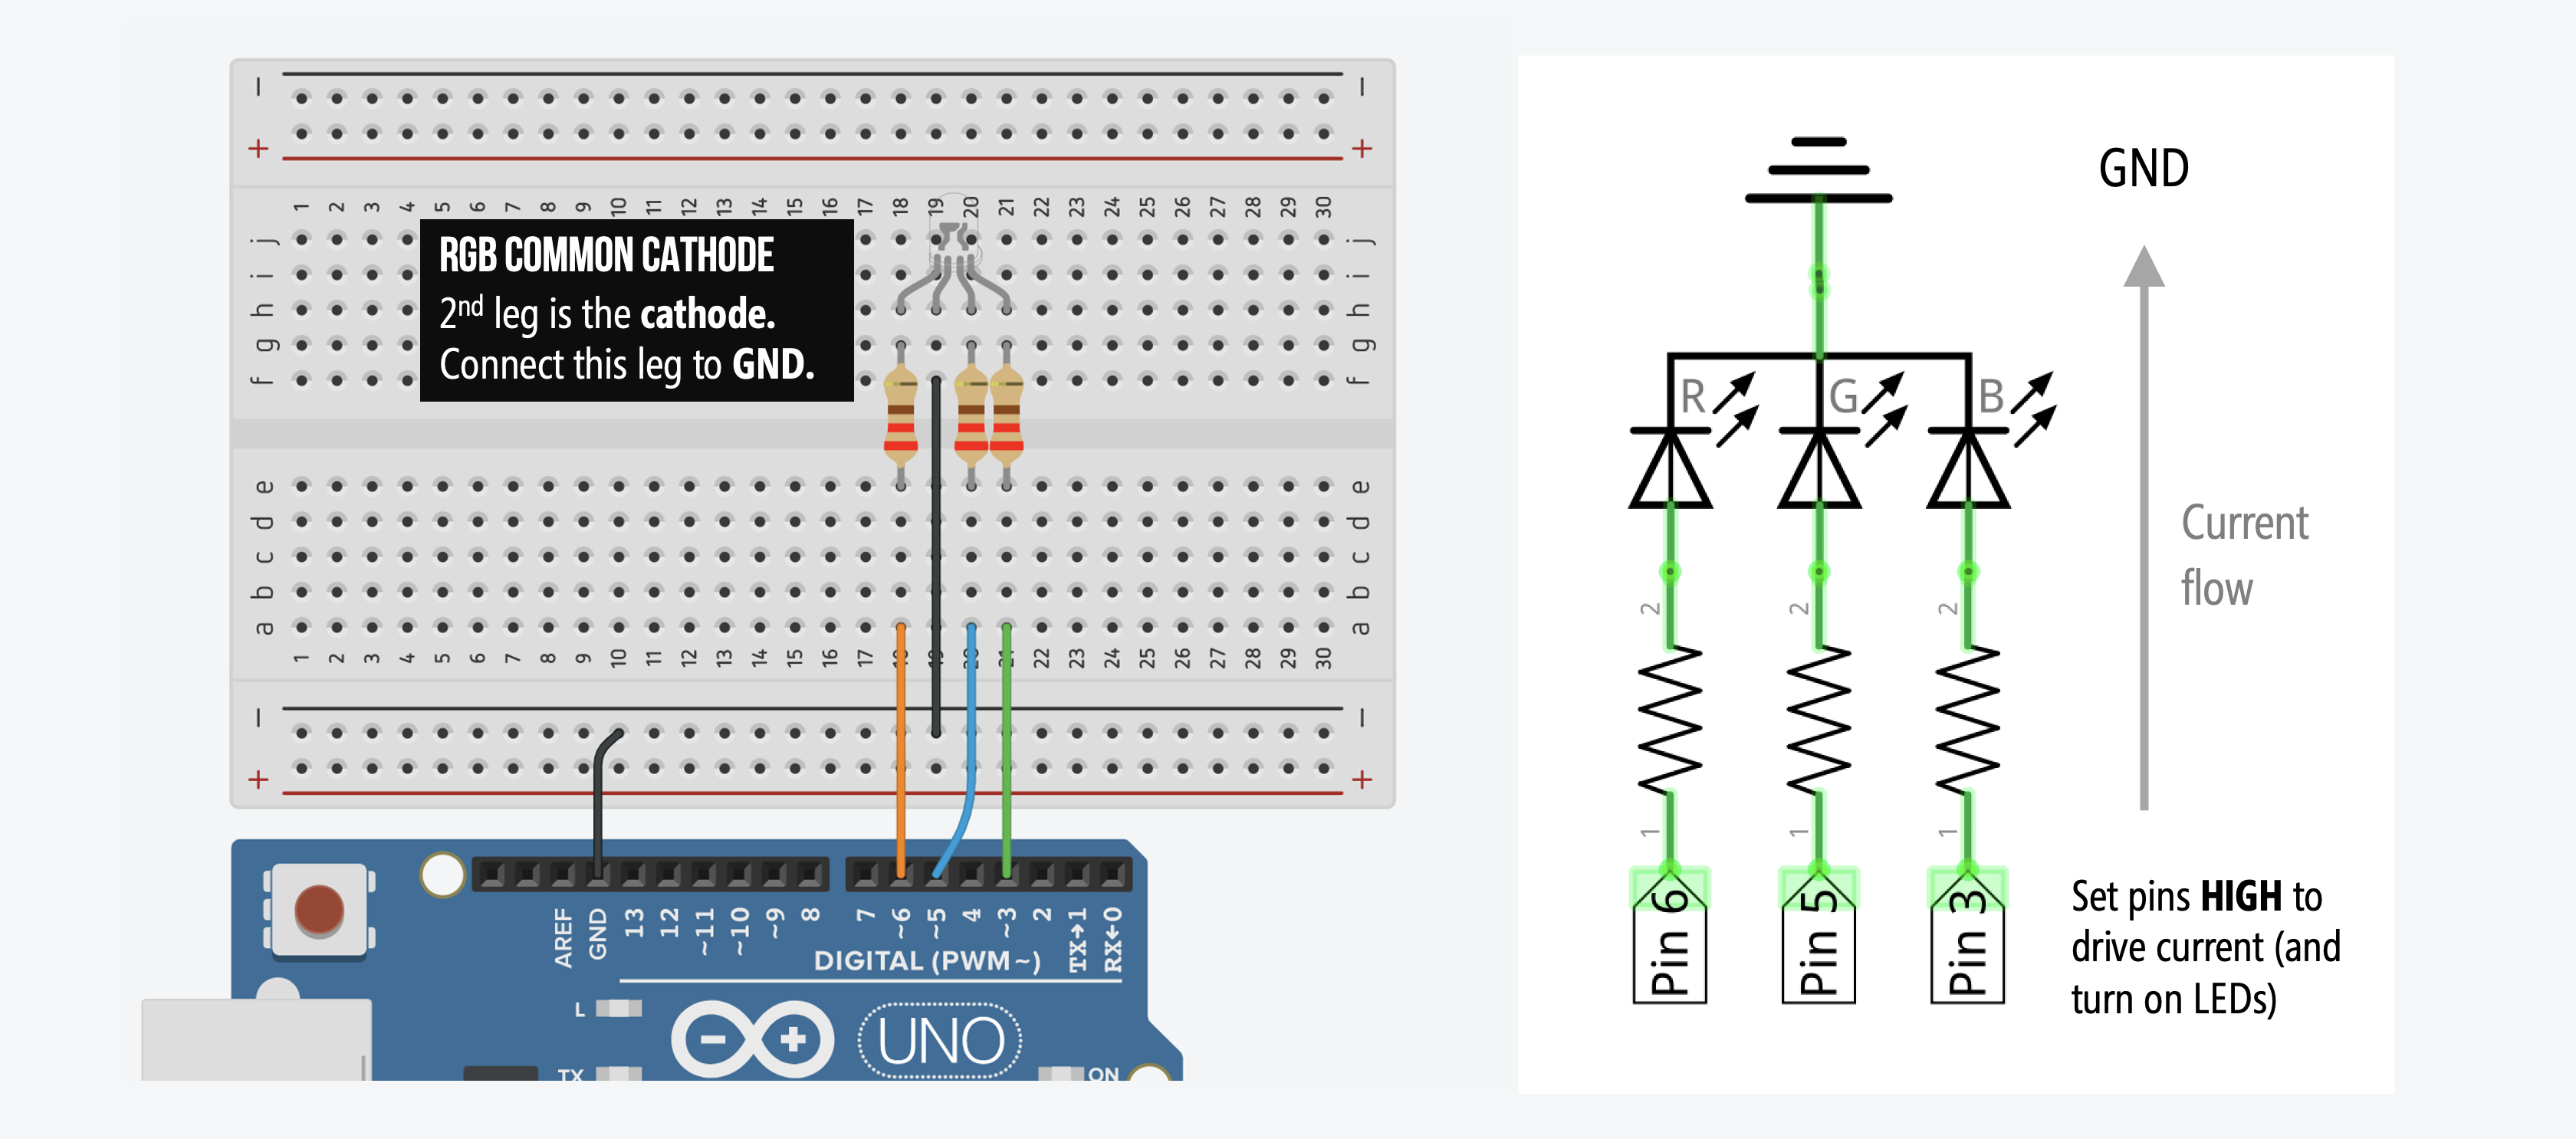 | 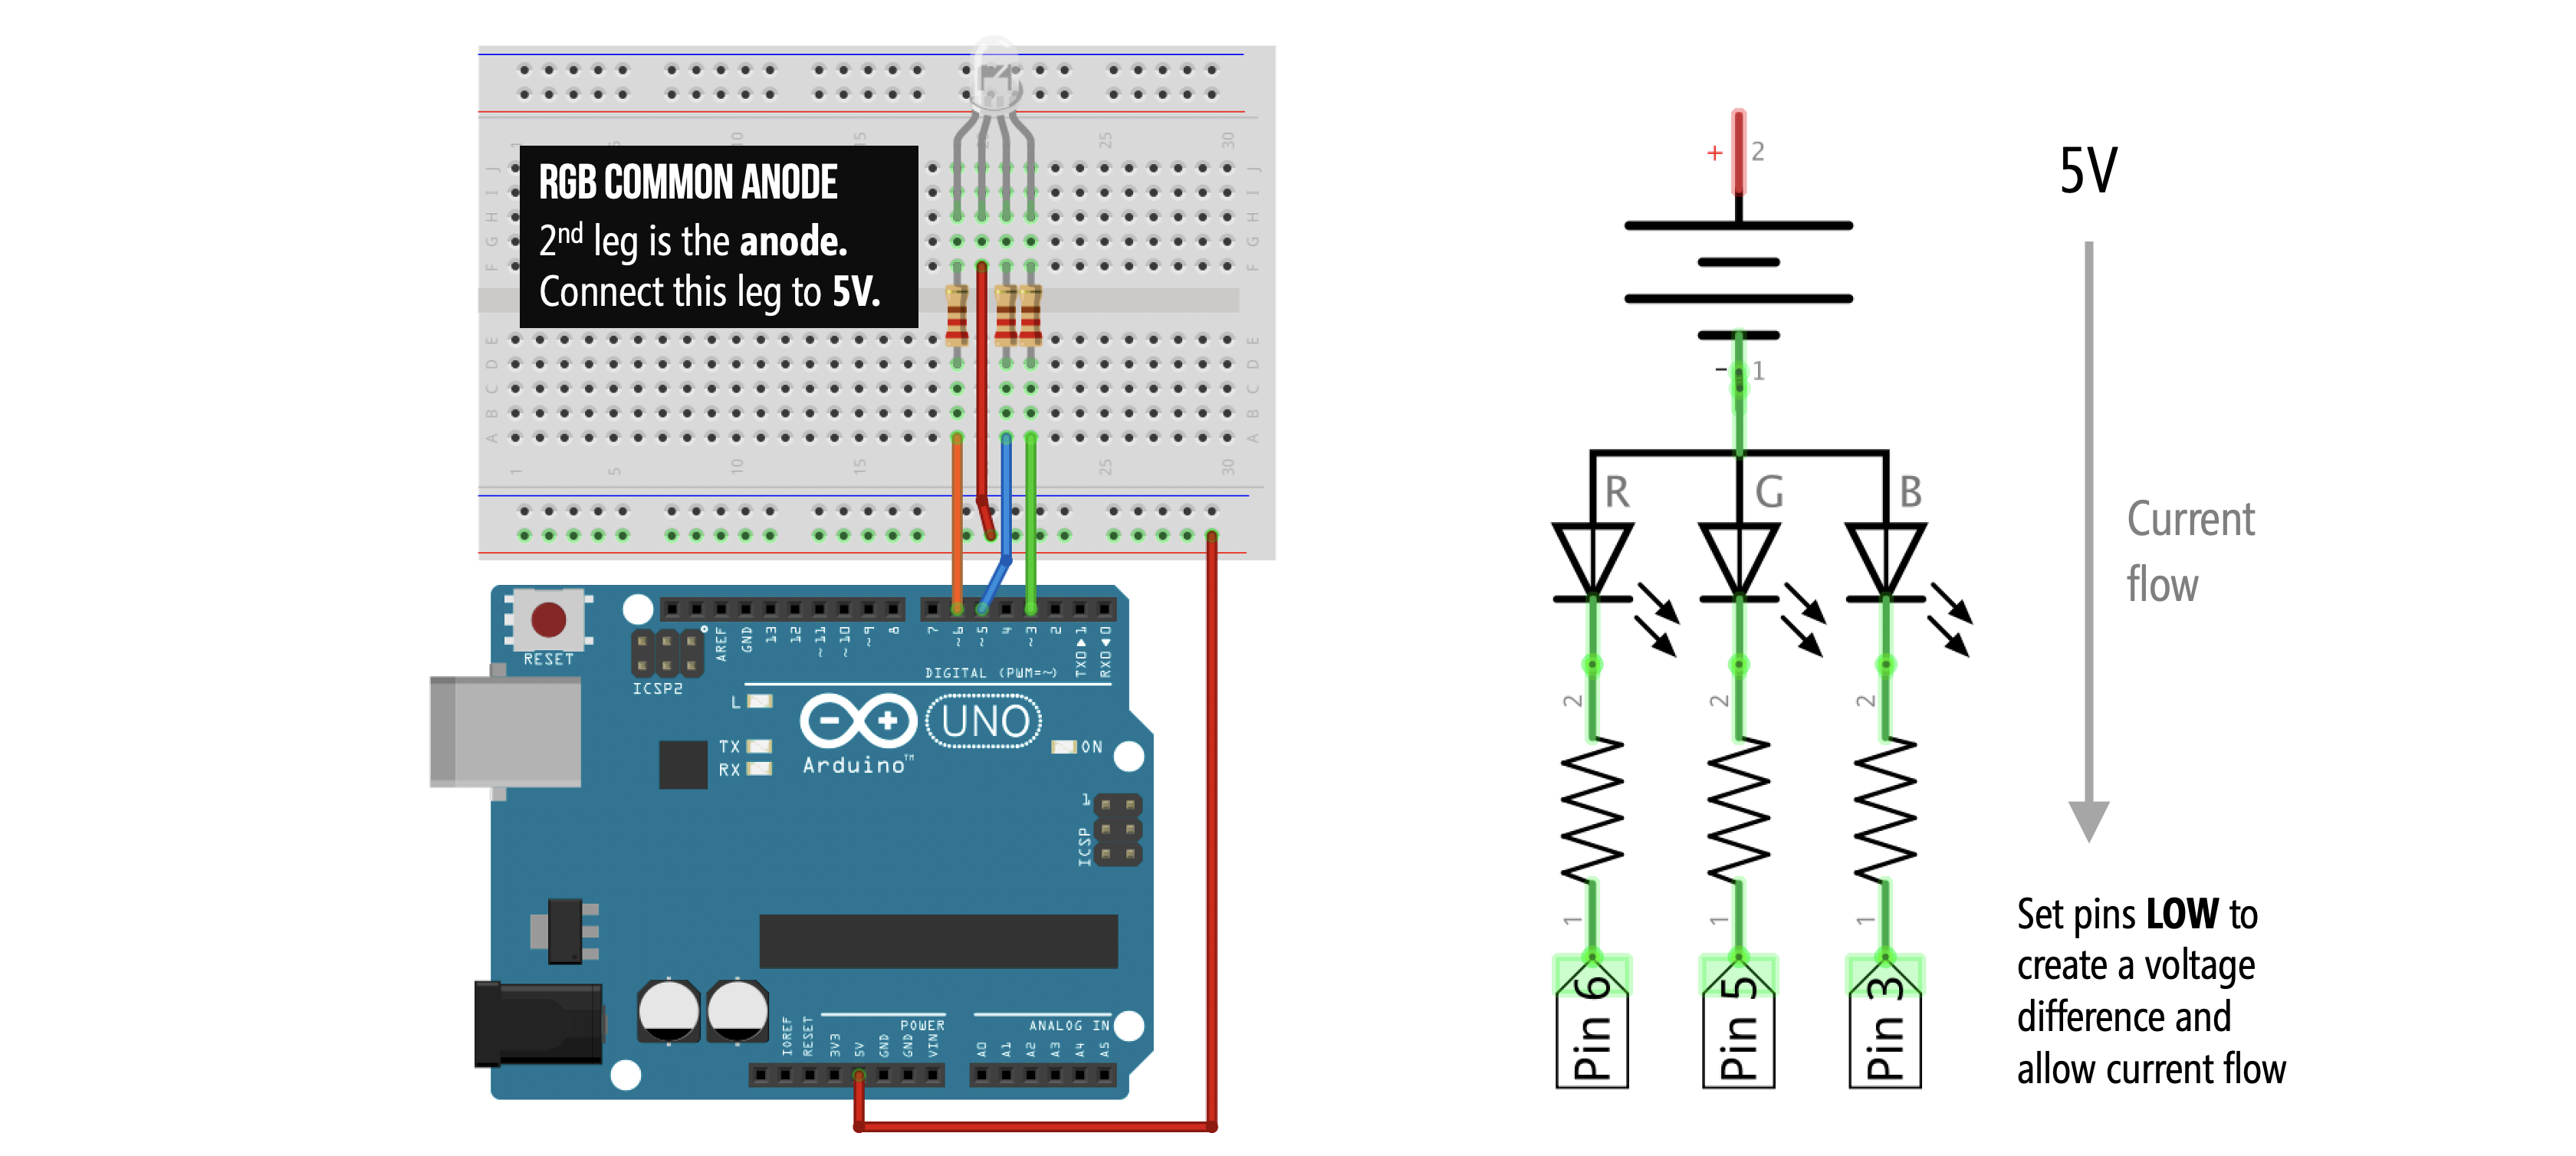 |
Writing the code
We are going to explore and implement two different RGB crossfade approaches.
- First, we will use
forloops to step through dyadic combinations between red, green, and blue LED colors. This approach is based on a now-expired gist by the userjamesotron. - Second, we will use the HSL color space to manipulate hue—what colloquially we refer to as color—and then convert this to the RGB color space for our
analogWritecalls. This approach is cleaner and less convoluted but requires using a separate library for the HSL-to-RGB conversion.
With analogWrite’s maximum output value of 255, each embedded red, green, blue LED can be set from 0 to 255, which enables 16,777,216 combinations (256^3). However, only a small fraction of these are perceptually different. Indeed, in our first crossfade solution, by default, we only fade between 156 combinations.
Crossfading in the RGB color space
The code for crossfading an RGB LED is the most complex that we’ve covered thus far (and, if you don’t have a coding background, it’s OK if you don’t fully understand it). For those in our engineering courses (like Ubiquitous Computing, Physical Computing, or Prototyping Interactive Systems), you are expected to read and understand this code.
There are many different ways you could crossfade an RGB LED depending on which colors you want to illuminate and how quickly. If you want to play with and explore the RGB color space, see this interactive visualization we made in p5js.
Our particular crossfade method works by increasing one LED color value (from 0 to 255) while decreasing another (from 255 to 0). For example, the code begins by decreasing the red LED value while increasing the green LED value. When the red LED value reaches 0, we begin decrementing another LED (green in this case). Similarly, when the green LED value reaches 255, we begin incrementing another LED (the blue LED in this case), and so on.
More specifically, we have an array int _rgbLedValues[3] that stores our {int red, int green, int blue} values. We initialize the array to {255, 0, 0}—so red=255, green=0, and blue=0. So, our RGB LED will start red.
int _rgbLedValues[] = {255, 0, 0}; // Red, Green, BlueTo help index into this array and track state, we create the following enum:
enum RGB{
  RED,
  GREEN,
  BLUE,
  NUM_COLORS
};
This enum allows us to access our RGB LED values by writing _rgbLedValues[RED], _rgbLedValues[GREEN], and _rgbLedValues[BLUE] rather than _rgbLedValues[0], _rgbLedValues[1], and _rgbLedValues[2]. The enum doesn’t just improve code readability and help avoid needless array index errors, it’s also used to track state with two state-tracking variables: _curFadingUpColor and _curFadingDownColor.
Our crossfade algorithm uses two for loops to simultaneously increase one color while decreasing another. We start by increasing green and decreasing red as controlled by enum RGB _curFadingUpColor = GREEN;) and (enum RGB _curFadingDownColor = RED;), respectively.
Once we reach our maximum color value of 255 for the current _curFadingUpColor, we select the next color to increase (beginning with RED and then to GREEN then BLUE then back to RED). Similarly, once we reach our minimum color value of 0 for _curFadingDownColor, we select the next color to decrease (same order as before: from RED to GREEN to BLUE then back to RED).
The full fade algorithm is captured in loop():
// Code based on https://gist.github.com/jamesotron/766994 (no longer available)
void loop() {

  // Increment and decrement the RGB LED values for the current
  // fade up color and the current fade down color
  _rgbLedValues[_curFadingUp] += FADE_STEP;
  _rgbLedValues[_curFadingDown] -= FADE_STEP;

  // Check to see if we've reached our maximum color value for fading up
  // If so, go to the next fade up color (we go from RED to GREEN to BLUE
  // as specified by the RGB enum)
  if(_rgbLedValues[_curFadingUp] > MAX_COLOR_VALUE){
    _rgbLedValues[_curFadingUp] = MAX_COLOR_VALUE;
    _curFadingUp = (RGB)((int)_curFadingUp + 1);

    if(_curFadingUp > (int)BLUE){
      _curFadingUp = RED;
    }
  }

  // Check to see if the current LED we are fading down has gotten to zero
  // If so, select the next LED to start fading down (again, we go from RED to
  // GREEN to BLUE as specified by the RGB enum)
  if(_rgbLedValues[_curFadingDown] < 0){
    _rgbLedValues[_curFadingDown] = 0;
    _curFadingDown = (RGB)((int)_curFadingDown + 1);

    if(_curFadingDown > (int)BLUE){
      _curFadingDown = RED;
    }
  }

  // Set the color and then delay
  setColor(_rgbLedValues[RED], _rgbLedValues[GREEN], _rgbLedValues[BLUE]);
  delay(DELAY_MS);
}
We control the fade step—the amount to fade on each loop() iteration—with const int FADE_STEP. With FADE_STEP=1, we fade between 768 color combinations (3*256). By default, FADE_STEP=5, which results in 156 color combinations.
Full RGB-based crossfader code
Here’s the code in its entirety:
This source code is on GitHub.
RGB-based crossfader videos
Here are two videos showing the code running on an Arduino Uno. First, in the Tinkercad simulator. You can see the crossfade colors and a plot of the corresponding analogWrite values.
Second, a workbench video of the code running on an Arduino Uno:
Crossfading in the HSL color space
The second method for crossfading the RGB LED takes advantage of the Hue, Saturation, Lightness (HSL) color space. To change the “color” of the RGB LED, we are really talking about changing its hue. It’s much easier to do this using HSL and then converting to RGB to set our RGB LED color.
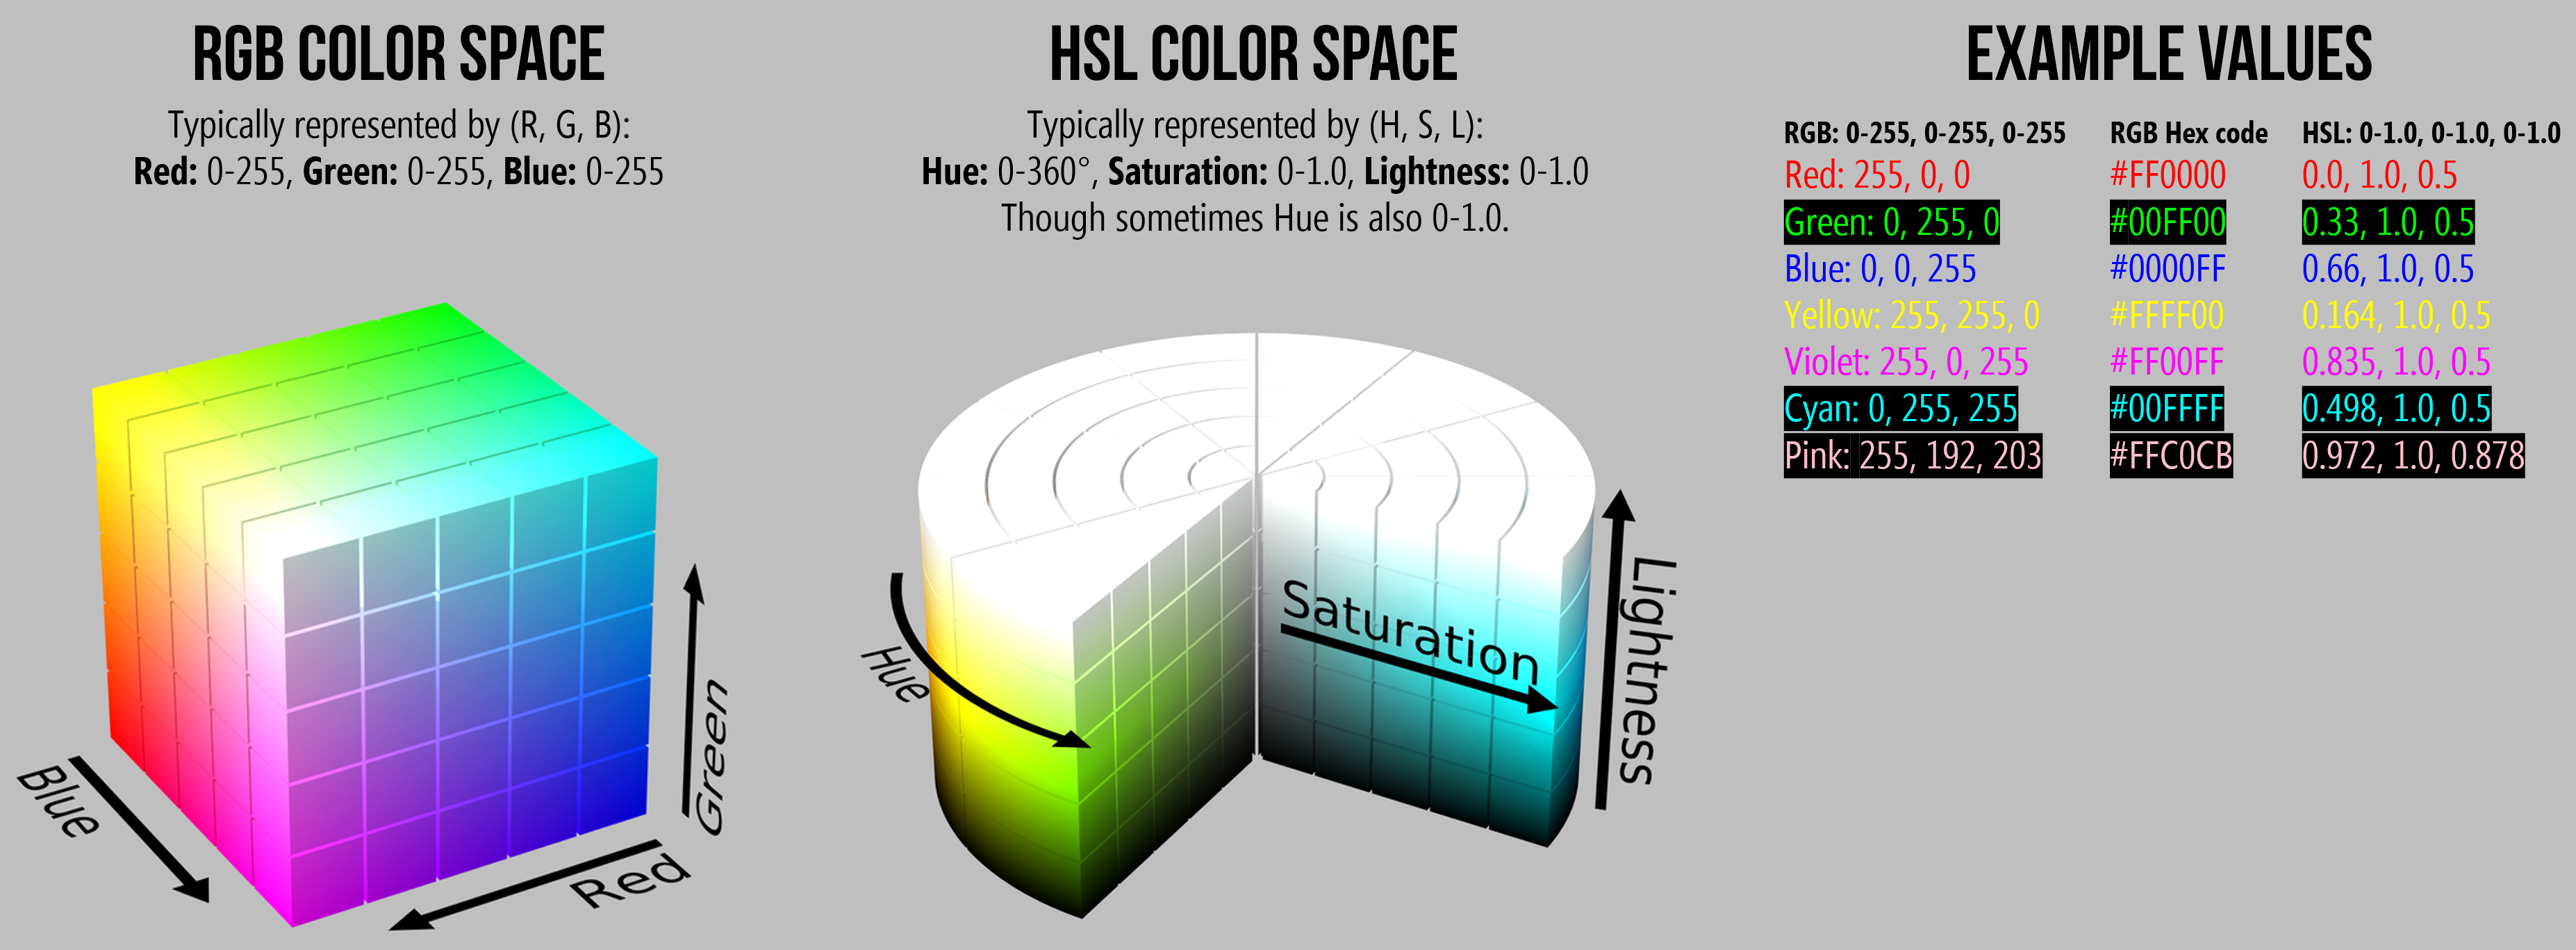 RGB and HSL color space visualizations from Wikipedia.
Here’s a video of various hues, saturations, and lightness levels using Hunor Marton’s HSL Color Picker. Play around with it yourself on codepen.io. You can also open up almost any painting or graphics application to play with and switch between colorspaces from MSPaint to Adobe Photoshop and Illustrator to GIMP and Inkscape.
A screen recording of Hunor Marton’s HSL Color Picker.
In our case, we perform this HSL-to-RGB conversion using the RGBConverter library. With this HSL approach, our code is comparatively much simpler, something like the following pseudocode:
// Basic overview of our approach (pseudocode)
float hue = 0, saturation = 0.8, lightness = 1.0;
float hueStepValue = 0.1f; // increment hue but keep saturation and lightness fixed
float MAX_HUE = 1.0f;
loop(){
    hue += stepValue;  // increment hue
    RGB rgb = convertHslToRgb(hue, saturation, lightness) // convert HSL to RGB
    setColor(rgb.red, rgb.green, rgb.blue); // set the color
    if(hue > MAX_HUE){ // reset hue to zero if MAX_HUE reached
        hue = 0;
    }
}
The downside of this implementation is that we must use floats because the RGBConverter library uses floating point functions. Why are floats bad? Two reasons: with the ATmega328 microcontroller, floating point arithmetic is slow (float division can be 2-4 times slower than integer division) and imprecise (floats can appear infinitely precise given their use of decimals but on the ATmega328, floats have ~6-7 decimal digits of precision).
However, these limitations won’t matter for our program—or for any of our introductory lessons—because we are not speed limited and don’t need high-precision math. If you want to know more about why embedded programmers try to avoid floating point operations, read the note below. Otherwise, skip ahead.
NOTE:
The ATmega328 chip (used by the Arduino Uno, Leonardo, etc.) does not natively support floating point (that is, there is no specialized hardware to speedup these floating point operations). This is a common limitation with microcontrollers. So, to avoid using floats while still computing the same mathematical operations, embedded programmers use fixed-point arithmetic.
Some interesting discussions and examples, include:
- Sensor smoothing and optimized math on the Arduino, Alan Burlison’s blog
- AVR GCC Fixed-Point vs. Floating Point Comparison, ucexperiment blog
- Speed of floating point operations, Arduino forums.
Full HSL-based crossfader code
The full code for our HSL-based crossfader is below. Importantly, you cannot simply copy/paste this code into your Arduino IDE. You must have the RGBConverter code in a sub-folder called src in your root sketch directory. Use the same directory structure as our GitHub. You can read more about loading libraries in the Arduino IDE below.
This source code is on GitHub.
Workbench video
Here’s a workbench video of CrossFadeHue.ino with a common cathode RGB LED.
Loading libraries in the Arduino IDE
There are multiple ways of loading external libraries in the Arduino IDE (see this official Arduino tutorial); however, most are focused on global libraries—that is, libraries that all of your sketches have access to. What if you want to load just a local library just for the current sketch?
Well, it turns out this fundamental feature has a long, sordid history in the Arduino community (for example: link, link). I have found three ways to load local .h and .cpp code:
First and easiest, place all .h and .cpp files in your root sketch folder (where your .ino file resides):
CrossFadeHue
|-CrossFadeHue.ino
|-RGBConverter.cpp
|-RGBConverter.h
Second, place all .h and .cpp files in a sub-folder off or your root sketch folder with a dir name of your choosing (e.g., lib):
CrossFadeHue
|-CrossFadeHue.ino
|-lib
  |-RGBConverter.cpp
  |-RGBConverter.h
Third, if you have lots of .h and .cpp files and want to organize them into their own individual sub-folders, then… this can be frustrating! But there is a solution since the ~Arduino 1.6 release: you must put these sub-folders into a sub-folder called src (link) within your root sketch directory. Indeed, this is exactly our setup for using the RGBConverter library. It’s in CrossFadeHue\src\RGBConverter. So, your directory structure should look like:
CrossFadeHue
|-CrossFadeHue.ino
|-src
  |-RGBConverter
    |-RGBConverter.cpp
    |-RGBConverter.h
Exercises
- New crossfade algorithms. Develop your own crossfade algorithm to fade between colors. Play around with hue, saturation, and lightness. How do they seem to affect the RGB LED?
- Fade multiple RGB LEDs. How could we modify our code to fade multiple RGB LEDs at different rates? Hint: We’ll work on one potential solution in the next lesson
Lesson Summary
In this lesson, you explored advanced color control and multi-file programming. You learned:
- How to use arrays,
enums, and state-tracking variables to create a complex, non-blocking crossfade algorithm. - Why the HSL (Hue, Saturation, Lightness) color space is often far more intuitive for programmatic color manipulation than the raw RGB color space.
- The trade-offs of using floating-point math (
floats) on 8-bit microcontrollers like the ATmega328. - How to properly import, structure, and use local external
C/C++libraries (.hand.cppfiles) within an Arduino sketch.
Next Lesson
For our next and final Intro to Output lesson, we are going to learn how to blink multiple LEDs at different frequencies, which is one of the most common questions on Arduino forums—perhaps because of the way the official Arduino Blink tutorial uses delay() to control blinking rates (which is fine for one LED but doesn’t scale). Before starting the lesson, it’s worth thinking about how you would blink multiple frequencies at different rates. :)