Lesson 5: Playing Tones
Table of Contents
- Materials
- The tone() situation on ESP32: a brief history
analogWritevs.tone(): what’s the difference?- Making the circuit
- How do piezo buzzers actually work?
- The
tone()function - Playing individual tones
- Playing a scale
- Playing a melody
- Combining tone with an LED
- Controlling pitch with a potentiometer
- The LEDC tone alternative
- Bonus demo videos
- Exercises
- Summary
- Resources
- Next Lesson
So far, every output we’ve produced in the ESP32 module has been visual—turning LEDs on, off, fading, and reading analog input. In this lesson, we’ll add a completely new output modality: sound! Using a piezo buzzer and the tone() function, we’ll learn how to play individual notes, scales, and even melodies on the ESP32.
If you completed our Intro to Arduino tone lesson, you’ll be happy to know that tone() and noTone() now work on the ESP32 in Arduino core v3.x—the code is nearly identical! But we’ll also explore the ESP32’s more powerful alternative: the LEDC tone functions (ledcWriteTone and ledcWriteNote), which give you additional control and work directly with the same PWM hardware we used in Lesson 3.
In this lesson, you will learn:
- How to play tones on the ESP32 using
tone()andnoTone()—now supported in ESP32 Arduino core v3.x!- How to use the LEDC tone functions (
ledcWriteToneandledcWriteNote) for more control- The difference between
analogWrite(duty cycle) andtone()(frequency)—and why it matters for sound- How to wire a passive piezo buzzer (no resistor needed!)
- How to play scales, melodies, and even the Imperial March 🎵
- How to combine tone output with an LED for multimodal feedback
- How to use a potentiometer to control pitch interactively
Materials
To start, you just need a piezo buzzer, a breadboard, and an ESP32. We use Adafruit’s ESP32-S3 Feather but any ESP32-S3 board will work! Later, we’ll also incorporate a potentiometer and RED led with a current-limiting resistor.
| Breadboard | ESP32 | Piezo Buzzer |
|---|---|---|
 | 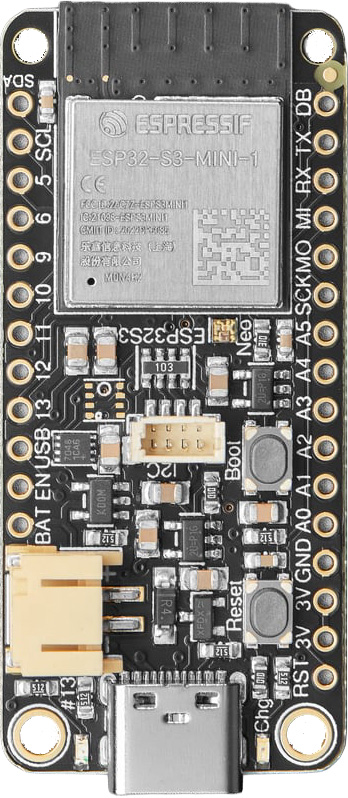 | 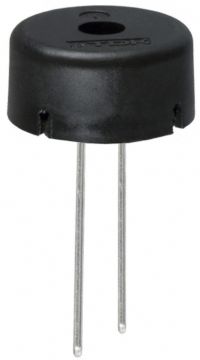 |
| Breadboard | ESP32-S3 Feather | Passive Piezo Buzzer |
We’ll be using a passive piezo buzzer such as the TDK PS1240 (~$0.40 from Mouser or ~$1.35 at Adafruit). These buzzers work with both 3.3V and 5V signals, and their resonant frequency (loudest tone) is around 4 kHz—but they can produce a wide range of audible frequencies. We’ve tested from 32 Hz up to 10 kHz, at which point the sound is ear piercing! Piezo buzzers are non-polarized (like resistors), so they can be connected in either orientation.
Make sure you have a passive piezo buzzer, not an active one. An active buzzer has a built-in oscillator and plays a fixed tone when powered. A passive buzzer requires an external signal (which is what
tone()provides) and can play different frequencies. If your buzzer makes a sound when you simply connect it to 3.3V and GND, it’s an active buzzer.Here’s the TDK PS1240 piezoelectronic buzzer datasheet, which makes clear on the title page that it is “without an oscillator circuit”.
The tone() situation on ESP32: a brief history
If you’ve searched online for “ESP32 tone,” you’ve probably encountered blog posts and forum threads declaring that tone() is “famously unsupported” on the ESP32. This is no longer true! Espressif added tone() and noTone() support in PR #6402 (merged March 2022), and it shipped with ESP32 Arduino core v2.0.3+. If you’re using v3.x (which we use in this course), tone() works out of the box.
The original version of this lesson was written when tone() was not part of the ESP32 Arduino package and relied entirely on using LEDC PWM to drive different frequency waveforms. To simplify things, we used a custom library that we built called Tone32.hpp to add duration support to the LEDC tone functions. Now that tone(pin, freq, duration) works natively, our custom Tone32.hpp is no longer needed—and you can write ESP32 tone code that’s nearly identical to Arduino Uno code. 🎉
The YouTube demo videos throughout this lesson were recorded with the old Huzzah32 board and the legacy v2.x LEDC API. The concepts are the same—only the code has gotten simpler!
analogWrite vs. tone(): what’s the difference?
Before we start making sounds, it’s important to understand how tone() differs from analogWrite(), which we used in the LED fade lesson to control brightness. Both produce square waves, but they control different properties of the wave:
-
analogWrite(pin, value)varies the duty cycle (the fraction of time the signal is HIGH) while keeping the frequency fixed (1 kHz by default on the ESP32 in v3.x). This is how we controlled LED brightness. -
tone(pin, frequency)varies the frequency (how many cycles per second) while keeping the duty cycle fixed at 50%. This is what controls pitch—the frequency of the sound wave determines whether you hear a low rumble or a high squeal.
We dive more deeply into these differences in the tone lesson as part of the Intro to Arduino series. We encourage you to check that out!
Don’t try running both
tone()andanalogWrite()on the same pin simultaneously—they both use the LEDC hardware under the hood, and they’ll conflict. Use separate pins if you want to fade an LED while playing a tone.
Making the circuit
The circuit couldn’t be simpler. Connect one leg of the piezo buzzer to a GPIO pin (we’ll use GPIO 13, which is also LED_BUILTIN) and the other leg to GND. No resistor is needed—the piezo buzzer draws very little current.
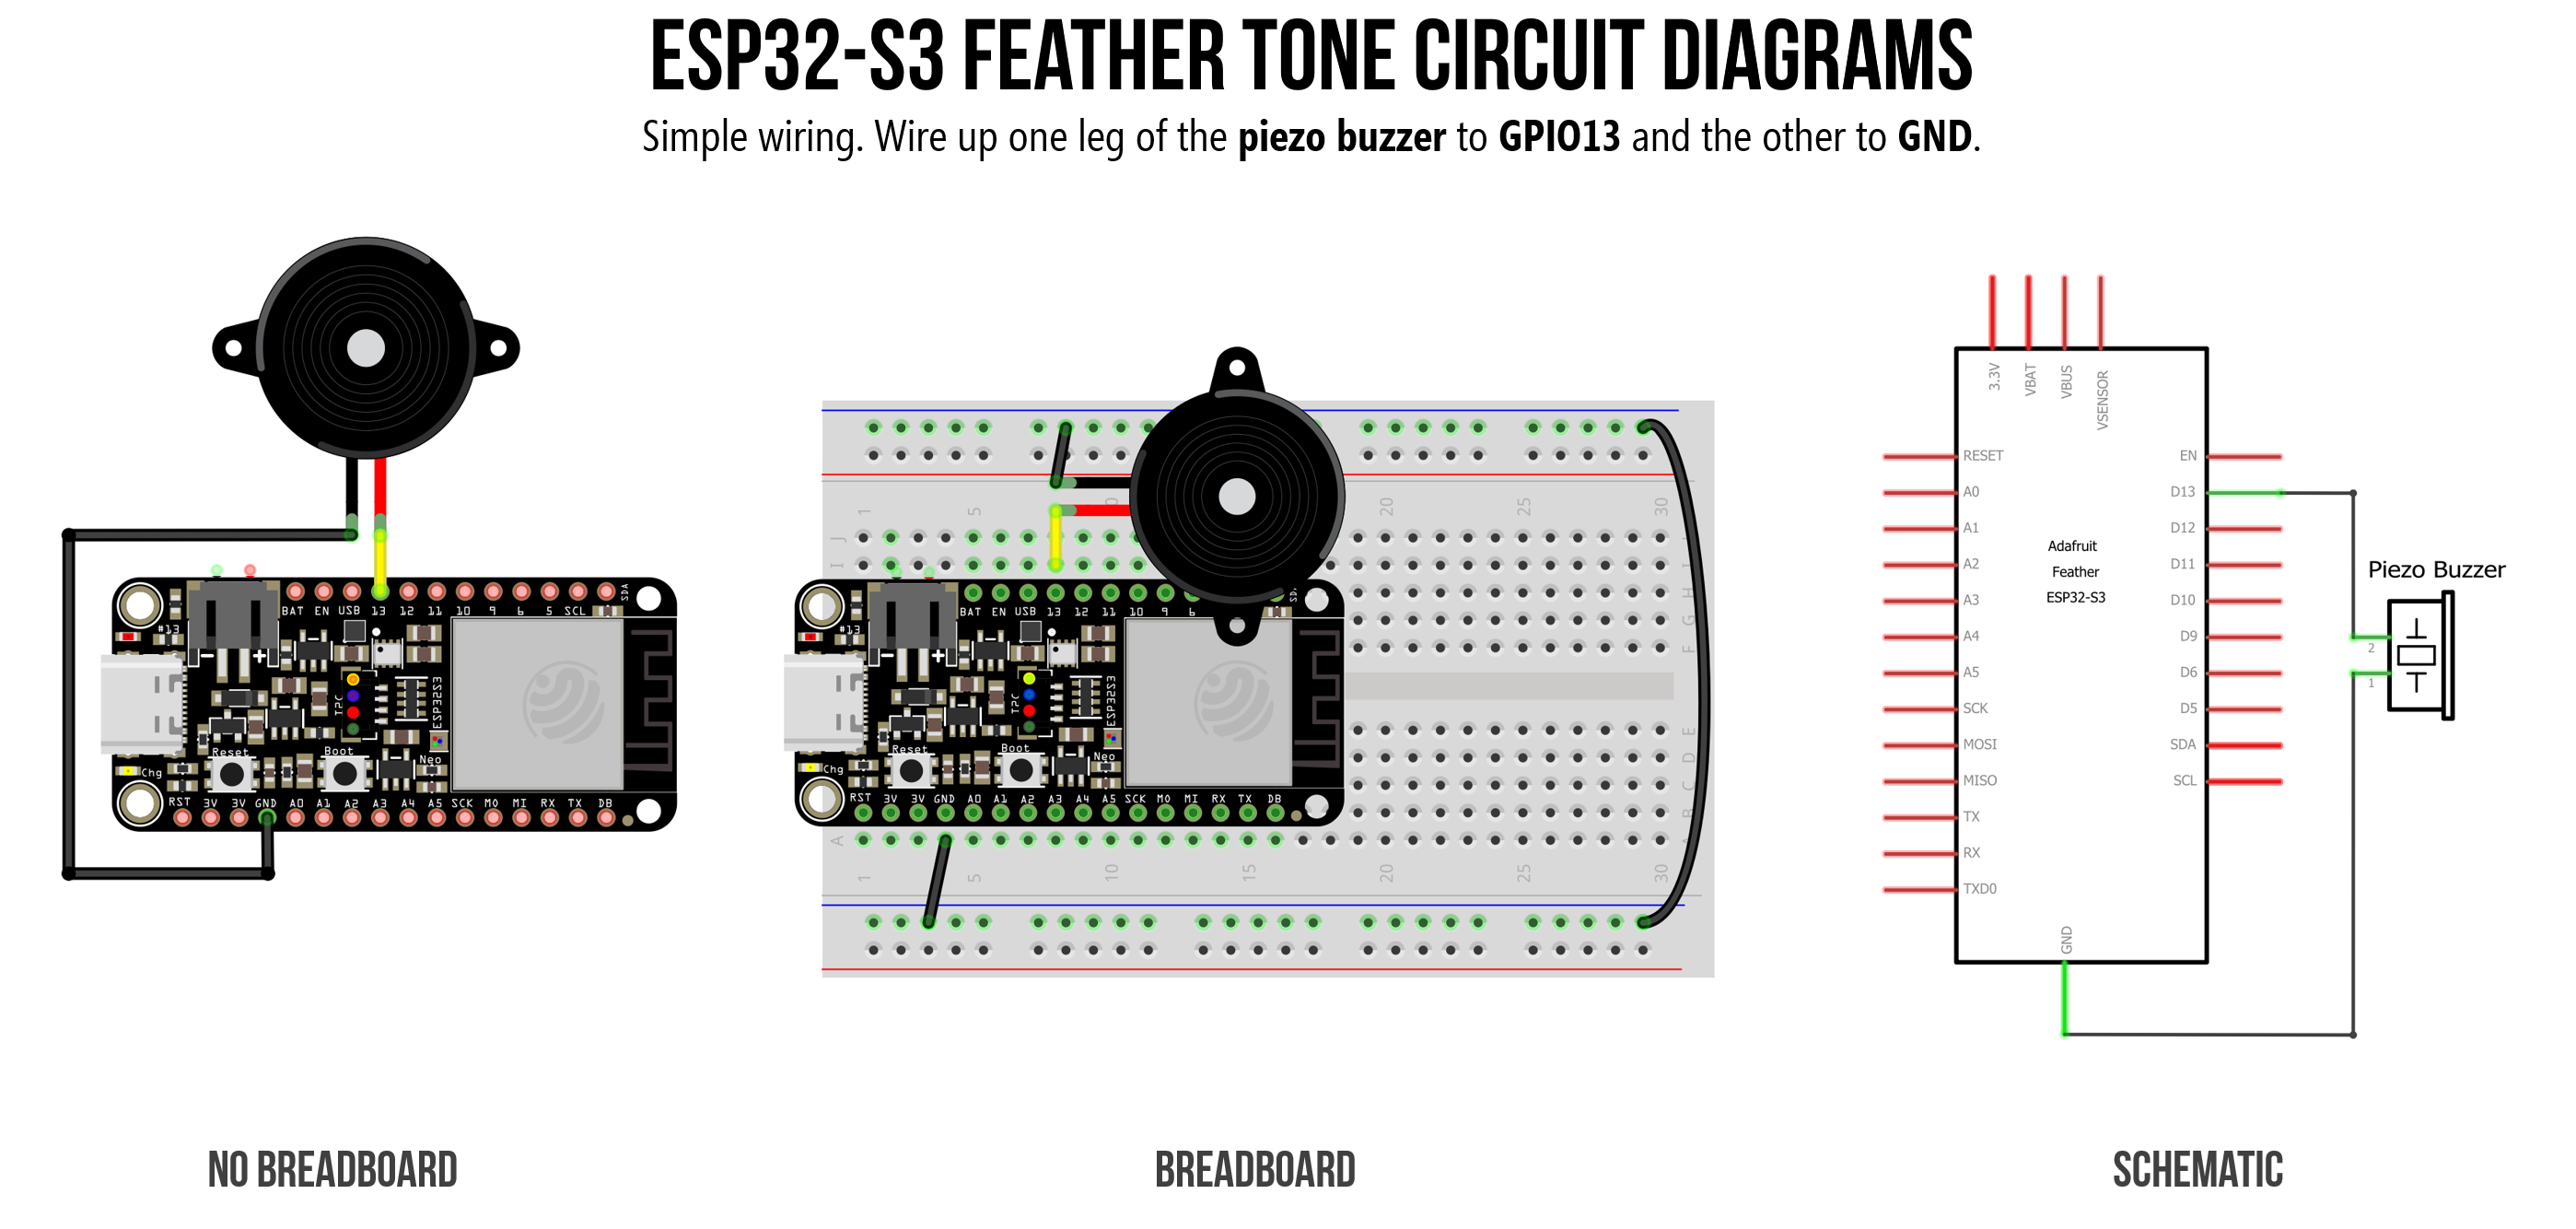 Figure. A simple circuit connecting a passive piezo buzzer to a GPIO pin and GND. No current-limiting resistor is required. Image made in Fritzing and PowerPoint.
Using the Huzzah32 instead? (click to expand)
On the Huzzah32, our original code examples and Fritzing diagrams use GPIO 26. You can use any output-capable GPIO pin—just update the pin number in your code. Avoid pins 34, 39, and 36, which are input-only.
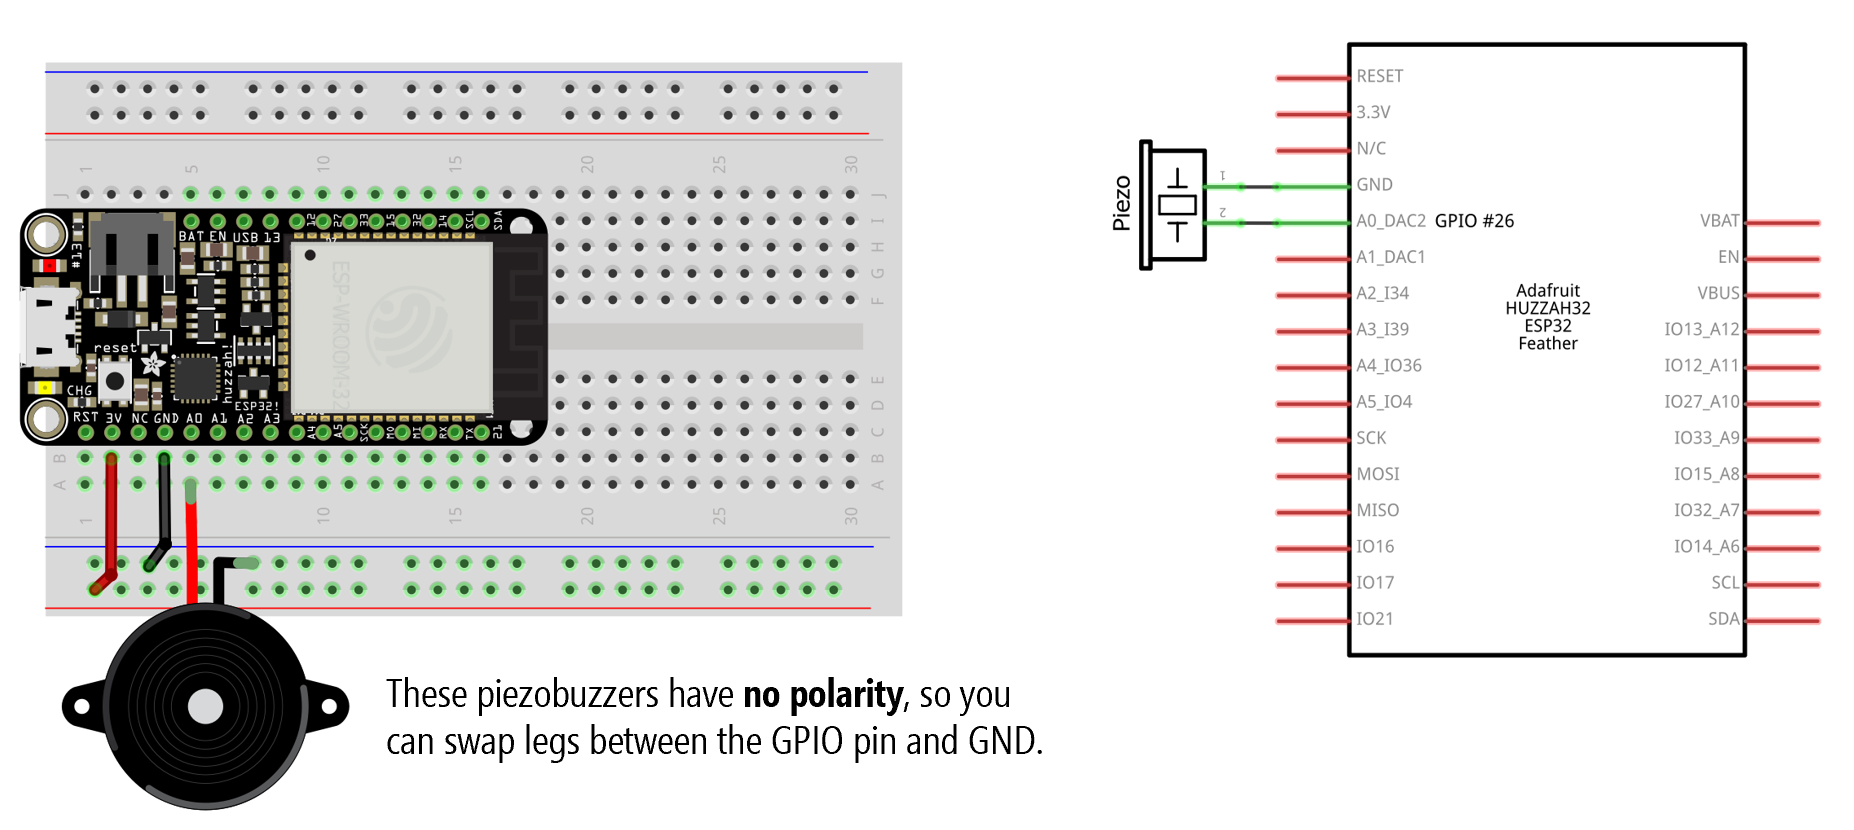 Figure. A simple circuit connecting a passive piezo buzzer to a GPIO pin and GND. No current-limiting resistor is required. Image made in Fritzing and PowerPoint.
We’ll use this basic circuit for most of the lesson—the real fun is in the code!
Why no series resistor?
In our previous lessons, we stressed the importance of using a current-limiting resistor with every LED. So why are we wiring the piezo buzzer directly to a GPIO pin without one?
Unlike LEDs, passive piezo buzzers draw very little current. They behave more like a small capacitor than a simple resistive load. The internal piezoceramic disk flexes when voltage is applied, and this process only requires a tiny amount of current—typically under 5 mA (see the interactive visualization below). Since the ESP32’s GPIO pins can safely source up to 20 mA, connecting the piezo buzzer directly is perfectly safe.
Piezo buzzers vs. electromagnetic speakers
You may have seen speaker circuits online that include an inline resistor (typically 100Ω–1kΩ). Those circuits use electromagnetic speakers, which have a low-impedance coil (commonly 8Ω or 16Ω) and can draw significant current. A series resistor is essential in those circuits.
Piezo buzzers are fundamentally different: they are capacitive devices, not resistive, and can be safely driven directly from a microcontroller pin. This capacitance also explains why you can’t easily use a series resistor to control volume—because a piezo’s impedance varies with frequency, a resistor attenuates different frequencies by different amounts rather than uniformly reducing volume. The simplest way to reduce volume? Put a piece of tape over the hole!
How do piezo buzzers actually work?
The word “piezoelectric” comes from the Greek word piezein, meaning to press or squeeze. Piezoelectric materials have a fascinating property: when you apply a voltage, they physically change shape. Inside your passive buzzer is a thin metal plate with a piezoceramic disk glued to it. When the ESP32 rapidly pulses voltage HIGH and LOW via the tone() function, the ceramic disk quickly bends back and forth. This rapid flexing pushes the surrounding air back and forth, generating the physical sound waves that reach your ears. The frequency of the electrical pulses directly dictates how fast the disk vibrates, which determines the pitch.
Figure. An interactive simulation of piezoelectric buzzer mechanics. In Pulse (Tone) mode, a square wave drives the ceramic disk to flex rapidly, producing sound waves. In Manual mode, you can apply a static voltage to see that a constant signal bends the disk but produces no sound. Open in the p5.js editor.
Why do they sound so… buzzy?
If you’ve been playing tones, you’ve probably noticed they sound harsh and reminiscent of old 8-bit video games. There are two main reasons:
-
The square wave: The
tone()function generates a perfect square wave, instantly snapping between 0V and 3.3V. Unlike the smooth, continuous curve of a sine wave—which produces a pure, clean tone like a tuning fork—a square wave contains many overlapping frequencies called harmonics (we explore this in Frequency Analysis). Our ears perceive these extra harmonics as a buzzy, aggressive sound. -
Physical resonance: Piezo buzzers are designed primarily as alert buzzers (think microwave beeps or smoke detectors), not high-fidelity speakers. They are physically tuned to resonate and be loudest at a specific frequency—usually around 4 kHz. As you play different notes, some pitches will sound overwhelmingly loud while others sound thin or muted.
Want to hear the difference? If you want to build deeper intuition for how different waveforms sound and look, check out this short, interactive guide by Josh Comeau: “Let’s Learn About Waveforms.” Make sure your sound is on (press ‘m’ to unmute).
The tone() function
The ESP32 Arduino library provides three functions for generating tones. Because it’s an Arduino library, the implementors tried to maintain the same function signatures as tone() for the Arduino Uno, Leonardo, etc. See the ESP32 Tone.cpp on GitHub for the implementation.
tone(pin, frequency)              // play continuously until noTone() is called
tone(pin, frequency, duration)    // play for 'duration' milliseconds, then stop
noTone(pin)                       // stop playing
A few important details:
tone()is non-blocking. The ESP32 will immediately move to the next line of code while the sound plays in the background (using an internal FreeRTOS task). If you want the program to wait until the note finishes, add adelay(duration)after the call.tone()can work on any GPIO pin—not just PWM pins. Under the hood, it uses the LEDC peripheral to generate the square wave.- On the Arduino Uno, only one tone can play at a time. On the ESP32, tone()claims a separate LEDC channel per pin, so multiple simultaneous tones on different pins may work—but this isn’t officially documented or guaranteed. For reliability, assume one tone at a time and callnoTone() before starting a new tone on a different pin.
- The
tone()implementation on the ESP32 callsledcAttach()internally to claim an available LEDC channel automatically (see Tone.cpp in the arduino-esp32 repo). This means it may conflict with PWM output on other pins if all LEDC channels are in use. In practice this is rarely a problem—the ESP32-S3 has 8 channels. - Do not mix
tone()and LEDC functions (likeledcWriteTone) on the same pin—they will both try to manage the same underlying channel and interfere with each other. Pick one approach per pin and stick with it.
Timer conflict on the Arduino Uno: On the Uno,
tone()uses Timer2, which disables PWM on specific pins (3 and 11). On the ESP32, the LEDC peripheral handles this differently—tone()simply claims one of the available PWM channels. If you’re also usingledcAttachfor LED fading, just make sure you don’t run out of channels (8 on the ESP32-S3, 16 on the original ESP32).
Playing individual tones
Let’s start simple. The following code plays concert A (440 Hz) for one second, pauses for half a second, then repeats:
/**
 * Play a simple repeating tone on a piezo buzzer.
 *
 * See: https://makeabilitylab.github.io/physcomp/esp32/tone
 */
const int BUZZER_PIN = 13;

void setup() {
  Serial.begin(115200);
  Serial.println("Playing concert A (440 Hz)...");
}

void loop() {
  tone(BUZZER_PIN, 440);       // Play concert A (440 Hz)
  delay(1000);                 // Let it play for one second
  noTone(BUZZER_PIN);          // Stop the tone
  delay(500);                  // Pause for half a second
}
Try changing the frequency: 262 is middle C, 523 is one octave higher (C5), and 1000 produces a high-pitched tone. What’s the lowest frequency you can hear? The highest? Most humans can hear roughly 20 Hz to 20 kHz, but this varies with age.
How do I make it quieter? Once you get your buzzer working, your first question will probably be: “How do I turn the volume down?” Because
tone()always outputs a fixed 50% duty cycle square wave, you cannot control the volume via code. Instead, we use a classic physical computing hack: put a piece of tape over it! A small piece of masking tape or painter’s tape directly over the hole on the piezo buzzer will significantly muffle the sound. As we discussed above, adding a series resistor doesn’t work well here because the piezo’s capacitive nature causes different frequencies to be muffled unevenly.
Playing a scale
Now let’s play something more musical. The Arduino IDE ships with a helpful file called pitches.h that defines frequency constants for musical notes. You can find it in the toneMelody example or access it via File -> Examples -> 02.Digital -> toneMelody in the IDE. You can also find musical note frequencies in this Piano Key Frequencies article on Wikipedia.
Here are a few of the note definitions from pitches.h:
#define NOTE_C4  262   // Middle C
#define NOTE_D4  294
#define NOTE_E4  330
#define NOTE_F4  349
#define NOTE_G4  392
#define NOTE_A4  440   // Concert A
#define NOTE_B4  494
#define NOTE_C5  523   // C one octave above middle C
Using these constants, we can play a C major scale:
#define NOTE_C4  262
#define NOTE_D4  294
#define NOTE_E4  330
#define NOTE_F4  349
#define NOTE_G4  392
#define NOTE_A4  440
#define NOTE_B4  494
#define NOTE_C5  523

const int BUZZER_PIN = 13;
const int NOTE_DURATION_MS = 400;
const int PAUSE_BETWEEN_NOTES_MS = 100;

int scale[] = {NOTE_C4, NOTE_D4, NOTE_E4, NOTE_F4,
               NOTE_G4, NOTE_A4, NOTE_B4, NOTE_C5};
int numNotes = 8;

void setup() {
  // Nothing to set up!
}

void loop() {
  // Play ascending
  for (int i = 0; i < numNotes; i++) {
    tone(BUZZER_PIN, scale[i], NOTE_DURATION_MS);
    delay(NOTE_DURATION_MS + PAUSE_BETWEEN_NOTES_MS);
  }

  delay(300);

  // Play descending
  for (int i = numNotes - 1; i >= 0; i--) {
    tone(BUZZER_PIN, scale[i], NOTE_DURATION_MS);
    delay(NOTE_DURATION_MS + PAUSE_BETWEEN_NOTES_MS);
  }

  delay(1000);
}
Notice that we use the duration parameter of tone(), so we don’t need to call noTone() manually—the tone stops automatically after NOTE_DURATION_MS milliseconds. One subtlety: tone() is non-blocking, meaning the sketch continues executing immediately even while the tone is still playing. That’s why we still need the delay() call—without it, the loop would race ahead to the next note before the current one finishes.
Behind the scenes: On the Arduino Uno,
tone()uses Timer2 and a hardware interrupt to track note duration. On the ESP32,tone()uses a FreeRTOS task with a message queue to manage timing in the background. FreeRTOS is a real-time operating system that runs on the ESP32 and handles multitasking—it’s whytone()can play a note asynchronously while yourloop()code keeps running. This is fundamentally different from the bare-metal timer interrupts on the Uno, and it’s a glimpse into why the ESP32 is so much more capable: it can run multiple concurrent tasks, manage WiFi and Bluetooth stacks, and still toggle a GPIO pin at precise frequencies—all at the same time. See Tone.cpp for the implementation, and the FreeRTOS documentation if you want to learn more about ESP32 multitasking.
Here’s an earlier video demo using the Huzzah32 (the code concepts are the same, but the version shown uses the legacy LEDC API):
Video. A video demonstration of a C major scale playing on the ESP32. The code shown uses the legacy v2.x LEDC API; the v3.x tone() version above produces identical output. Source: PlayScale.ino (legacy version). Make sure your sound is on.
Playing a melody
Now for the fun part—let’s play a real melody! We store the melody as two arrays: one for the notes and one for the note durations.
The Arduino IDE includes a built-in example that plays a short melody. You can access it via File -> Examples -> 02.Digital -> toneMelody. Instead, we’ve written our own version using the Imperial March from Star Wars:
#define NOTE_C4  262
#define NOTE_D4  294
#define NOTE_E4  330
#define NOTE_F4  349
#define NOTE_G4  392
#define NOTE_GS4 415
#define NOTE_A4  440
#define NOTE_B4  494
#define NOTE_C5  523
#define NOTE_E5  659
#define NOTE_F5  698

const int BUZZER_PIN = 13;

// The Imperial March - Main Theme (two phrases)
int melody[] = {
  // Phrase 1: The iconic opening
  NOTE_A4, NOTE_A4, NOTE_A4, NOTE_F4, NOTE_C5,
  NOTE_A4, NOTE_F4, NOTE_C5, NOTE_A4,

  // Phrase 2: The response (up the octave)
  NOTE_E5, NOTE_E5, NOTE_E5, NOTE_F5, NOTE_C5,
  NOTE_GS4, NOTE_F4, NOTE_C5, NOTE_A4
};

// Note durations as divisors of DURATION_BASE:
//   2 = half, 4 = quarter, 6 = dotted eighth, 8 = eighth
int noteDurations[] = {
  4, 4, 4, 6, 16,
  4, 6, 16, 2,

  4, 4, 4, 6, 16,
  4, 6, 16, 2
};

// In C/C++, arrays don't have a built-in .length property.
// We calculate the number of elements by dividing the total array memory size (in bytes)
// by the memory size of a single element (the first item at index 0).
const int NUM_NOTES = sizeof(melody) / sizeof(melody[0]);

// The tempo in Beats Per Minute
const int BPM = 104;

// A minute has 60,000 ms. Divide by BPM for quarter-note duration.
// Multiply by 4 because our array uses '4' to represent a quarter note.
const int DURATION_BASE = (60000 / BPM) * 4;

// Pause between notes as a multiplier of note duration.
// 0.3 means 30% of the note length itself
const float NOTE_GAP_FACTOR = 0.30;

void setup() {
  for (int i = 0; i < NUM_NOTES; i++) {
    // Calculate note duration from the base tempo value
    // e.g., quarter note = 2308/4 = 577ms, dotted eighth = 2308/6 ≈ 385ms
    int duration = DURATION_BASE / noteDurations[i];
    if (melody[i] > 0) {
      tone(BUZZER_PIN, melody[i], duration);
    }
    delay(duration);  // Wait for the duration whether playing a note or resting

    // Pause between notes
    int pauseBetweenNotes = duration * NOTE_GAP_FACTOR;
    delay(pauseBetweenNotes);

    noTone(BUZZER_PIN);
  }
}

void loop() {
  // Melody plays once in setup(), nothing to do here
}
To represent a rest (silence), use a note value of 0 in the melody array. The code checks for this and simply skips the tone() call, relying on the delay() to produce a silent pause. Avoid calling tone(pin, 0) directly—while it may produce silence on some platforms, it can cause unexpected behavior on others due to division by zero in the timer math.
Want to play more complex melodies? Search online for “Arduino tone songs” or “Arduino buzzer melodies”—the community has transcribed hundreds of songs into Arduino
tone()format. The arduino-songs repository by Robson Couto is a great collection. Just remember that the piezo buzzer can only play one note at a time (no chords!).What about chords? The default
tone()library cannot generate multiple simultaneous frequencies. However, Brett Hagman, the original author of the Arduino tone function, wrote a more advanced tone library that supports multiple simultaneous tones on separate pins.
Combining tone with an LED
Now let’s bring together what we’ve learned. Since we already know how to control LEDs from lessons L2 through L4, we can add visual feedback synchronized with our audio output. This kind of multimodal feedback—combining sound and light—makes the output more engaging and is a common pattern in interactive projects.
Red siren tone materials
| Breadboard | ESP32 | Piezo Buzzer | Red LED | Resistor |
|---|---|---|---|---|
| | |  |  |
| Breadboard | ESP32-S3 Feather | Passive Piezo Buzzer | Red LED | 220Ω Resistor |
Flashing an LED with each note
The simplest approach is to turn an LED on while a note plays and off during the pause. Here’s a simple two-tone siren that alternates an LED with each pitch change:
const int BUZZER_PIN = 13;
const int LED_PIN = 5;       // Use any output-capable GPIO
const int SOUND_DURATION_MS = 500;

void setup() {
  pinMode(LED_PIN, OUTPUT);
}

void loop() {
  tone(BUZZER_PIN, 392);           // G4
  digitalWrite(LED_PIN, HIGH);     // LED on for high tone
  delay(SOUND_DURATION_MS);

  tone(BUZZER_PIN, 262);           // C4
  digitalWrite(LED_PIN, LOW);      // LED off for low tone
  delay(SOUND_DURATION_MS);
}
You can also check out our Imperial March code, which turns on LED_BUILTIN whenever a note is played:
- Imperial March simplified on GitHub
- Imperial march advanced on GitHub, which includes better rhythm and an extended melody.
Controlling pitch with a potentiometer
Let’s make things interactive! By combining analogRead() (from Lesson 4) with tone(), we can build a simple instrument where a potentiometer controls the pitch. This is the same analogRead() → map() → output pattern we used in Lesson 4 to control LED brightness—but now we’re driving a completely different output modality!
Pot-controlled pitch materials
| Breadboard | ESP32 | Piezo Buzzer | Trimpot |
|---|---|---|---|
| | |  |
| Breadboard | ESP32-S3 Feather | Passive Piezo Buzzer | 10kΩ Trimpot |
The circuit
Add a potentiometer to the buzzer circuit. Connect the potentiometer’s wiper (middle pin) to an analog input pin—we’ll use A5 since it’s on ADC1 (works even with WiFi active, as we discussed in Lesson 4).
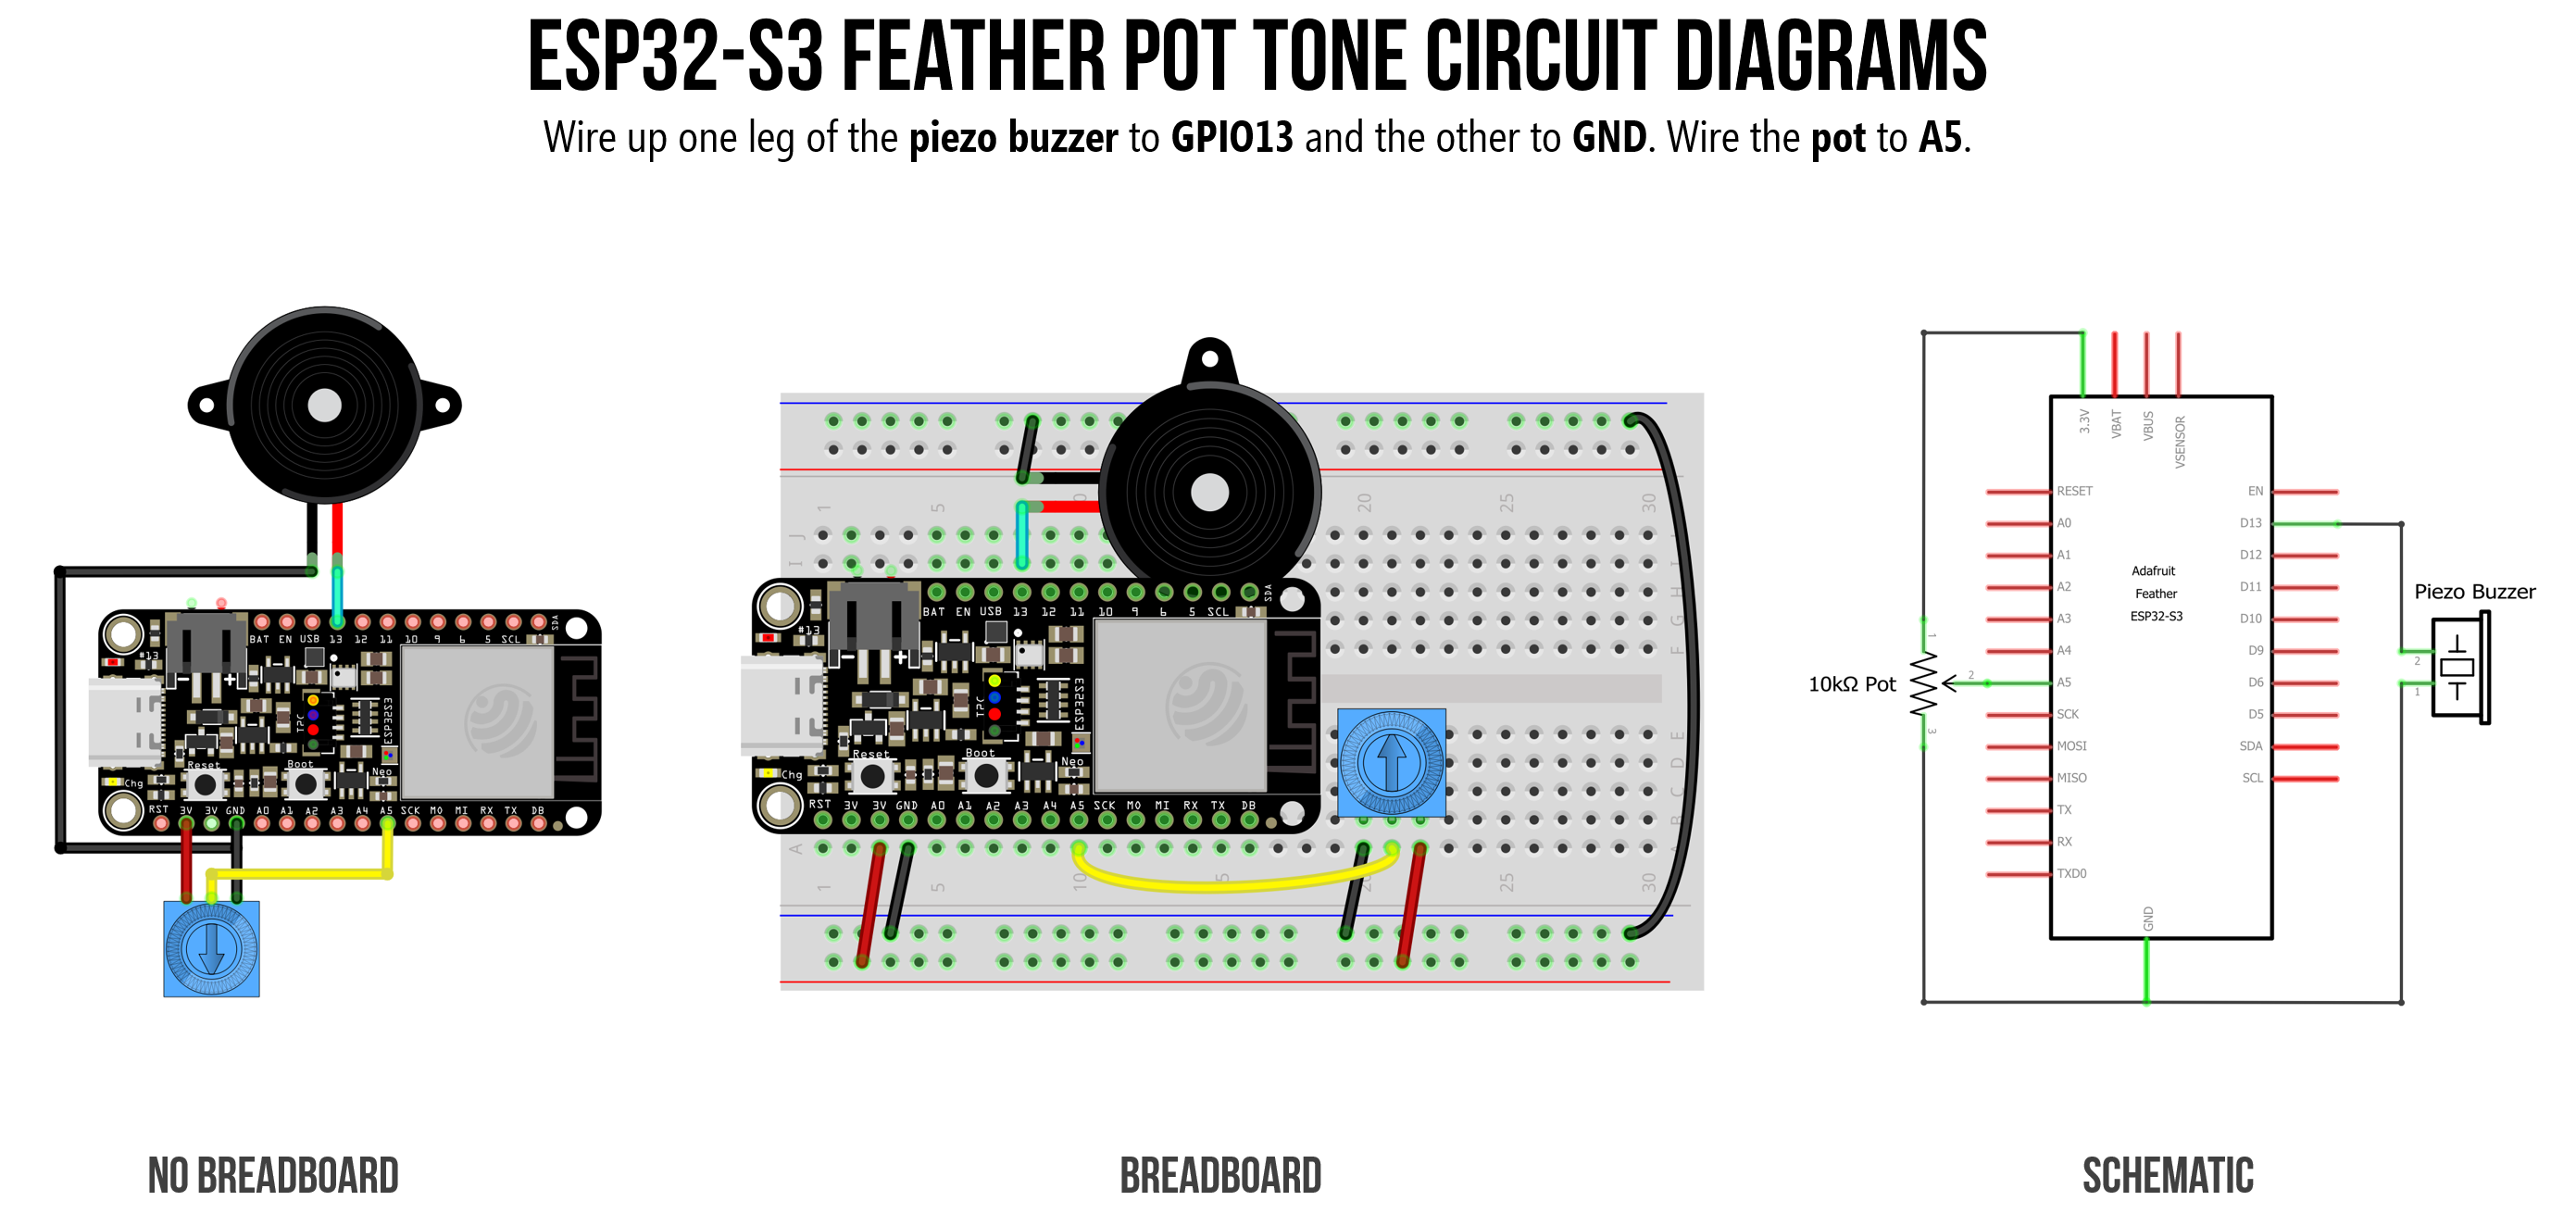 Figure. The circuit diagram for the pot-controlled pitch piezo buzzer. No current-limiting resistor is required. Image made in Fritzing and PowerPoint.
Using the Huzzah32 instead? (click to expand)
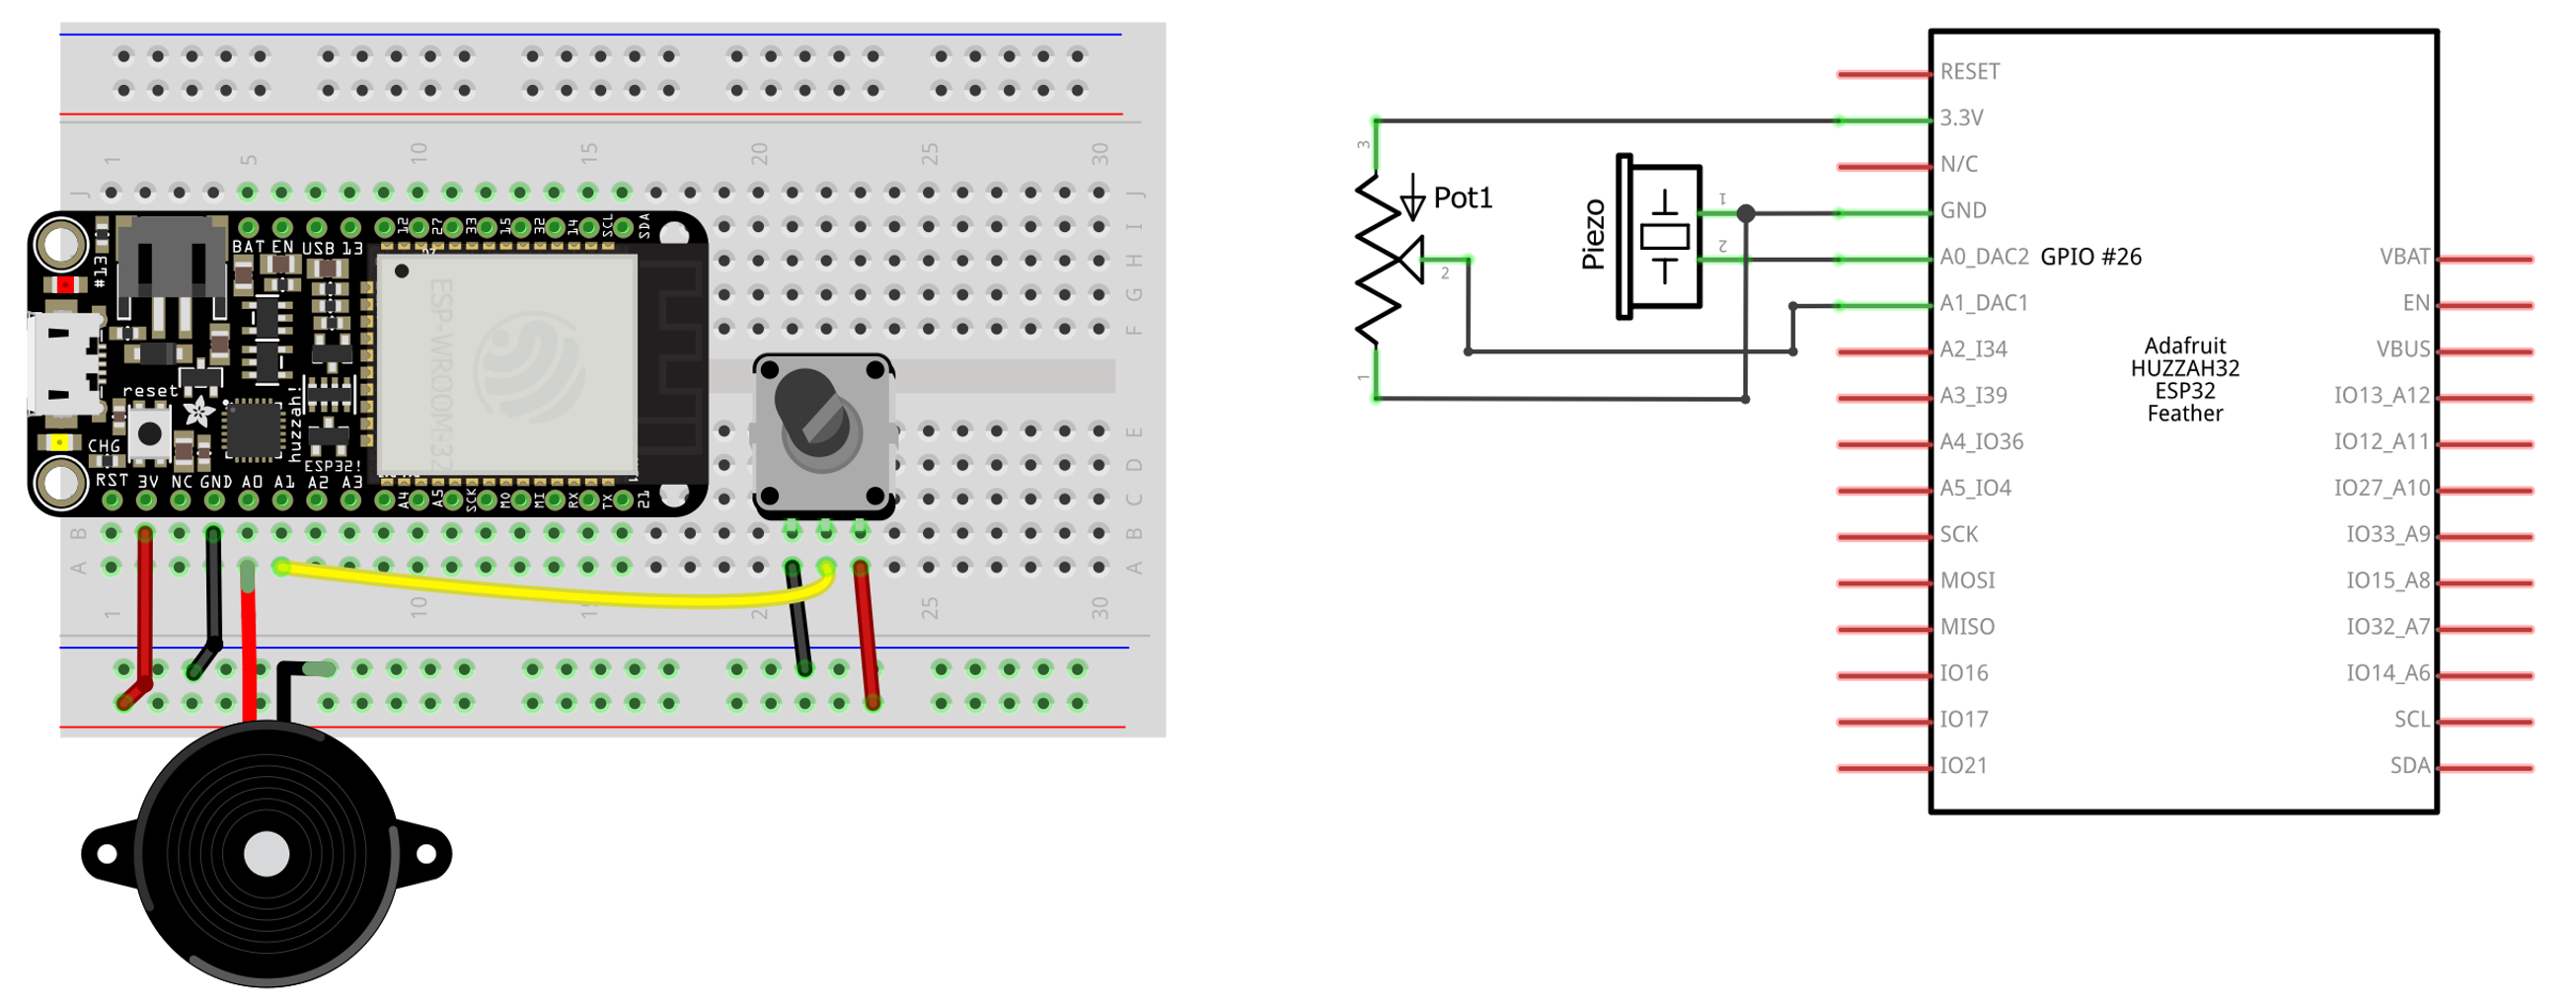 Figure. Circuit diagram with a piezo buzzer and potentiometer connected to the ESP32. Image made in Fritzing and PowerPoint.
Sweeping through frequencies
This version maps the potentiometer to a continuous range of frequencies:
/**
 * Use a potentiometer to control the frequency of a piezo buzzer.
 * Turn the knob to sweep through audible frequencies!
 *
 * See: https://makeabilitylab.github.io/physcomp/esp32/tone
 */
const int BUZZER_PIN = 13;
const int POT_INPUT_PIN = A5;

#if defined(ESP32)
  const int MAX_ANALOG_VAL = 4095;
#else
  const int MAX_ANALOG_VAL = 1023;
#endif

const int MIN_FREQ = 31;    // Lowest frequency tone() supports
const int MAX_FREQ = 1500;  // 1500 Hz is already quite ear-piercing!

void setup() {
  Serial.begin(115200);
}

void loop() {
  int potVal = analogRead(POT_INPUT_PIN);
  int freq = map(potVal, 0, MAX_ANALOG_VAL, MIN_FREQ, MAX_FREQ);

  tone(BUZZER_PIN, freq);

  Serial.print("Pot: ");
  Serial.print(potVal);
  Serial.print(" -> Freq: ");
  Serial.print(freq);
  Serial.println(" Hz");

  delay(50);
}
Turn the potentiometer slowly and listen to the pitch sweep from a low rumble to a high squeal.
Here’s an earlier video demo on the Huzzah32 (same concept, legacy LEDC API):
Video. A video demonstration of potentiometer-controlled frequency output on the Huzzah32. The code shown uses the legacy v2.x LEDC API; the v3.x tone() version above produces identical output. Source: AnalogInputTone.ino (legacy version). The version shown in the video also displays the frequency on an OLED. Make sure your sound is on.
Challenge: Modify the code so the potentiometer walks through the C major scale (8 discrete notes) instead of sweeping continuously through frequencies. Hint: use
map()to convert the pot value to a scale index (0–7) and look up the frequency from an array.
Using the Huzzah32 instead? (click to expand)
On the Huzzah32, use A1 (GPIO 25) for the potentiometer input and GPIO 26 for the buzzer. A1 is on ADC2, which works fine when WiFi is off. If you need WiFi, use an ADC1 pin such as A7 (GPIO 32).
The LEDC tone alternative
While tone() is the simplest approach and what we recommend for most projects, the ESP32 also offers the LEDC tone functions—ledcWriteTone() and ledcWriteNote()—which use the same LEDC PWM hardware we learned about in Lesson 3. These give you some advantages:
ledcWriteNote(pin, note, octave)lets you specify notes by name and octave using the built-innote_tenum—nopitches.hneeded.ledcWriteTone(pin, frequency)plays a specific frequency, similar totone().- Both work directly with the LEDC channel system, which can be useful if you’re already using LEDC for other purposes.
In ESP32 Arduino core v3.x, the LEDC tone functions take a pin number (not a channel number). In the old v2.x API, they took a channel number. This is the same v2 → v3 migration we discussed in Lesson 3. If you see old tutorials using
ledcAttachPinand passing channel numbers toledcWriteTone, that’s the v2.x API.
Using ledcWriteNote
The note_t enum provides named constants for all twelve chromatic notes:
typedef enum {
    NOTE_C, NOTE_Cs, NOTE_D, NOTE_Eb, NOTE_E, NOTE_F, NOTE_Fs,
    NOTE_G, NOTE_Gs, NOTE_A, NOTE_Bb, NOTE_B, NOTE_MAX
} note_t;
To play a note, first attach the pin with ledcAttach, then call ledcWriteNote:
const int BUZZER_PIN = 13;

void setup() {
  // Attach the pin to the LEDC peripheral
  // The initial frequency (2000) will be overridden by ledcWriteNote
  ledcAttach(BUZZER_PIN, 2000, 10);
}

void loop() {
  // Play the C major scale using ledcWriteNote
  ledcWriteNote(BUZZER_PIN, NOTE_C, 4);   // Middle C (C4)
  delay(500);
  ledcWriteNote(BUZZER_PIN, NOTE_D, 4);
  delay(500);
  ledcWriteNote(BUZZER_PIN, NOTE_E, 4);
  delay(500);
  ledcWriteNote(BUZZER_PIN, NOTE_F, 4);
  delay(500);
  ledcWriteNote(BUZZER_PIN, NOTE_G, 4);
  delay(500);
  ledcWriteNote(BUZZER_PIN, NOTE_A, 4);
  delay(500);
  ledcWriteNote(BUZZER_PIN, NOTE_B, 4);
  delay(500);
  ledcWriteNote(BUZZER_PIN, NOTE_C, 5);   // C5
  delay(500);
}
The nice thing about ledcWriteNote is that you don’t need pitches.h—the frequency lookup is built into the ESP32 library.
Stopping the tone with LEDC
To stop a tone with the LEDC functions, call ledcWriteTone(pin, 0) to silence the pin while keeping the channel attached, or ledcDetach(pin) to fully release the channel.
Don’t mix
tone()and LEDC on the same pin. If you start a sound withtone(), stop it withnoTone(). If you start a sound withledcWriteTone()orledcWriteNote(), stop it withledcWriteTone(pin, 0)orledcDetach(pin). Mixing the two APIs on the same pin will cause them to fight over the underlying LEDC channel, leading to unpredictable behavior. Pick one approach per pin and stick with it.
Legacy v2.x LEDC API (click to expand)
In ESP32 Arduino core v2.x, the LEDC tone functions took a channel number instead of a pin number:
// v2.x API (old — don't use with v3.x!)
ledcSetup(channel, freq, resolution);    // configure a channel
ledcAttachPin(pin, channel);             // attach pin to channel
ledcWriteTone(channel, frequency);       // play tone on channel
ledcWriteNote(channel, note, octave);    // play note on channel
The key difference: in v2.x, ledcWriteTone takes a channel number. In v3.x, ledcWriteTone takes a pin number. If you’re following older tutorials online, this is the most common source of confusion. See the migration guide for full details.
The YouTube videos throughout this lesson were recorded with the v2.x API—the concepts are the same; only the function signatures changed.
tone() vs. LEDC: which should I use?
tone() / noTone() | ledcWriteTone() / ledcWriteNote() | |
|---|---|---|
| Simplicity | ✅ Familiar Arduino API | Requires ledcAttach setup |
| Cross-platform | ✅ Works on Uno, Leonardo, ESP32 | ESP32 only |
| Duration support | ✅ Built-in duration parameter | ❌ Must manage timing yourself |
| Named notes | ❌ Need pitches.h for note names | ✅ Built-in note_t enum |
| Channel control | ❌ Automatic | ✅ Can choose channels explicitly |
For most projects in this course, tone() is the simplest and best choice. Use the LEDC functions when you need finer control over PWM channels or when you want the convenience of the built-in note_t enum.
Bonus demo videos
Here are two additional demo videos from our earlier Huzzah32 work. These use the legacy v2.x API and our old Tone32.hpp library for duration tracking, but the concepts—reading analog input, mapping to notes, playing tones with durations—are exactly what you’ve learned in this lesson using the standard tone() function.
Potentiometer-controlled scale with OLED
Video. A potentiometer walks up and down the C scale, with each note playing for 500ms. The OLED shows the note name and remaining duration. Recorded on the Huzzah32 with the legacy v2.x API. Source: AnalogInputTone32WithOLED.ino. Make sure your sound is on.
Ball bounce with sound effects
Video. A ball bouncing on an OLED display, playing a brief tone on each collision with the floor or ceiling. This demonstrates using tone durations for sound effects in a game-like application. Source: BallBounceTone32WithOLED.ino. Make sure your sound is on.
Exercises
Want to go further? Here are some challenges:
Exercise 1: Write a program that plays a short tune when the board boots, then stops. Use setup() to play the melody (like the Imperial March example) and leave loop() empty.
Exercise 2: Hearing range test. Write a program that sweeps from 20 Hz to 20,000 Hz. At what frequency can you no longer hear the tone? Compare with classmates—does it vary?
Exercise 3: LED + melody. Modify the Imperial March code to also light up the onboard NeoPixel in different colors for different notes. High notes could be red, low notes could be blue—use map() to convert the frequency to a hue value and ColorHSV() from the Adafruit NeoPixel library!
Exercise 4: Two-pot instrument. Add a second potentiometer to control the duration of each note independently from the pitch. One knob controls frequency, the other controls how long each tone plays before a brief silence.
Exercise 5: Port from Arduino. Take the scale or melody code from our Intro to Arduino tone lesson and run it on the ESP32 without changes. Does it work? What (if anything) needs to change? (Spoiler: very little!)
Exercise 6: Compare tone() vs. LEDC. Rewrite the C scale example using ledcWriteNote() instead of tone(). What are the practical differences you notice? Which approach do you prefer, and why?
Summary
In this lesson, you added sound to your ESP32 repertoire! Here’s what you learned:
- The
tone()andnoTone()functions are now supported on the ESP32 in Arduino core v3.x (added in v2.0.3), making tone code nearly identical between the Arduino Uno and ESP32. - The ESP32 also provides LEDC tone functions (
ledcWriteToneandledcWriteNote) as a more powerful alternative, with built-in support for named notes via thenote_tenum. - The critical difference between
analogWrite()(varies duty cycle at a fixed frequency) andtone()(varies frequency at a fixed 50% duty cycle). Onlytone()can produce different pitches. - Passive piezo buzzers are capacitive devices that draw very little current and can be connected directly to a GPIO pin without a resistor.
- The
analogRead()→map()→ output pattern works for driving any output—LEDs, tones, and beyond. - Combining sound and light creates multimodal feedback that makes interactive projects more engaging.
Resources
- Arduino
tone()reference - ESP32 LEDC API documentation
- ESP32 Tone.cpp source — the implementation of
tone()andnoTone()for the ESP32 - PR #6402 — the pull request that added
tone()andnoTone()to the ESP32 Arduino core - arduino-songs — a community collection of melodies transcribed into Arduino
tone()format - Let’s Learn About Waveforms — interactive guide to understanding waveform shapes and their sounds
Next Lesson
In the next lesson, we’ll learn about the ESP32’s built-in capacitive touch sensing hardware—no external components needed! You’ll use touch inputs to trigger tones and build a simple touch piano.