Lesson 2: Making with MakeCode
Table of Contents
- The MakeCode Programming Environment
- Our first program: Blinky
- Adding sound to Blinky
- Transferring our program to the CPX
- Sharing our MakeCode program
- Design Activity
- Next Lesson
Video. A taste of MakeCode—the block editor we’ll use all lesson—here building a quick rainbow NeoPixel animation just by dragging blocks. Code link.
In this lesson, we will make our first MakeCode+CPX program—called Blinky—which will play a sound effect at the start and then repeatedly flash lights. As we build, we will learn about the MakeCode programming environment, the simulator, and how to load our program on to the CPX.
The MakeCode Programming Environment
MakeCode is a visual programming language—like Scratch—built on Blockly. As the video above shows, to program the CPX, you simply drag-and-drop “puzzle pieces.” We call these pieces blocks. As you fit blocks together, you can create interactive programs!
The MakeCode interface
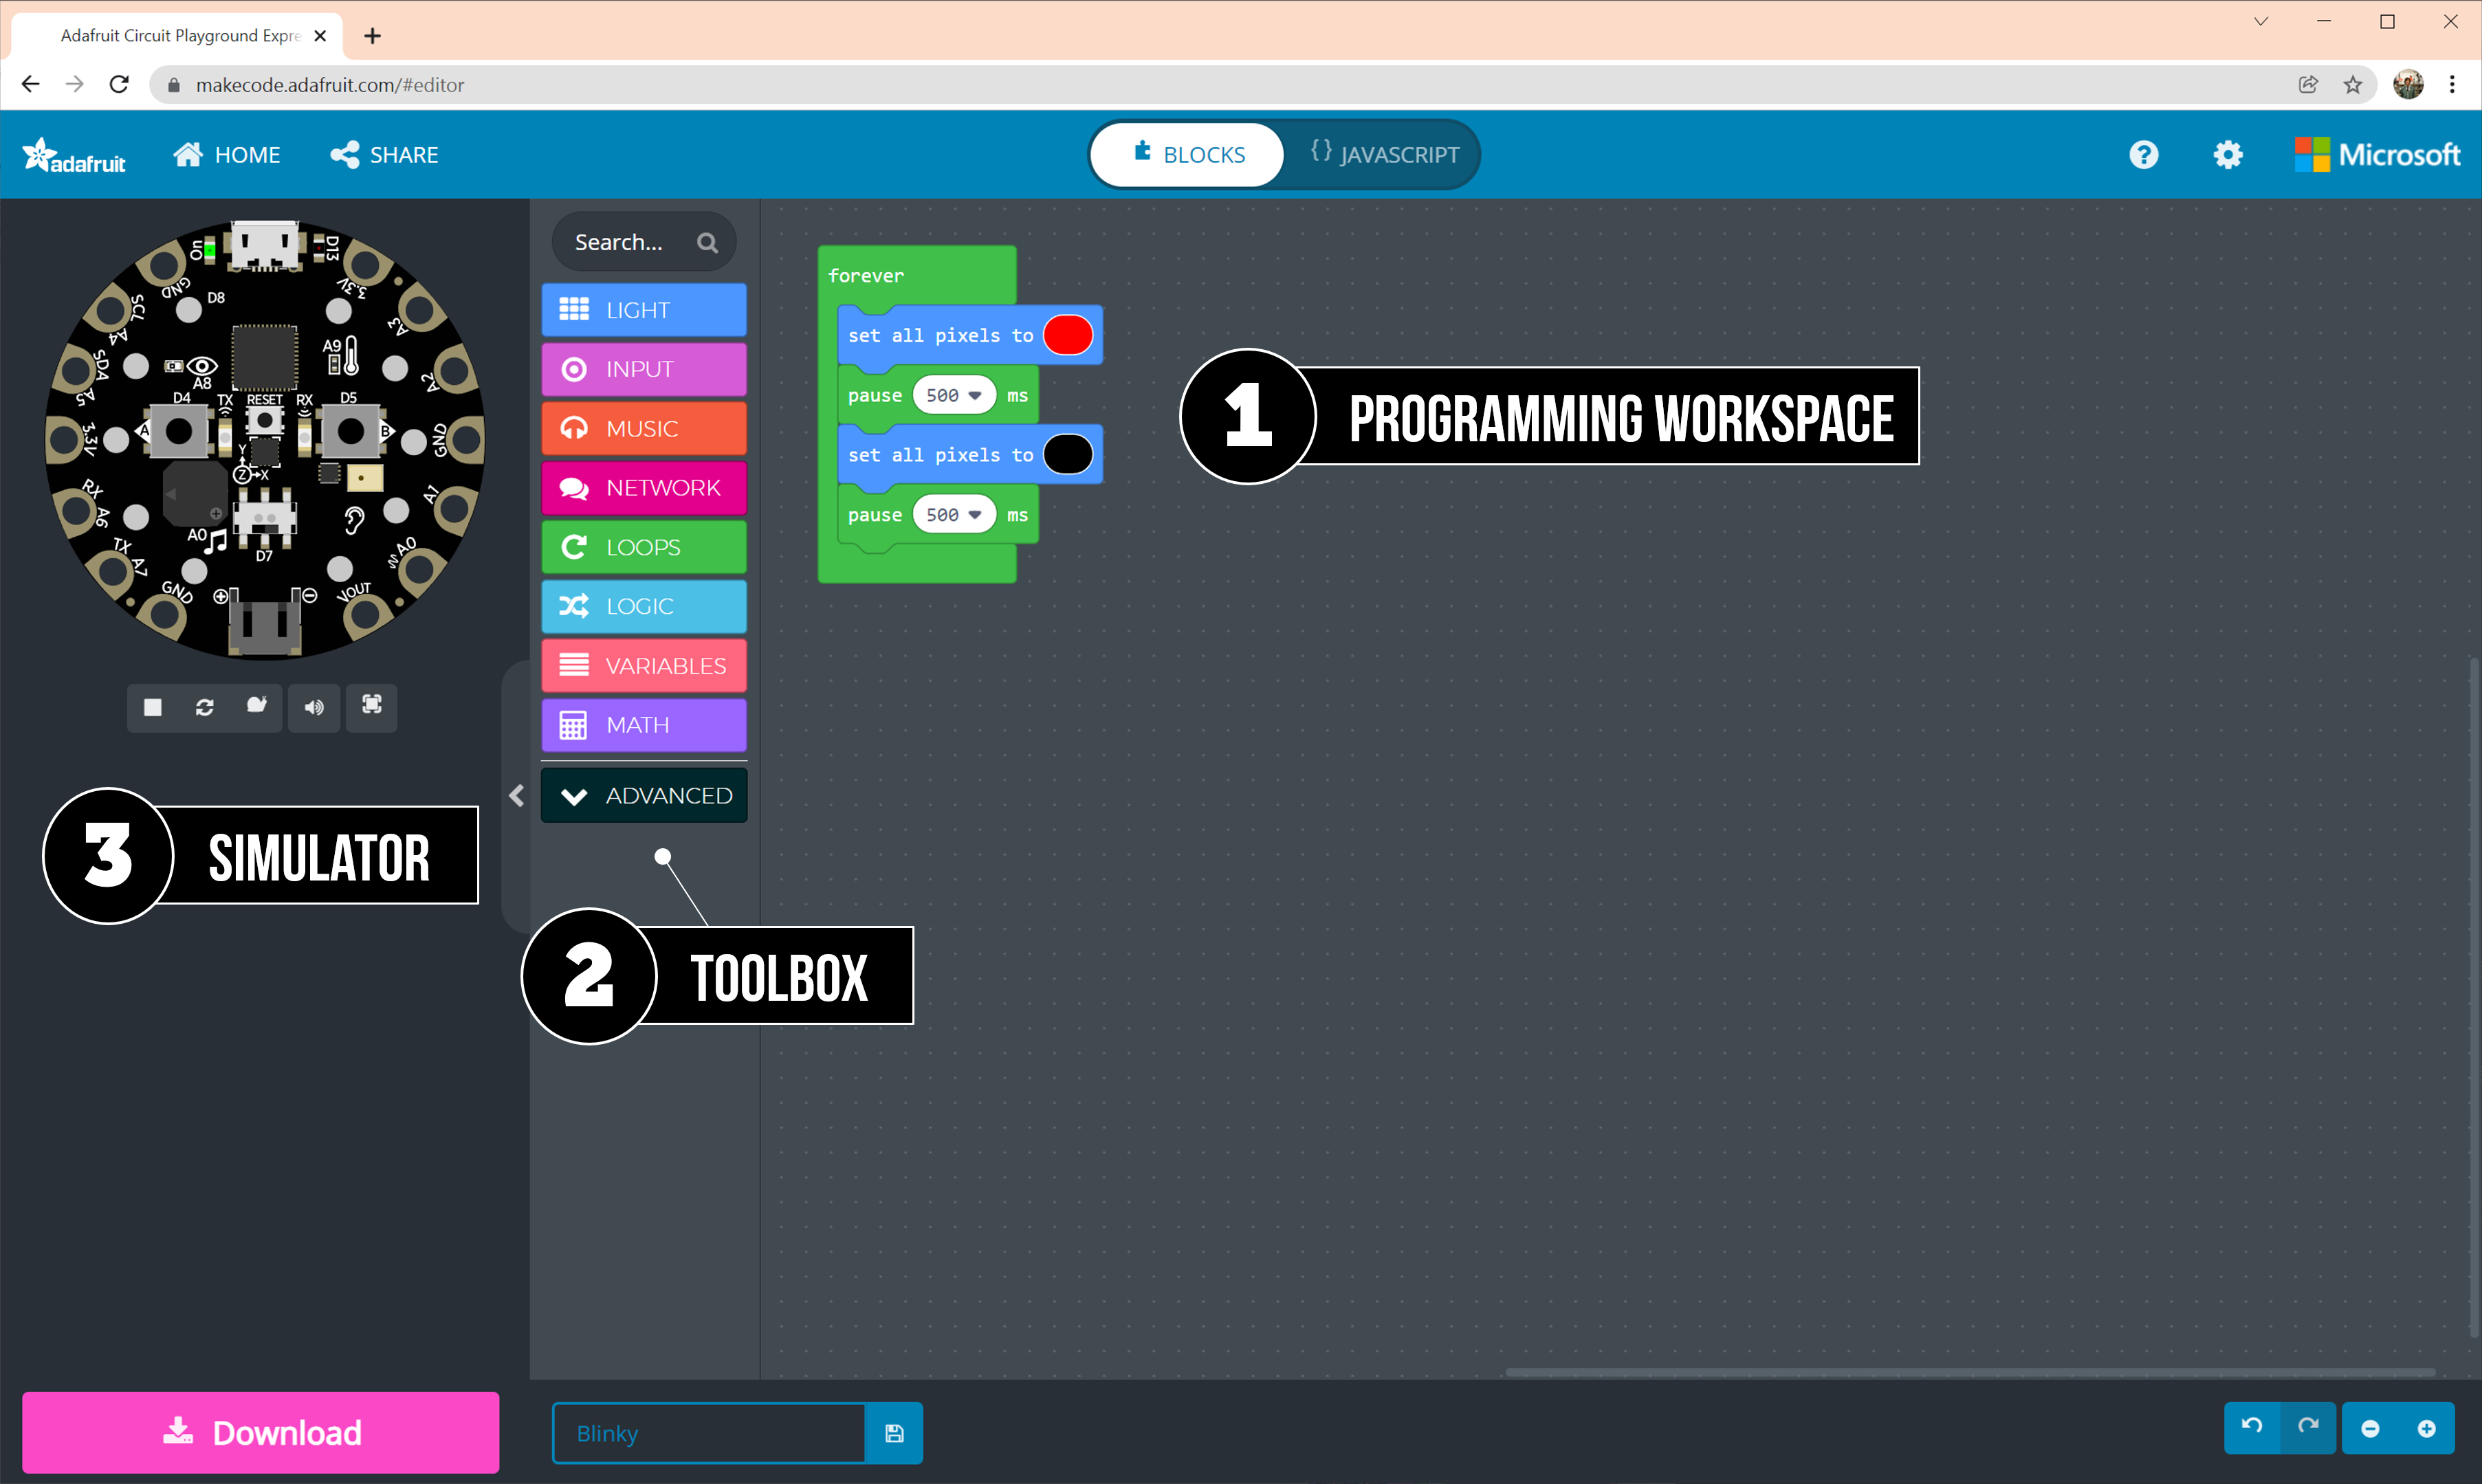 Figure. An annotated screenshot of the MakeCode interface highlighting the (1) programming workspace, (2) toolbox, and (3) the simulator.
The MakeCode editor has three primary user interface areas: (1) programming workspace, (2) toolbox, and (3) simulator. Use the:
- Programming workspace to build your program by dragging-and-dropping the puzzle pieces
- Toolbox to retrieve the puzzle pieces (aka blocks)
- Simulator to test your program before downloading it to your CPX
Our first program: Blinky
Let’s make our first program: Blinky! To start, we’ll make Blinky flash all ten of the CPX’s NeoPixel LEDs on and off. Then we’ll add in a special “startup” sound to introduce other programmable elements.
Video. The initial Blinky program: notice how the simulator’s lights (the NeoPixels) are flashing red for 500ms then off for 500ms and repeating.
As you build your program, observe how the simulator on the left shows it’s behavior in real-time—notice the flashing LEDs in the video above. As you make changes in MakeCode, the simulator will automatically restart.
Step 1: Creating a new project
To start, go to https://makecode.adafruit.com/ and click the “New Project” button.
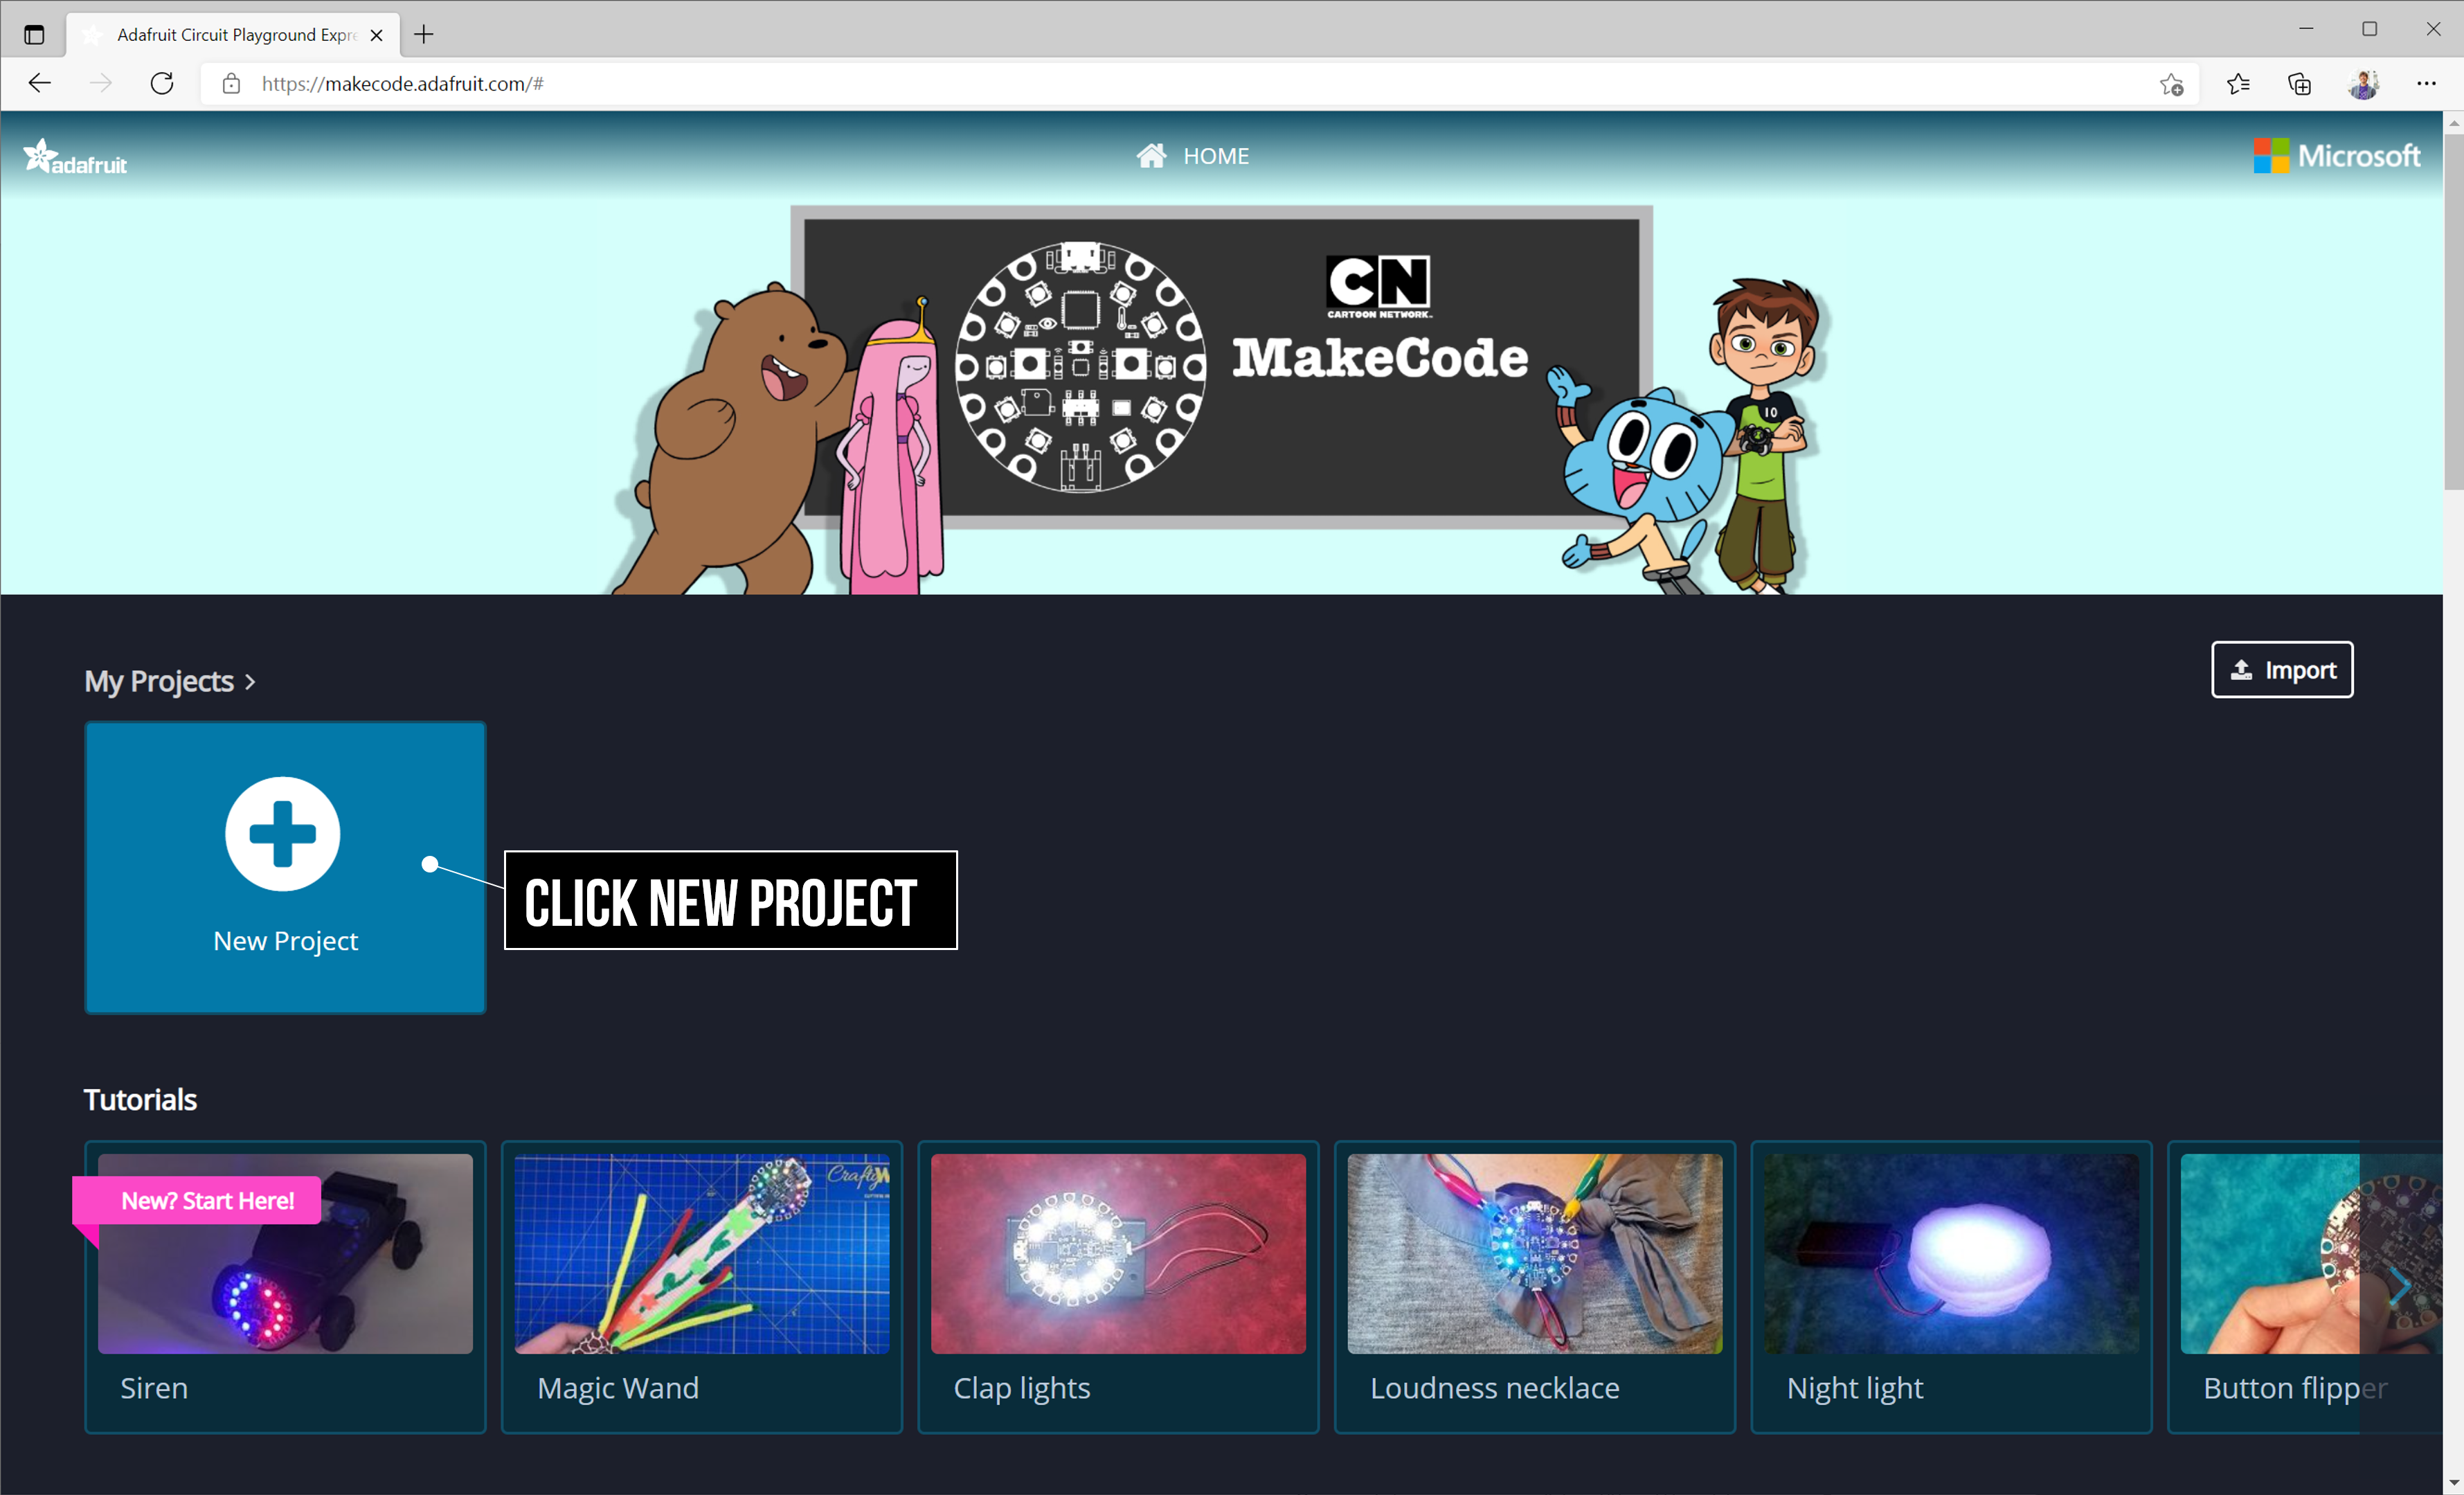 Figure. On the MakeCode website, click the “New Project” button.
After clicking, you should see the MakeCode editor interface with a largely empty workspace (see screenshot below). You might observe that MakeCode pre-populates the workspace with a forever block, which starts automatically and runs repeatedly in a loop forever.
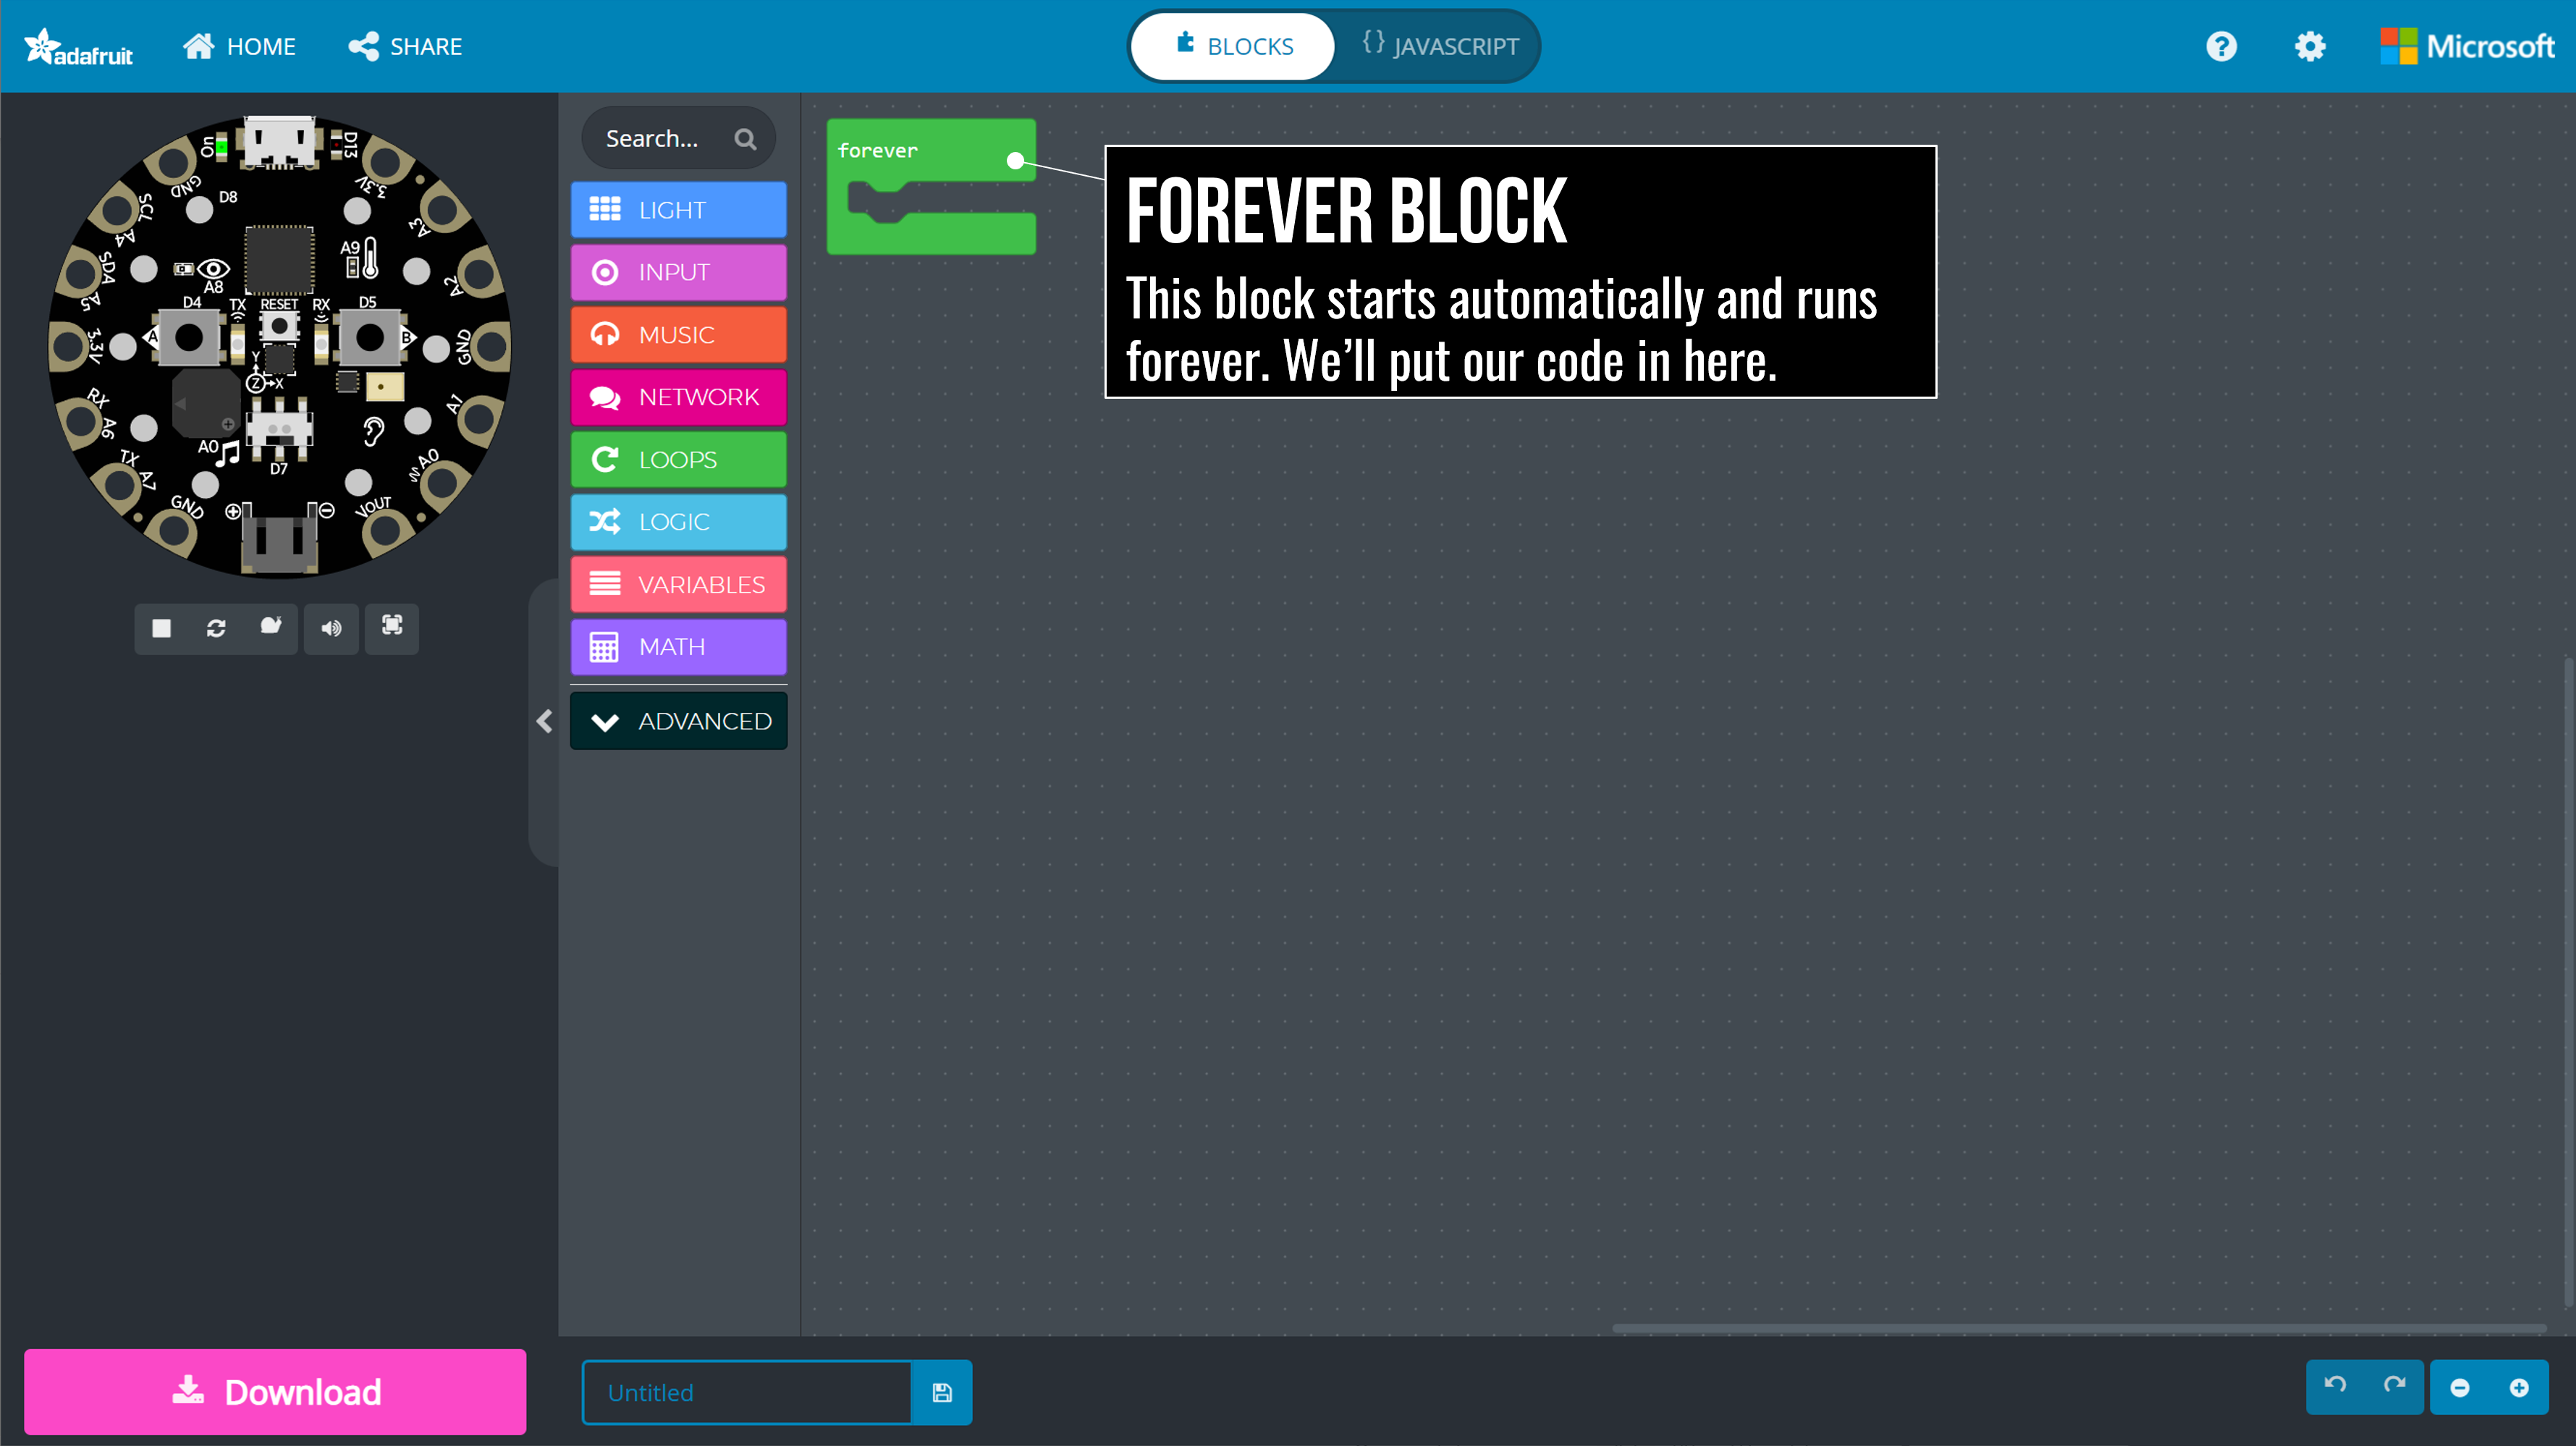 Figure. The
 forever block starts automatically and runs repeatedly in a loop forever. Remember, you can always right click on these images and select “Open image in new tab” to see larger versions.
For Blinky, we’ll put our program inside this forever block; however, it’s not always needed (as we’ll see in future lessons).
Step 2: Add in a light block
Now let’s add our first block: a LIGHT block to turn on the lights—that is, the 10 NeoPixels. There are lots of different LIGHT block possibilities but, for now, let’s use the set all pixels to block, which will set all 10 NeoPixels to the same color.
From the LIGHT menu inside the toolbox, drag-and-drop the set all pixels to block to the workspace.
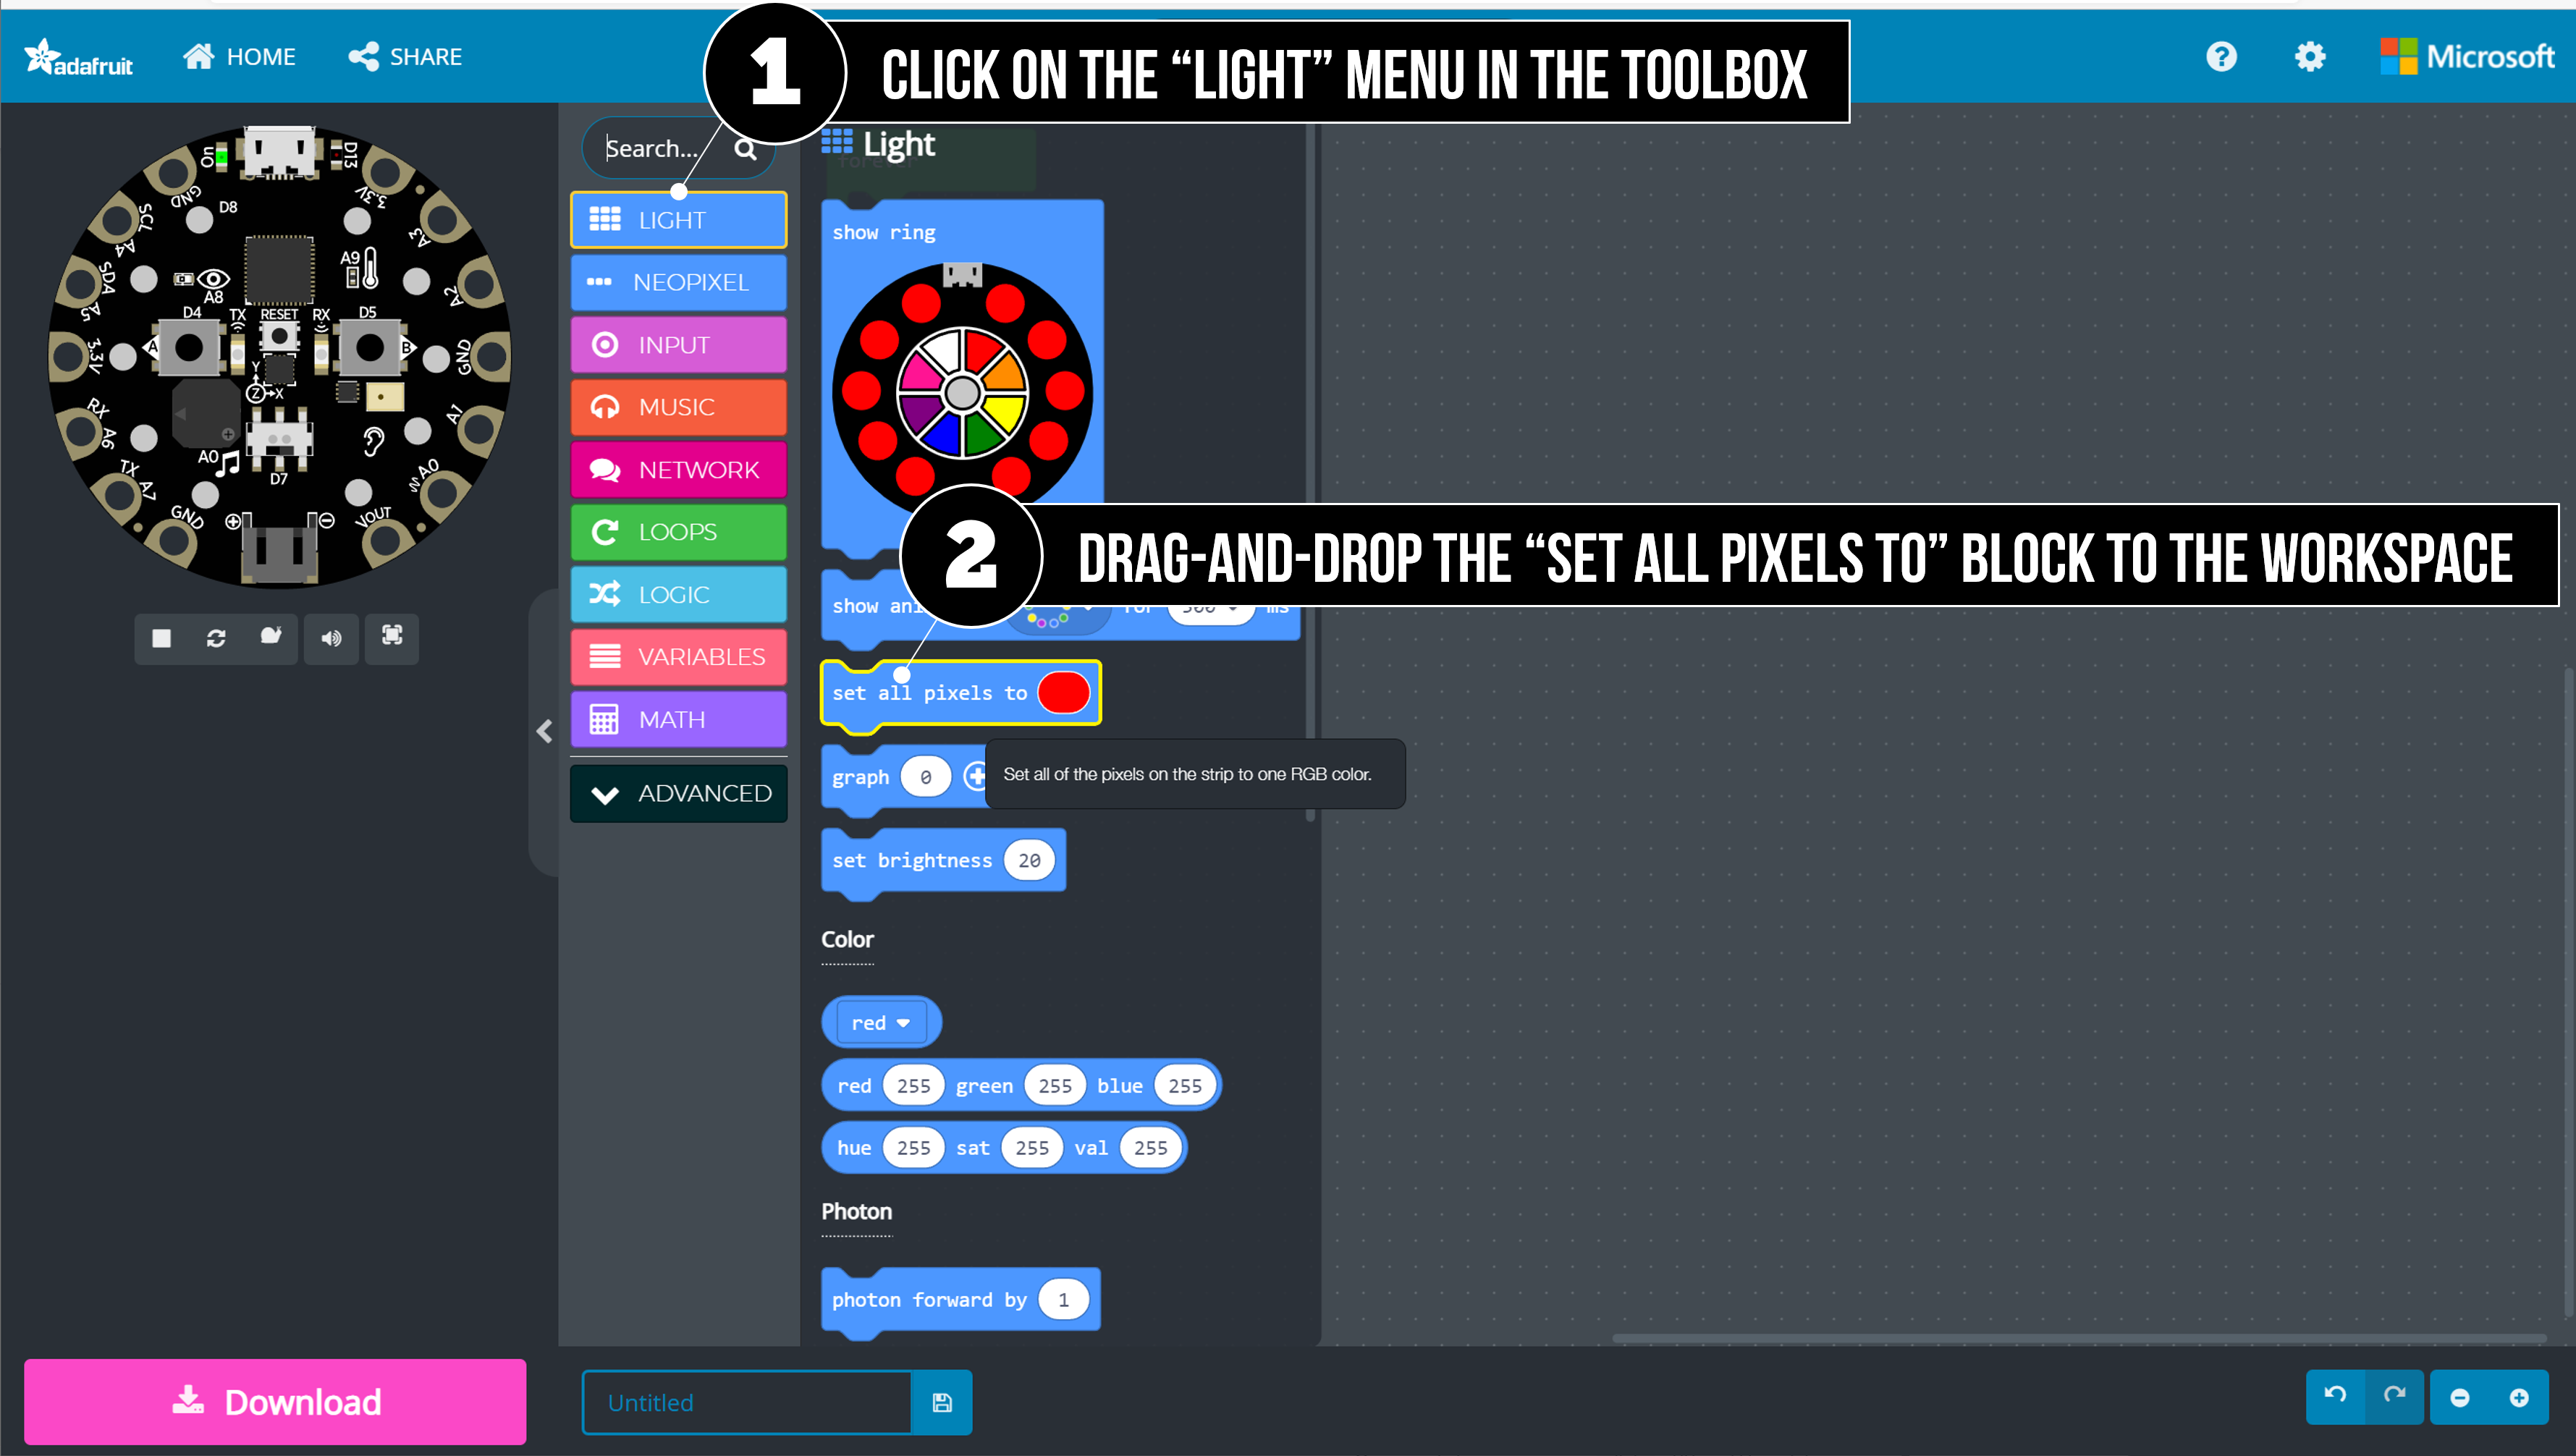 Figure. Drag-and-drop the
 set all pixels to block from the LIGHT menu.
Place the set all pixels to block inside the forever block in the workspace. Your program should now look like this:
![]() Figure. The
Figure. The set all pixels to block sets all 10 CPX lights (the NeoPixels) to the same color. In this case, we’ll set them to red.
Notice too how the NeoPixels are now glowing red in the simulator—neat!
Step 3: Add in a pause block
To make the light blink, we need to add in a pause block, which is somewhat hidden away in the LOOPS toolbox menu. Click on the LOOPS menu button and drag-and-drop the pause block to the workspace.
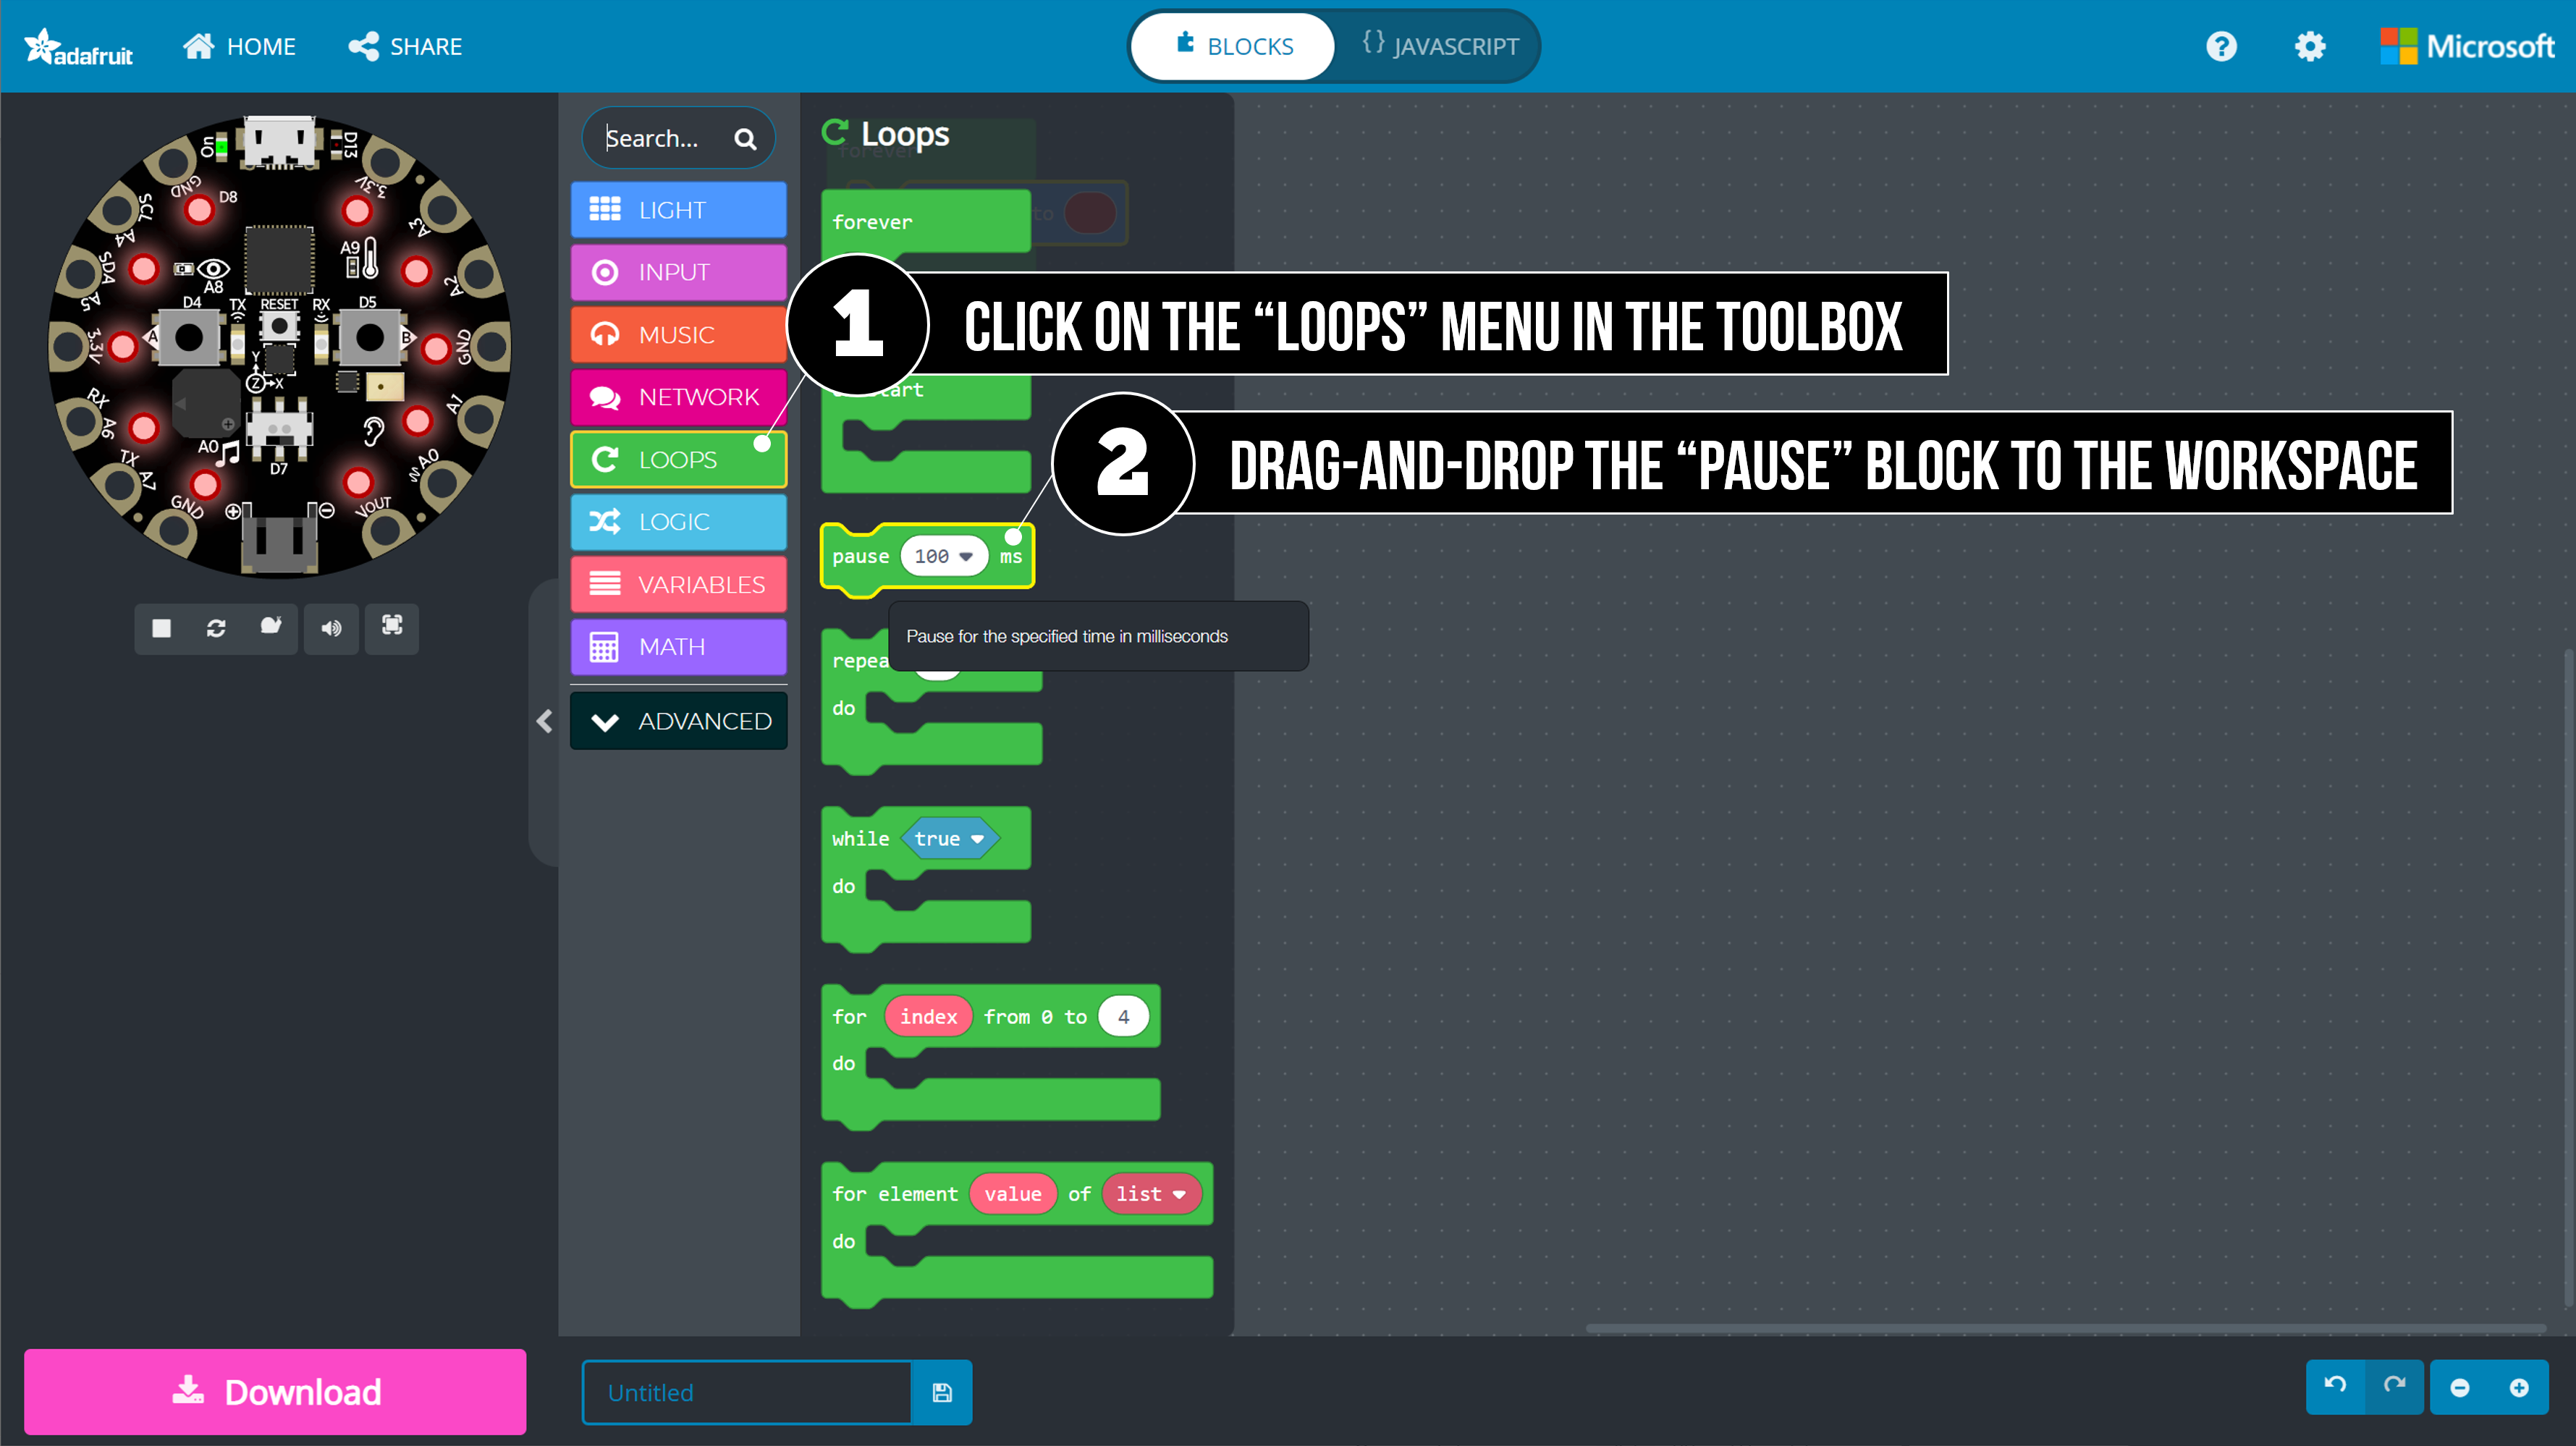 Figure. Drag-and-drop the
 pause block from the LOOPS toolbox menu.
Let’s set the red light to stay on for half-a-second (500 milliseconds) before moving on to the next puzzle piece.
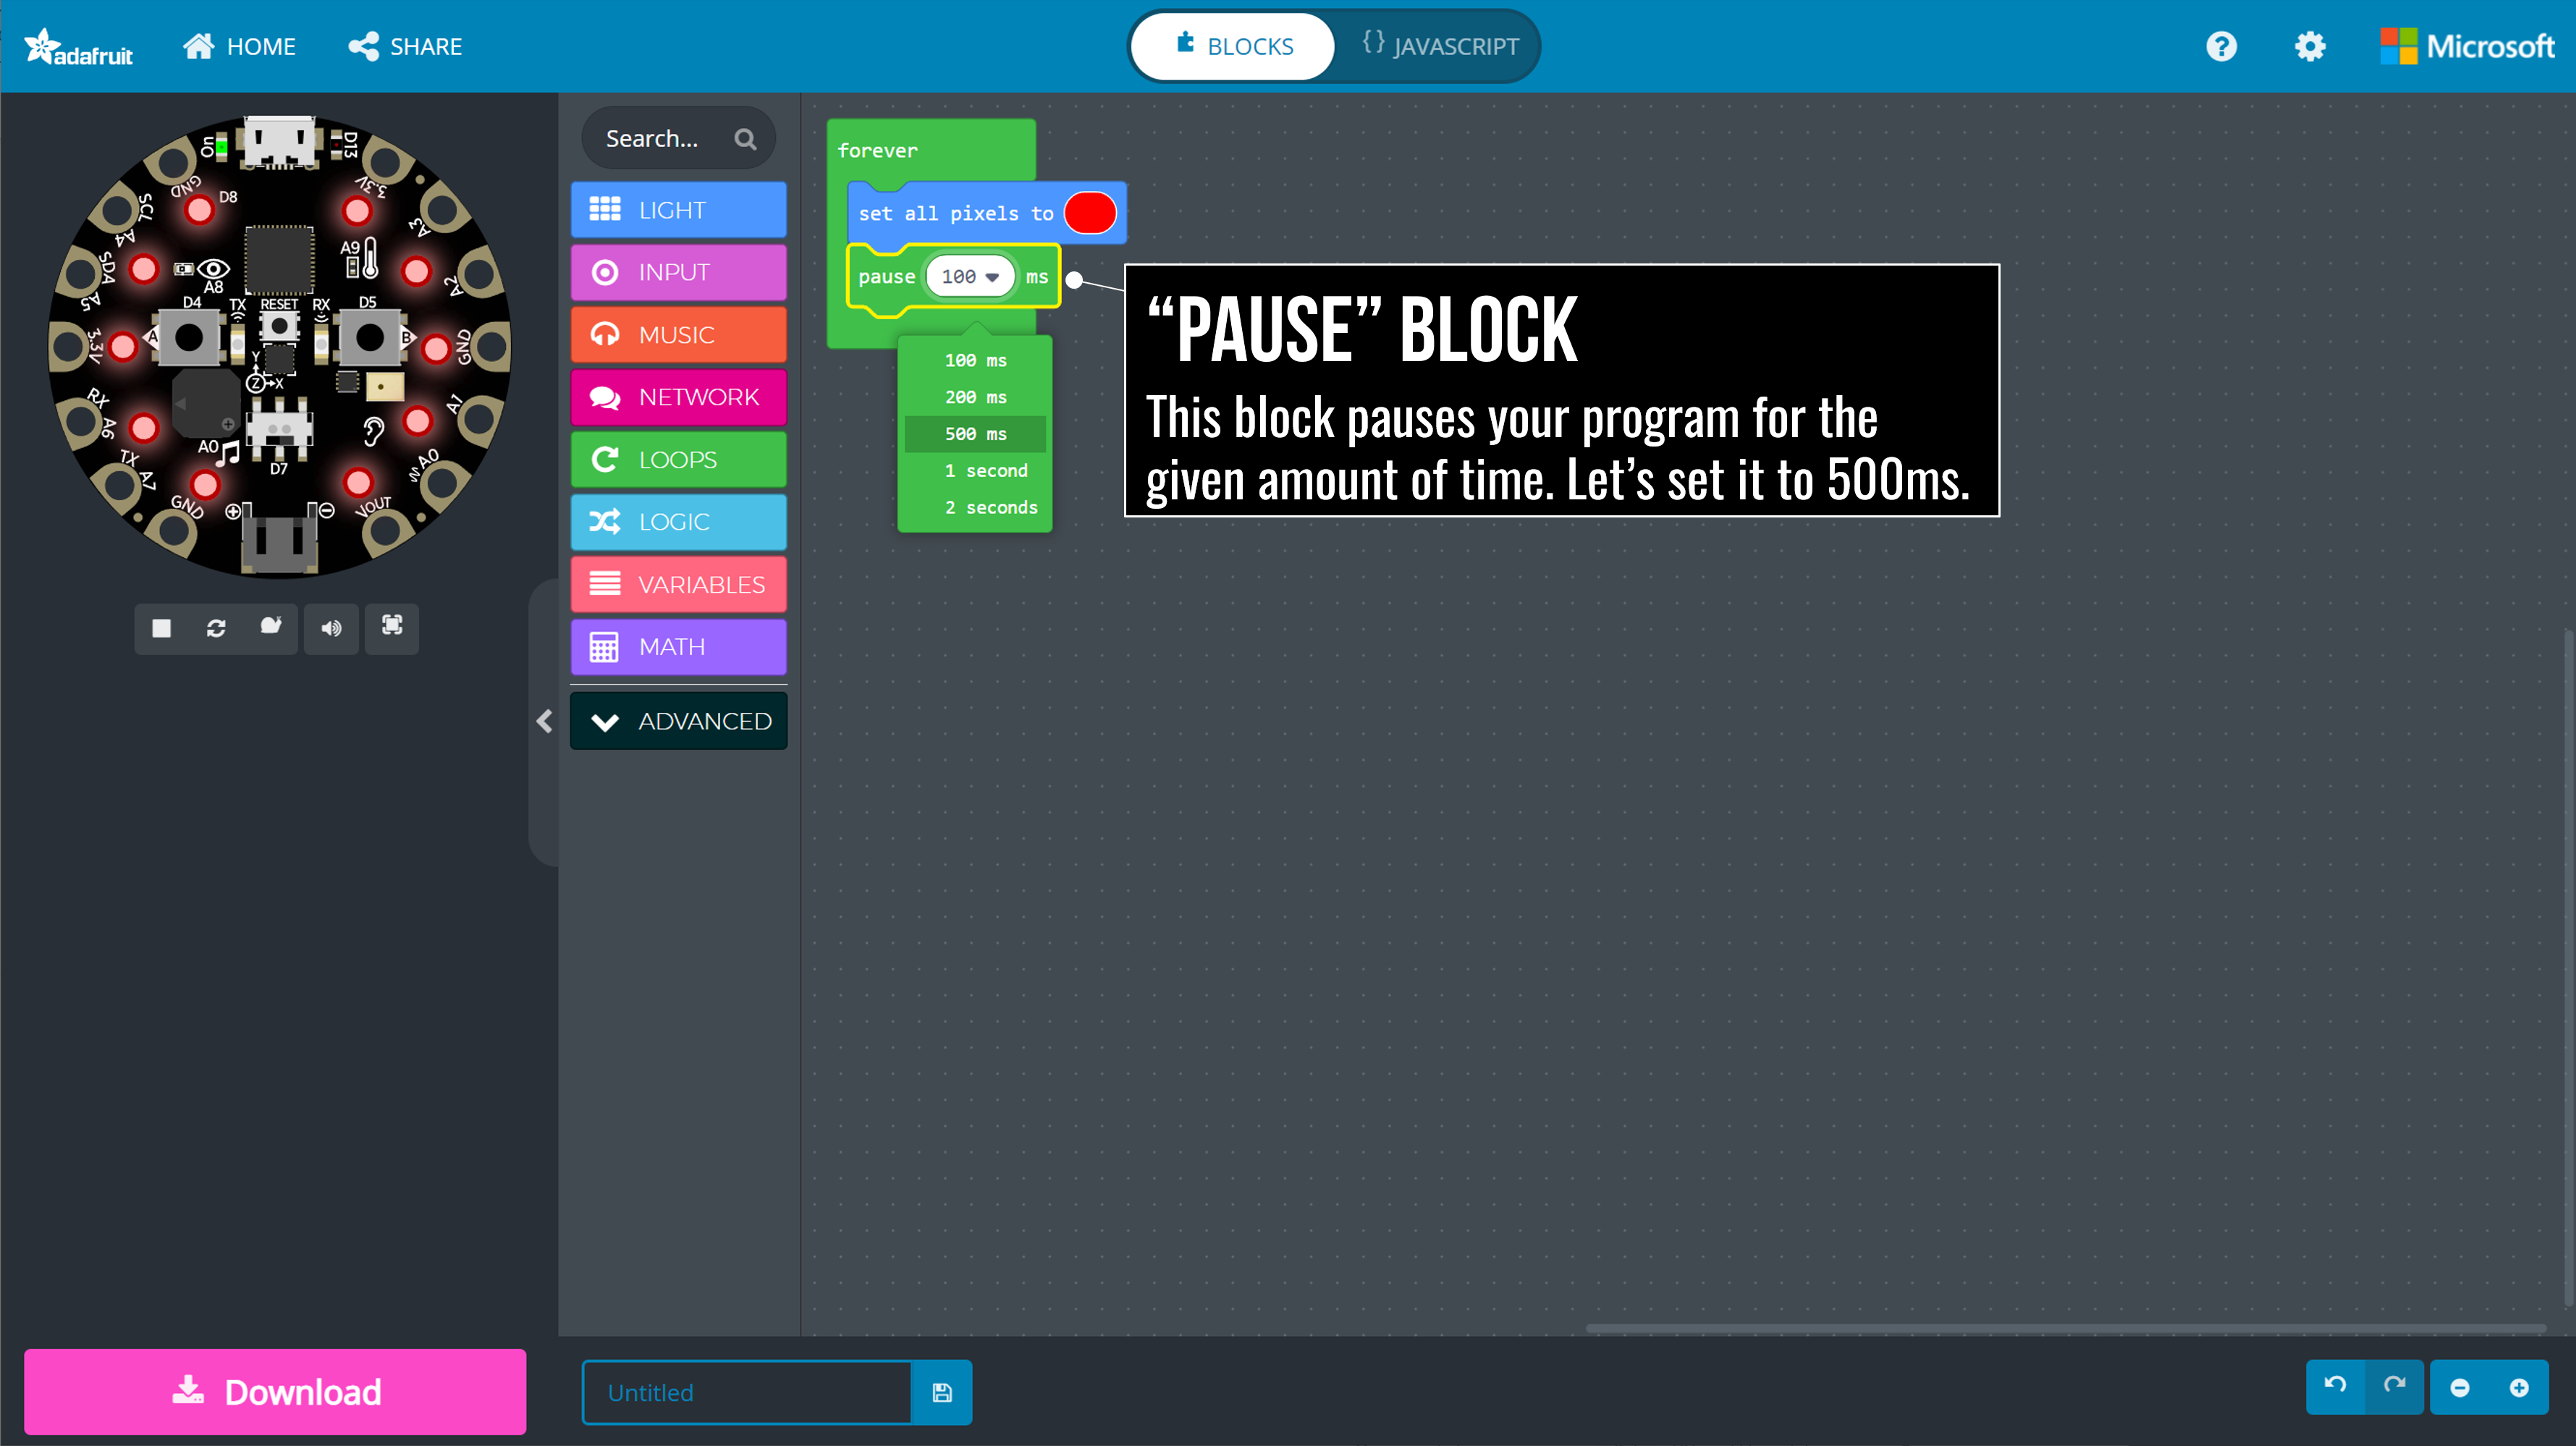 Figure. The
 pause block pauses your program for a specified time. In this case, let’s set it to half-a-second (500ms) so that the red light is shown for 500ms.
Step 4: Turn off light
Finally, to complete the blinking effect, we need to turn off the lights. Again, we can use the set all pixels to block.
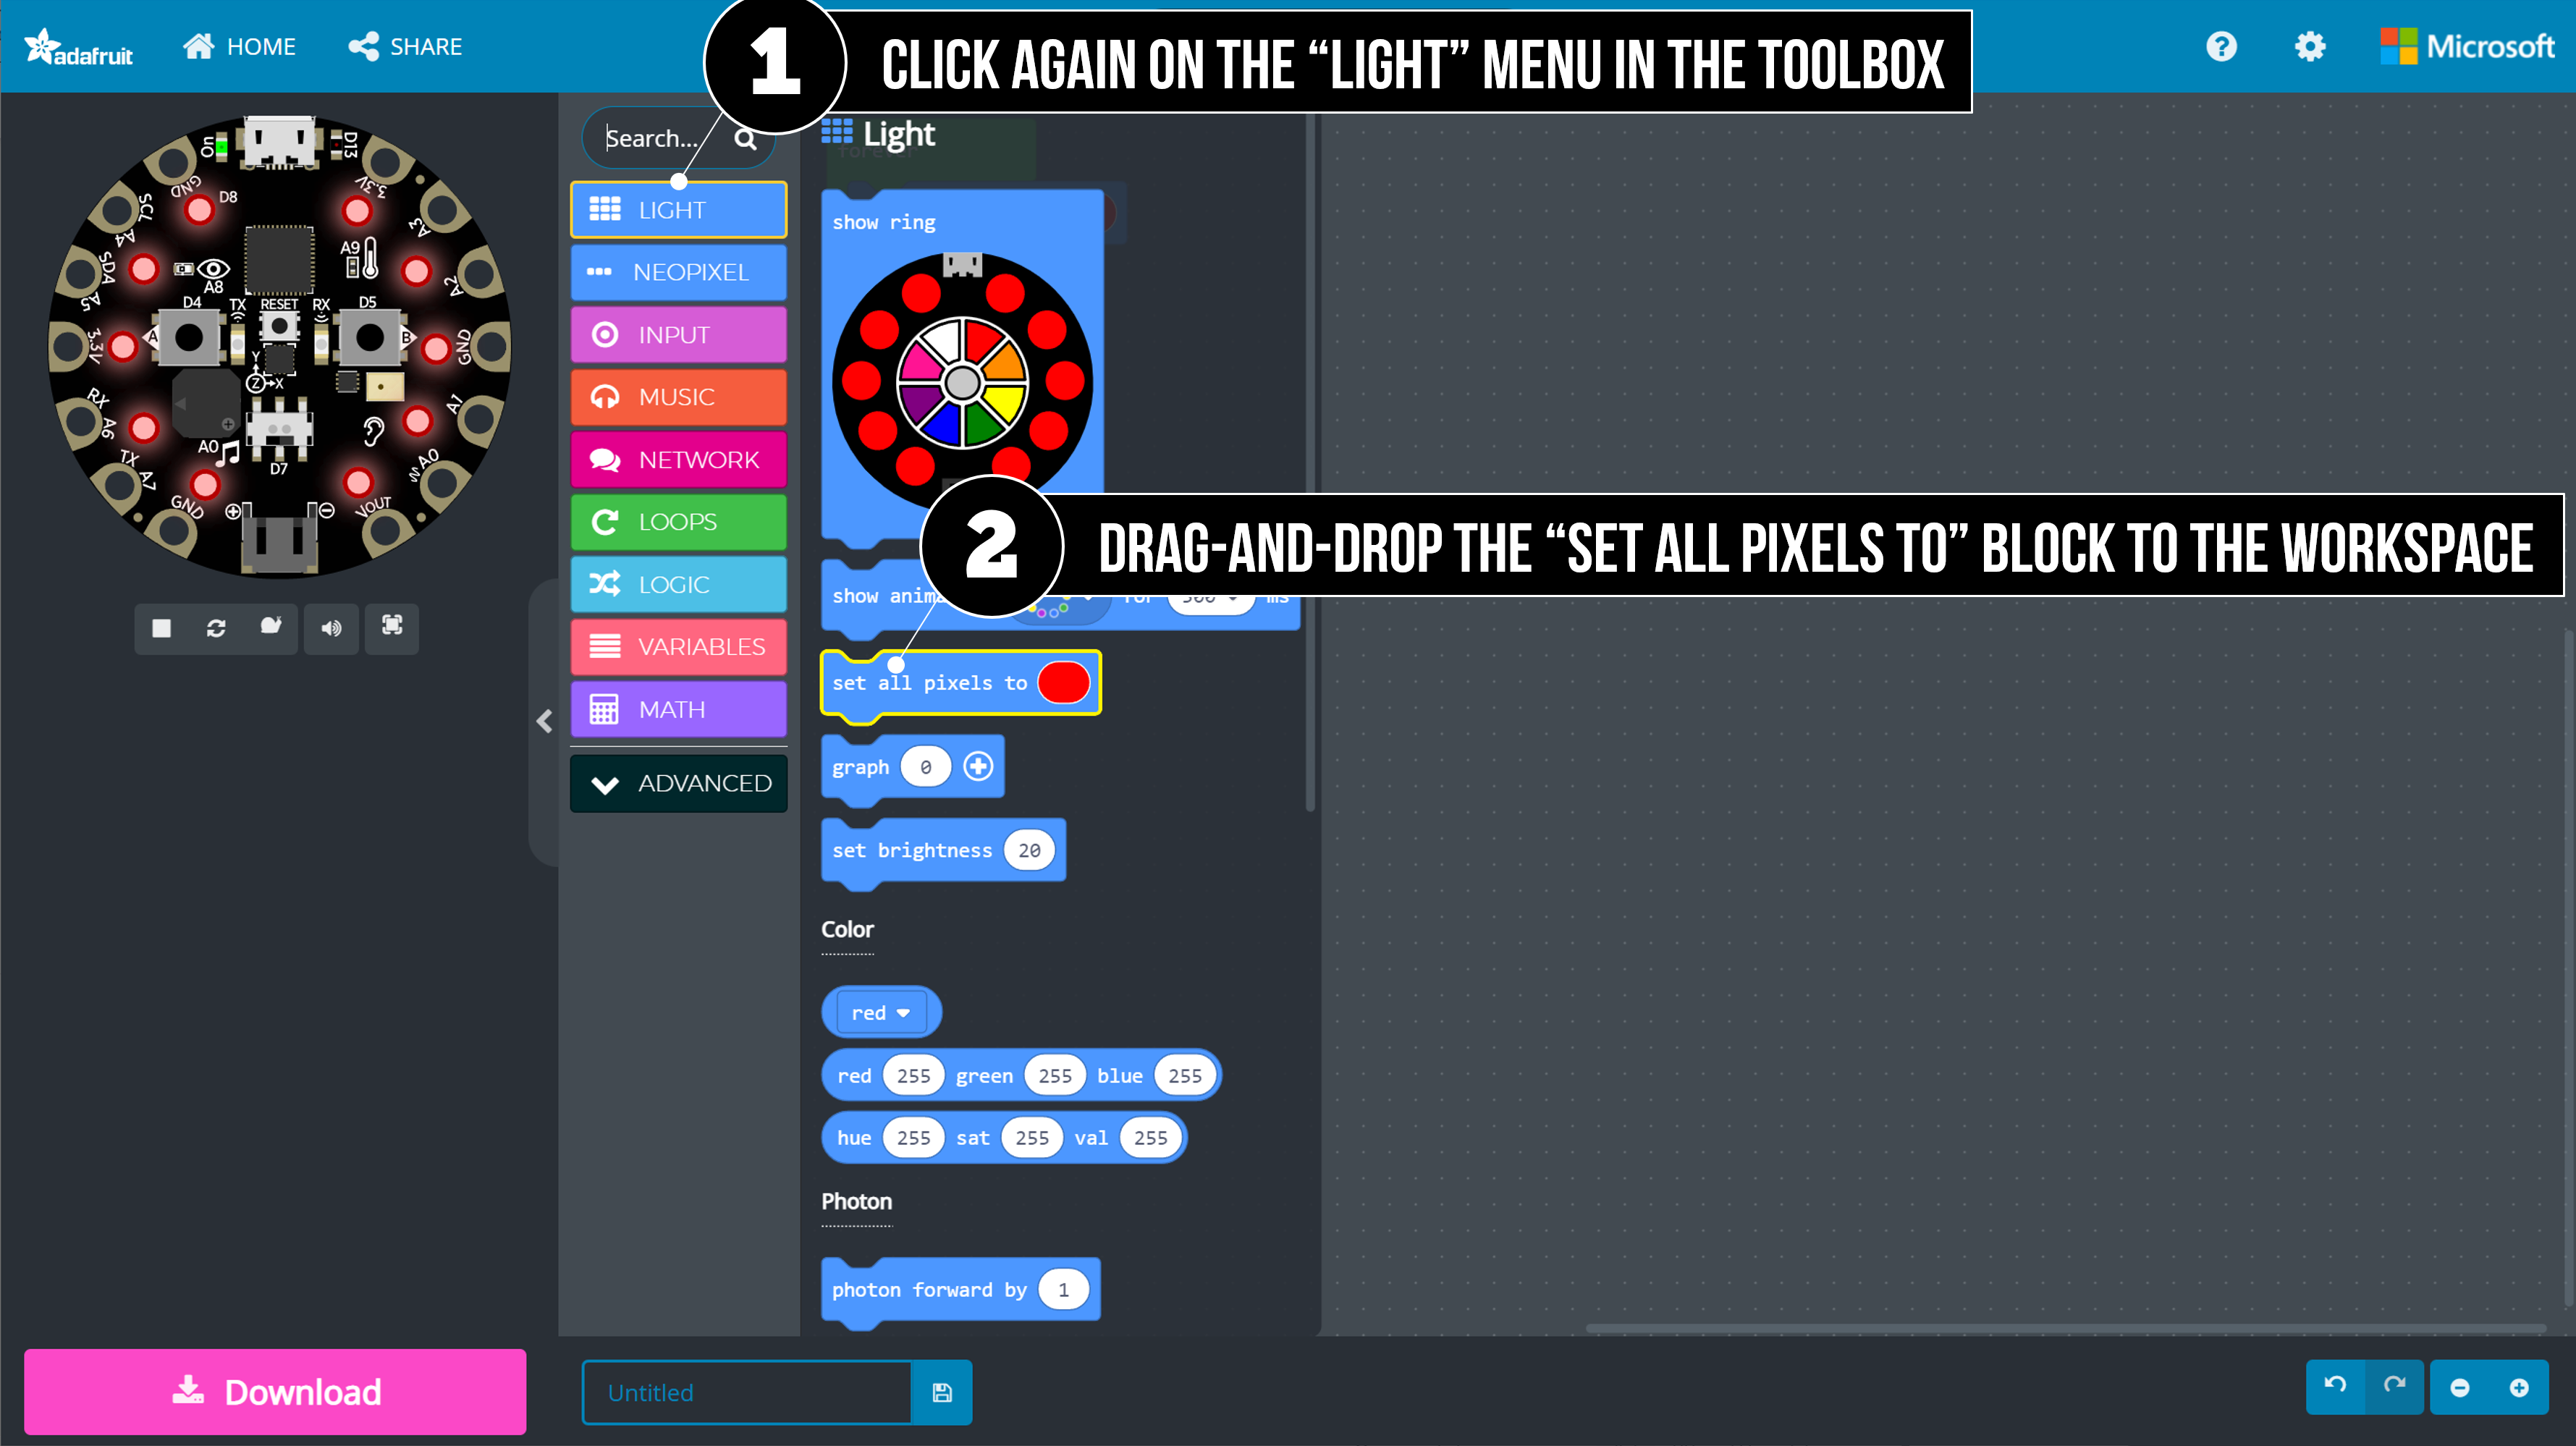 Figure. To turn off the light, we need another light block. Drag-and-drop a second
 set all pixels to block from the LIGHT menu.
This time we will set the light color to black. In MakeCode, setting lights to black is equivalent to turning them off. You could choose a different color, if you’d like.
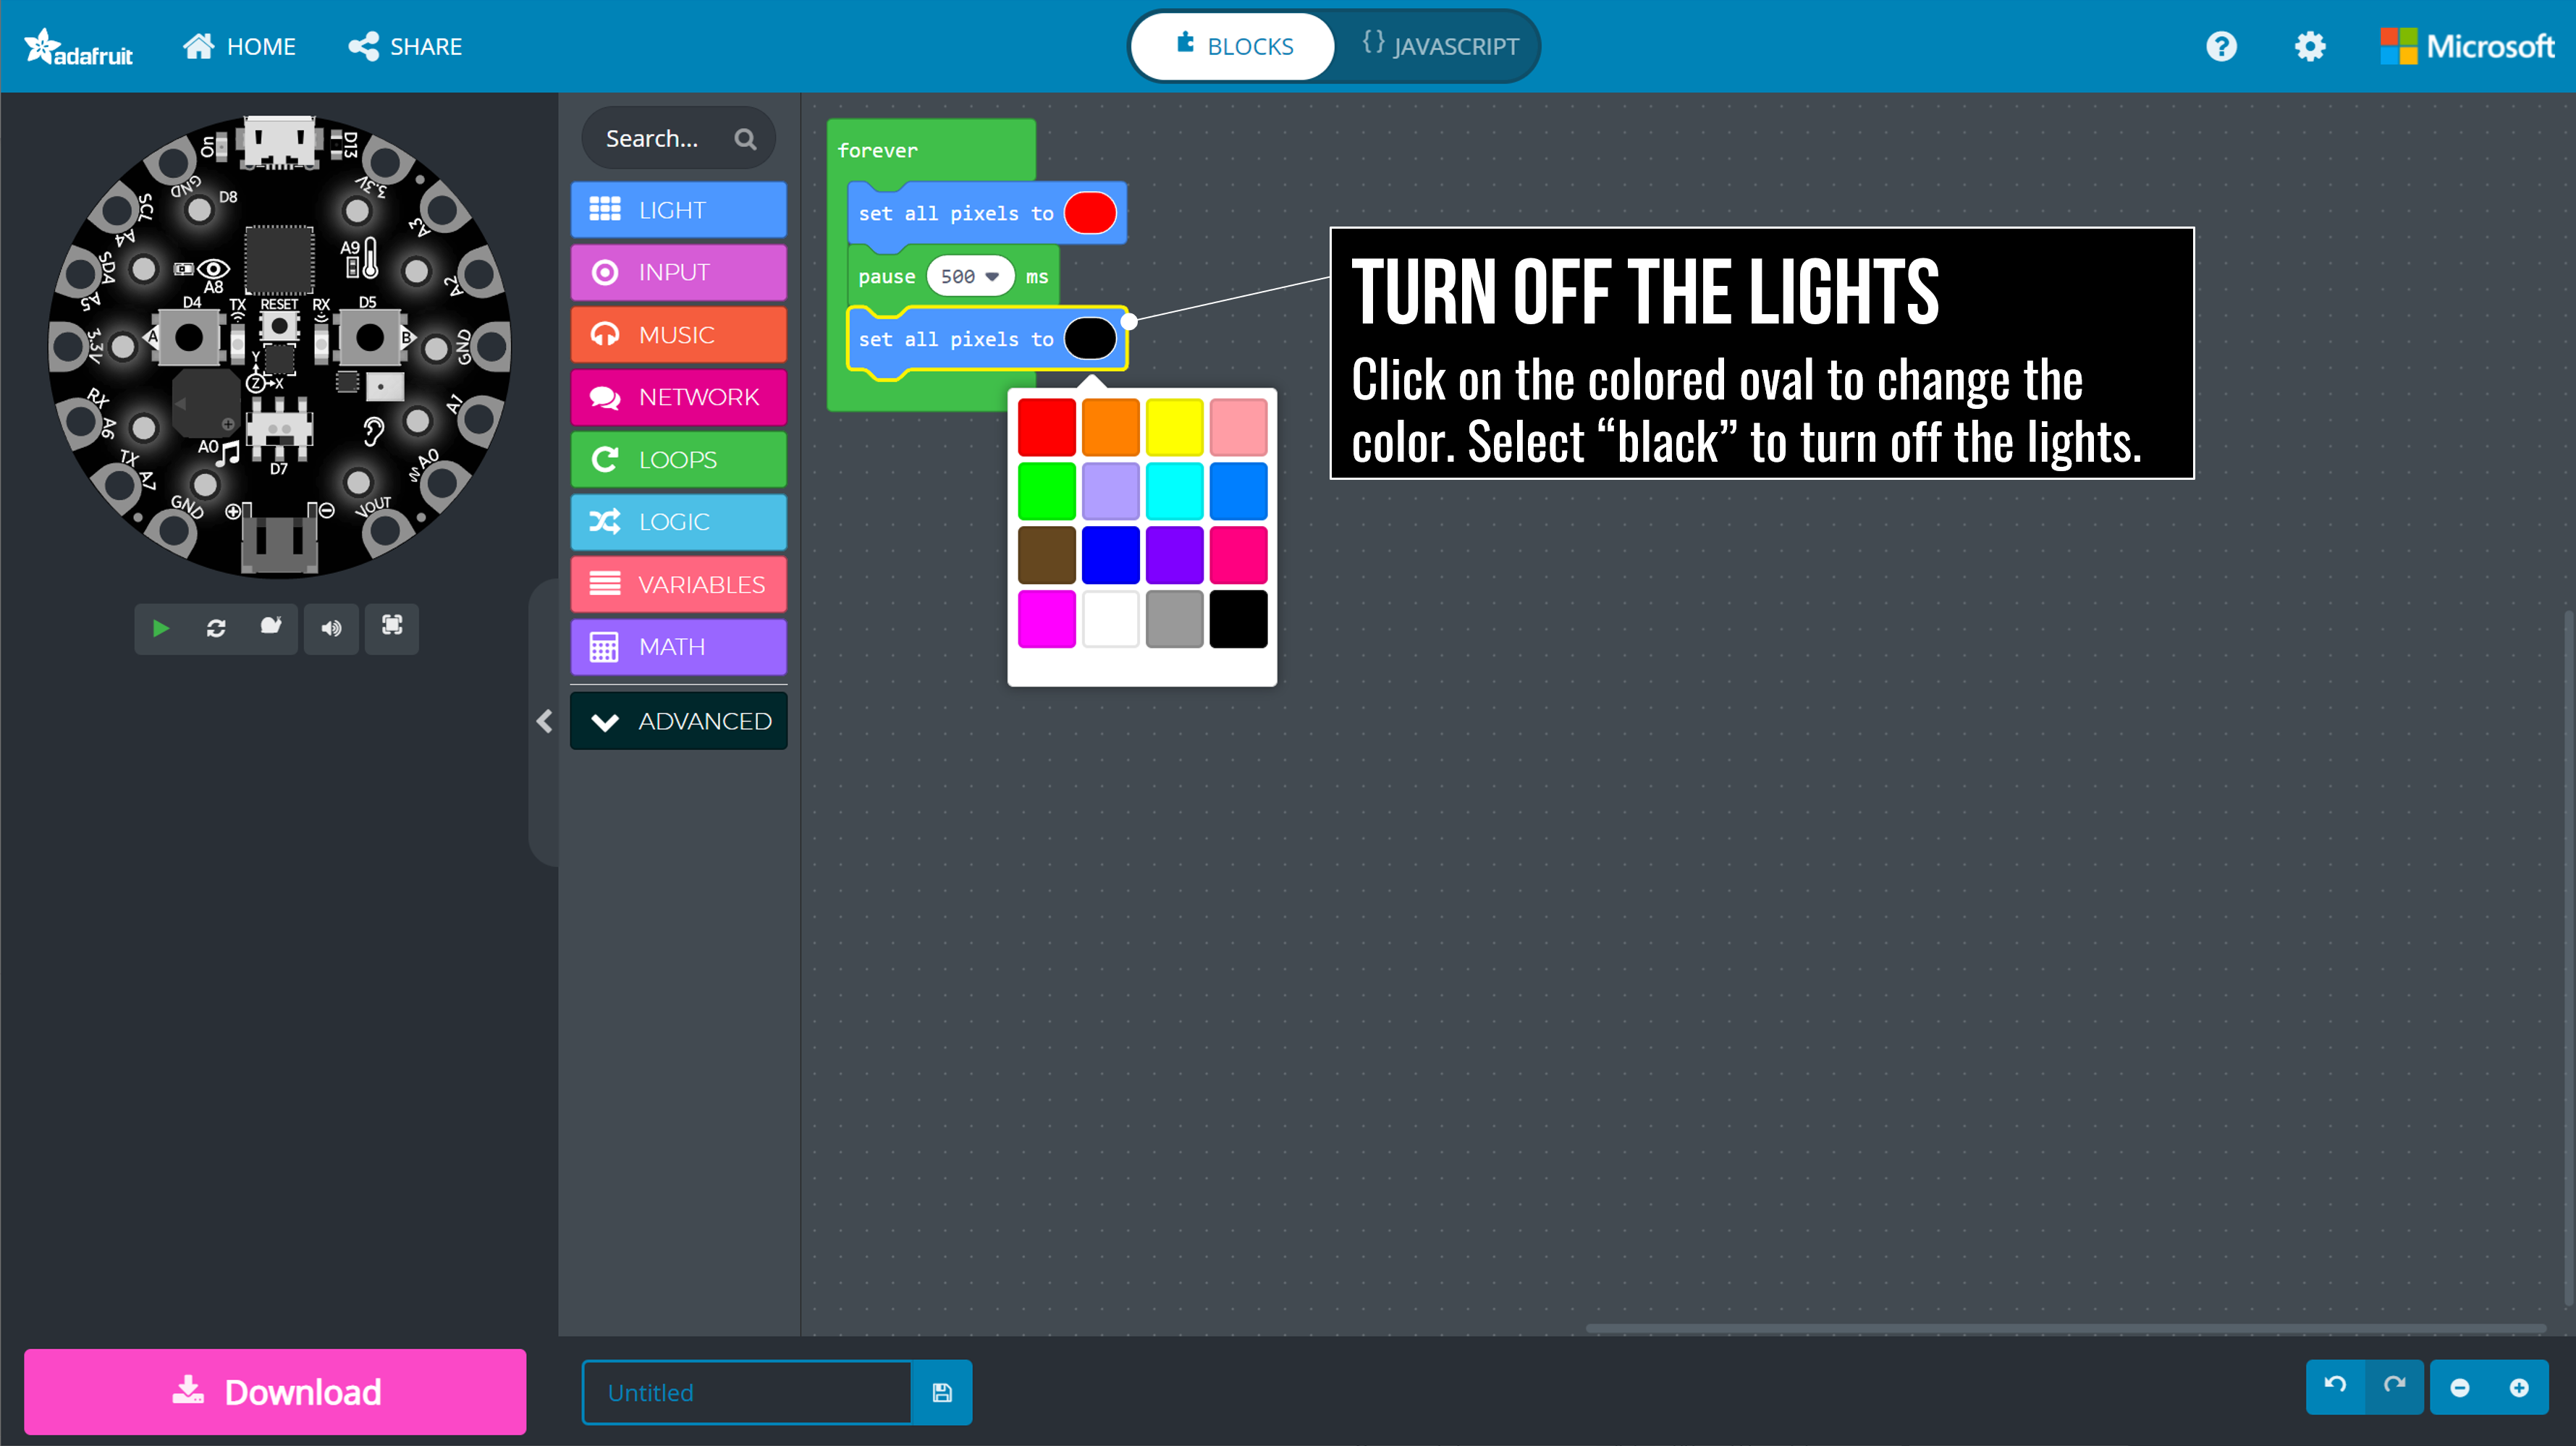 Figure. To change the light colors in the
 set all pixels to block, click on the colored oval and select a color from the pop-up menu.
Step 5: Add final pause block
As before, we also need to add in a pause block, which will control how long the lights are off before looping back to the beginning of our program.
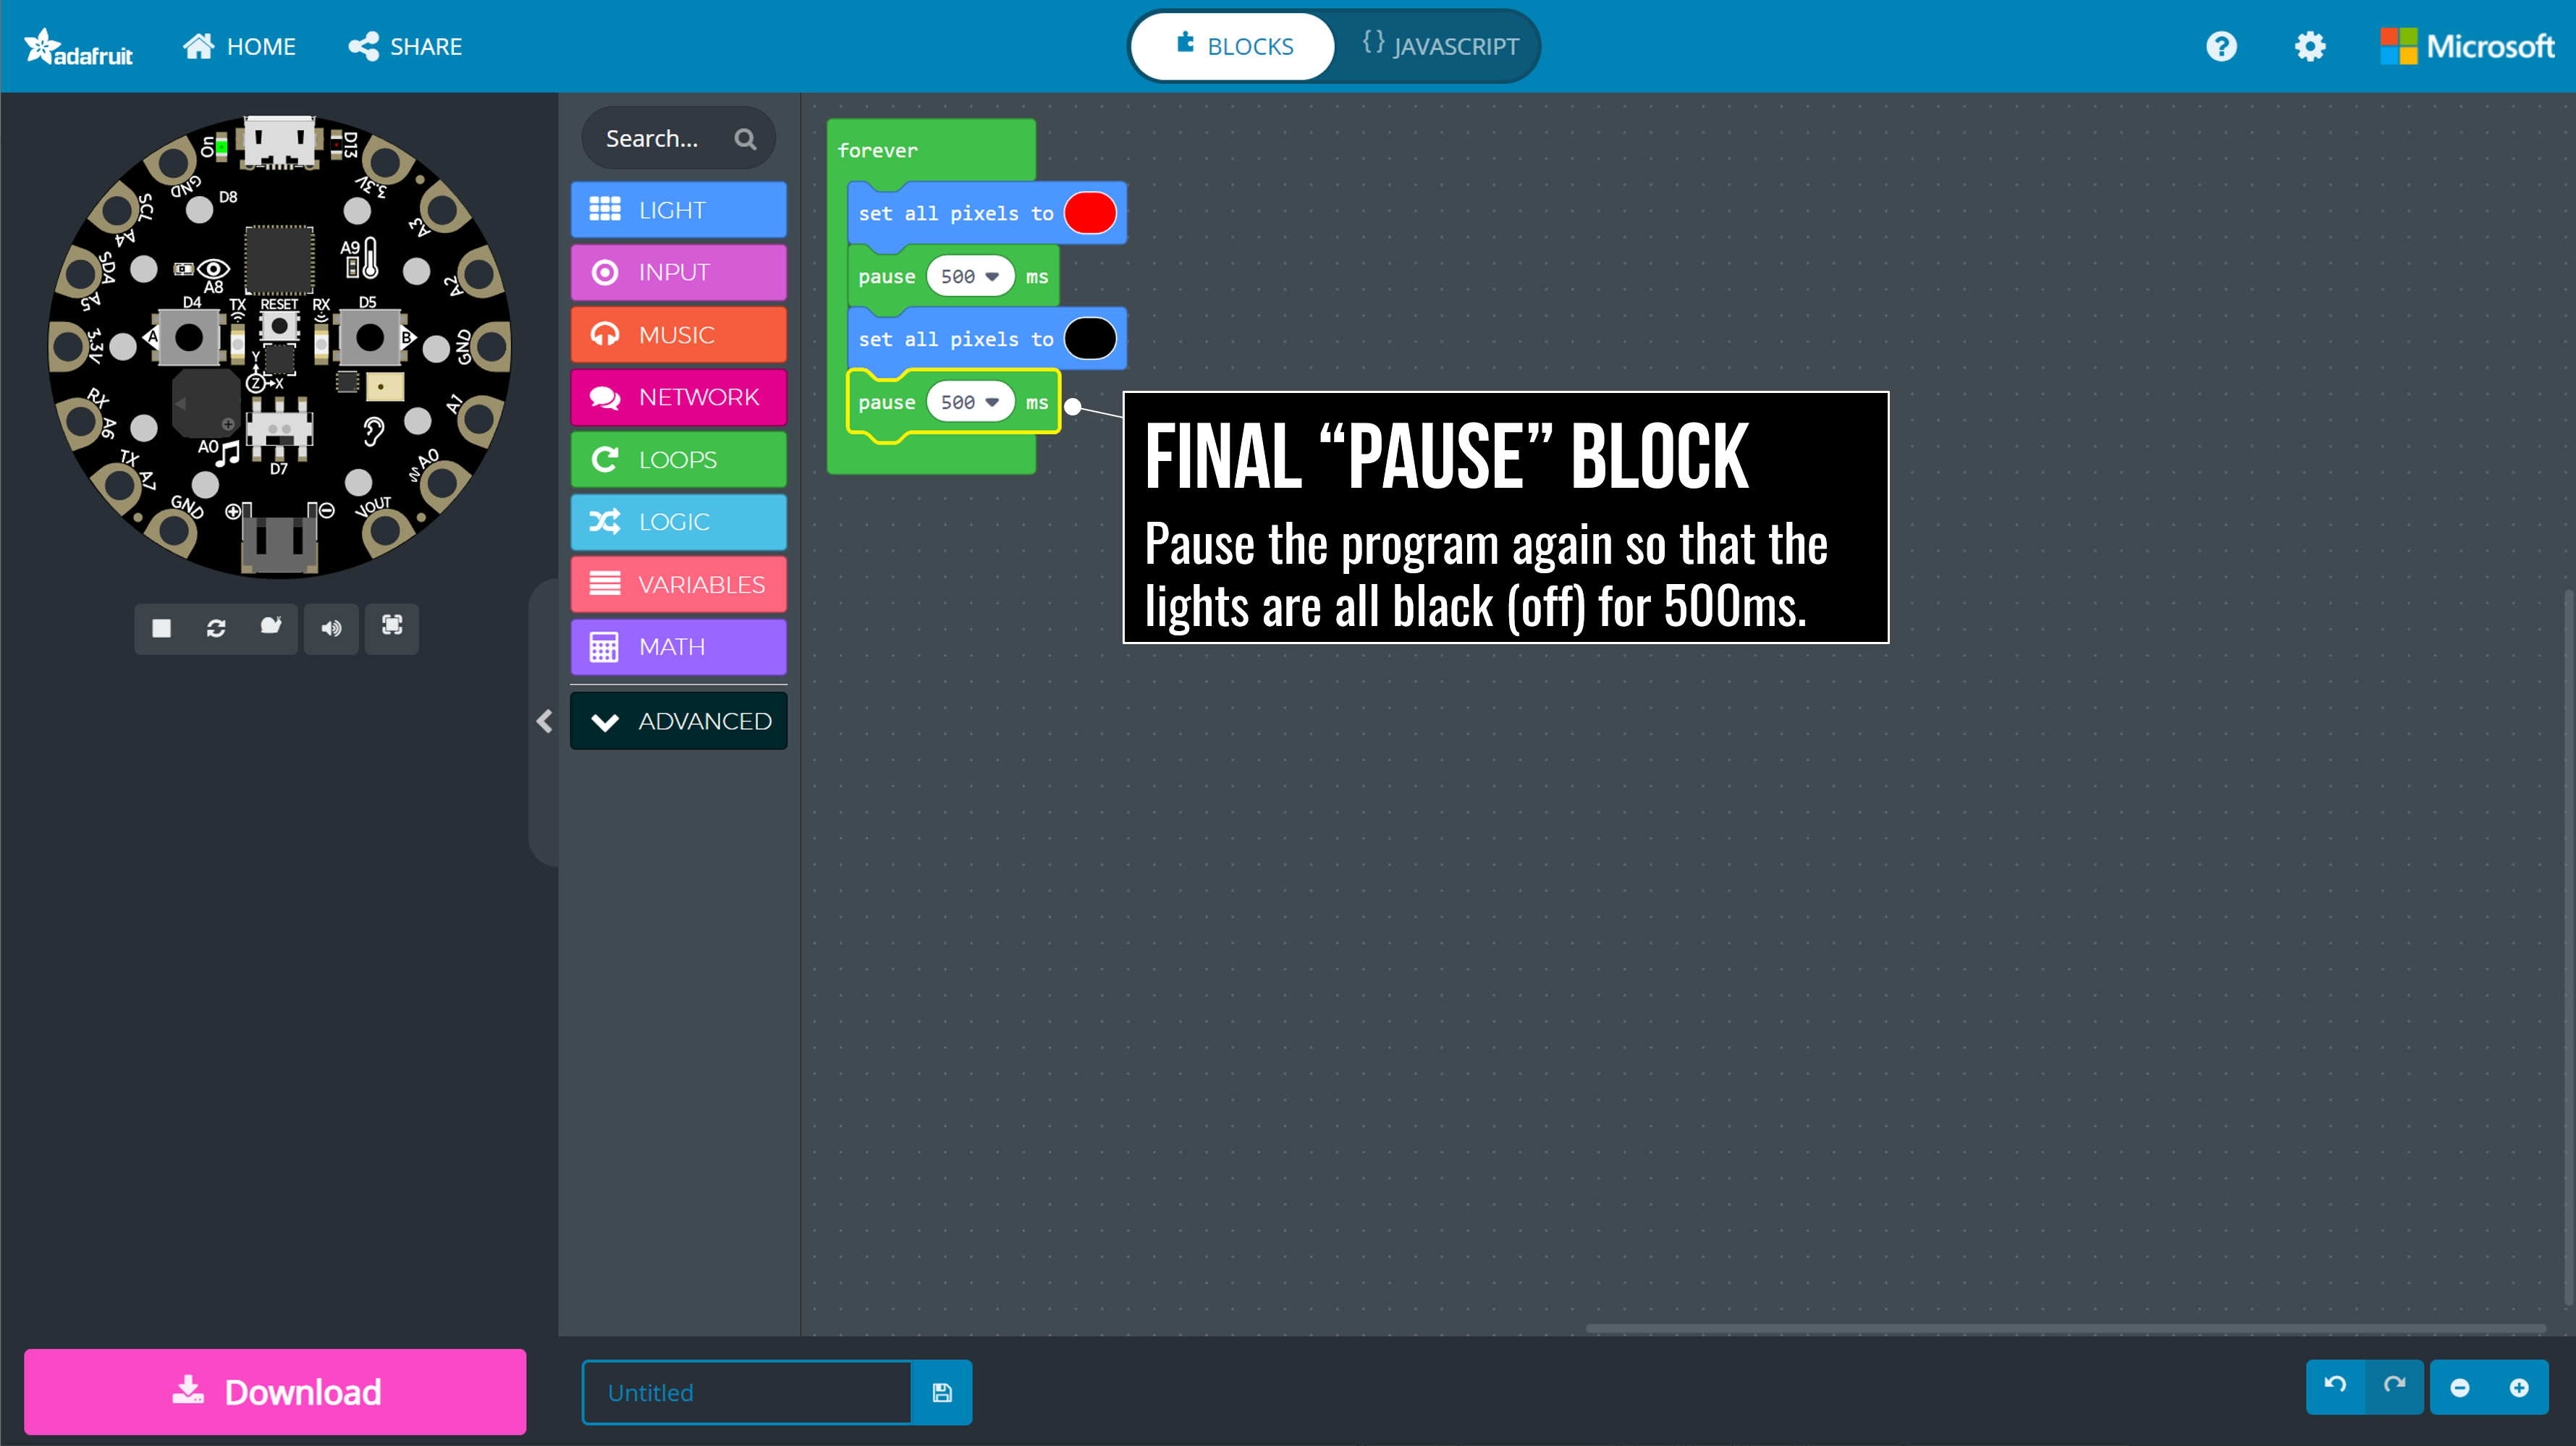 Figure. Drag-and-drop the
 pause block from the LOOPS toolbox menu.
Our final program should look like this. Because our code sits within a forever block, it will loop forever thereby creating a neverending on-off flashing of red lights.
 Figure. Because our code sits within a
 forever block, it will loop forever thereby creating a neverending on-off flashing of red lights.
Video of building Blinky
Here’s a full walkthrough video of building Blinky from start-to-finish in MakeCode in only 30 seconds. This really demonstrates how quickly we can prototype electronic behaviors with MakeCode+CPX.
Video. A full walkthrough video of building Blinky from start-to-finish in only 30 seconds. Feel free to pause the video or open it in a new tab for full screen (right click on the video and select “Open video in new tab”).
Adding sound to Blinky
Before downloading Blinky on to the physical CPX board, let’s make one more addition: a “startup” sound, which plays when the CPX is first turned on (or reset).
Video. Adding a “startup” sound to Blinky. Now, when Blinky is turned on, it will play a sound.
Step 1: Add “on start” block
In addition to the forever block, which runs repeatedly, MakeCode also has an on start block that runs when the program first starts. This is a perfect place to put “startup sound” code!
Open the LOOPS toolbox menu and drag-and-drop the on start block into your workspace.
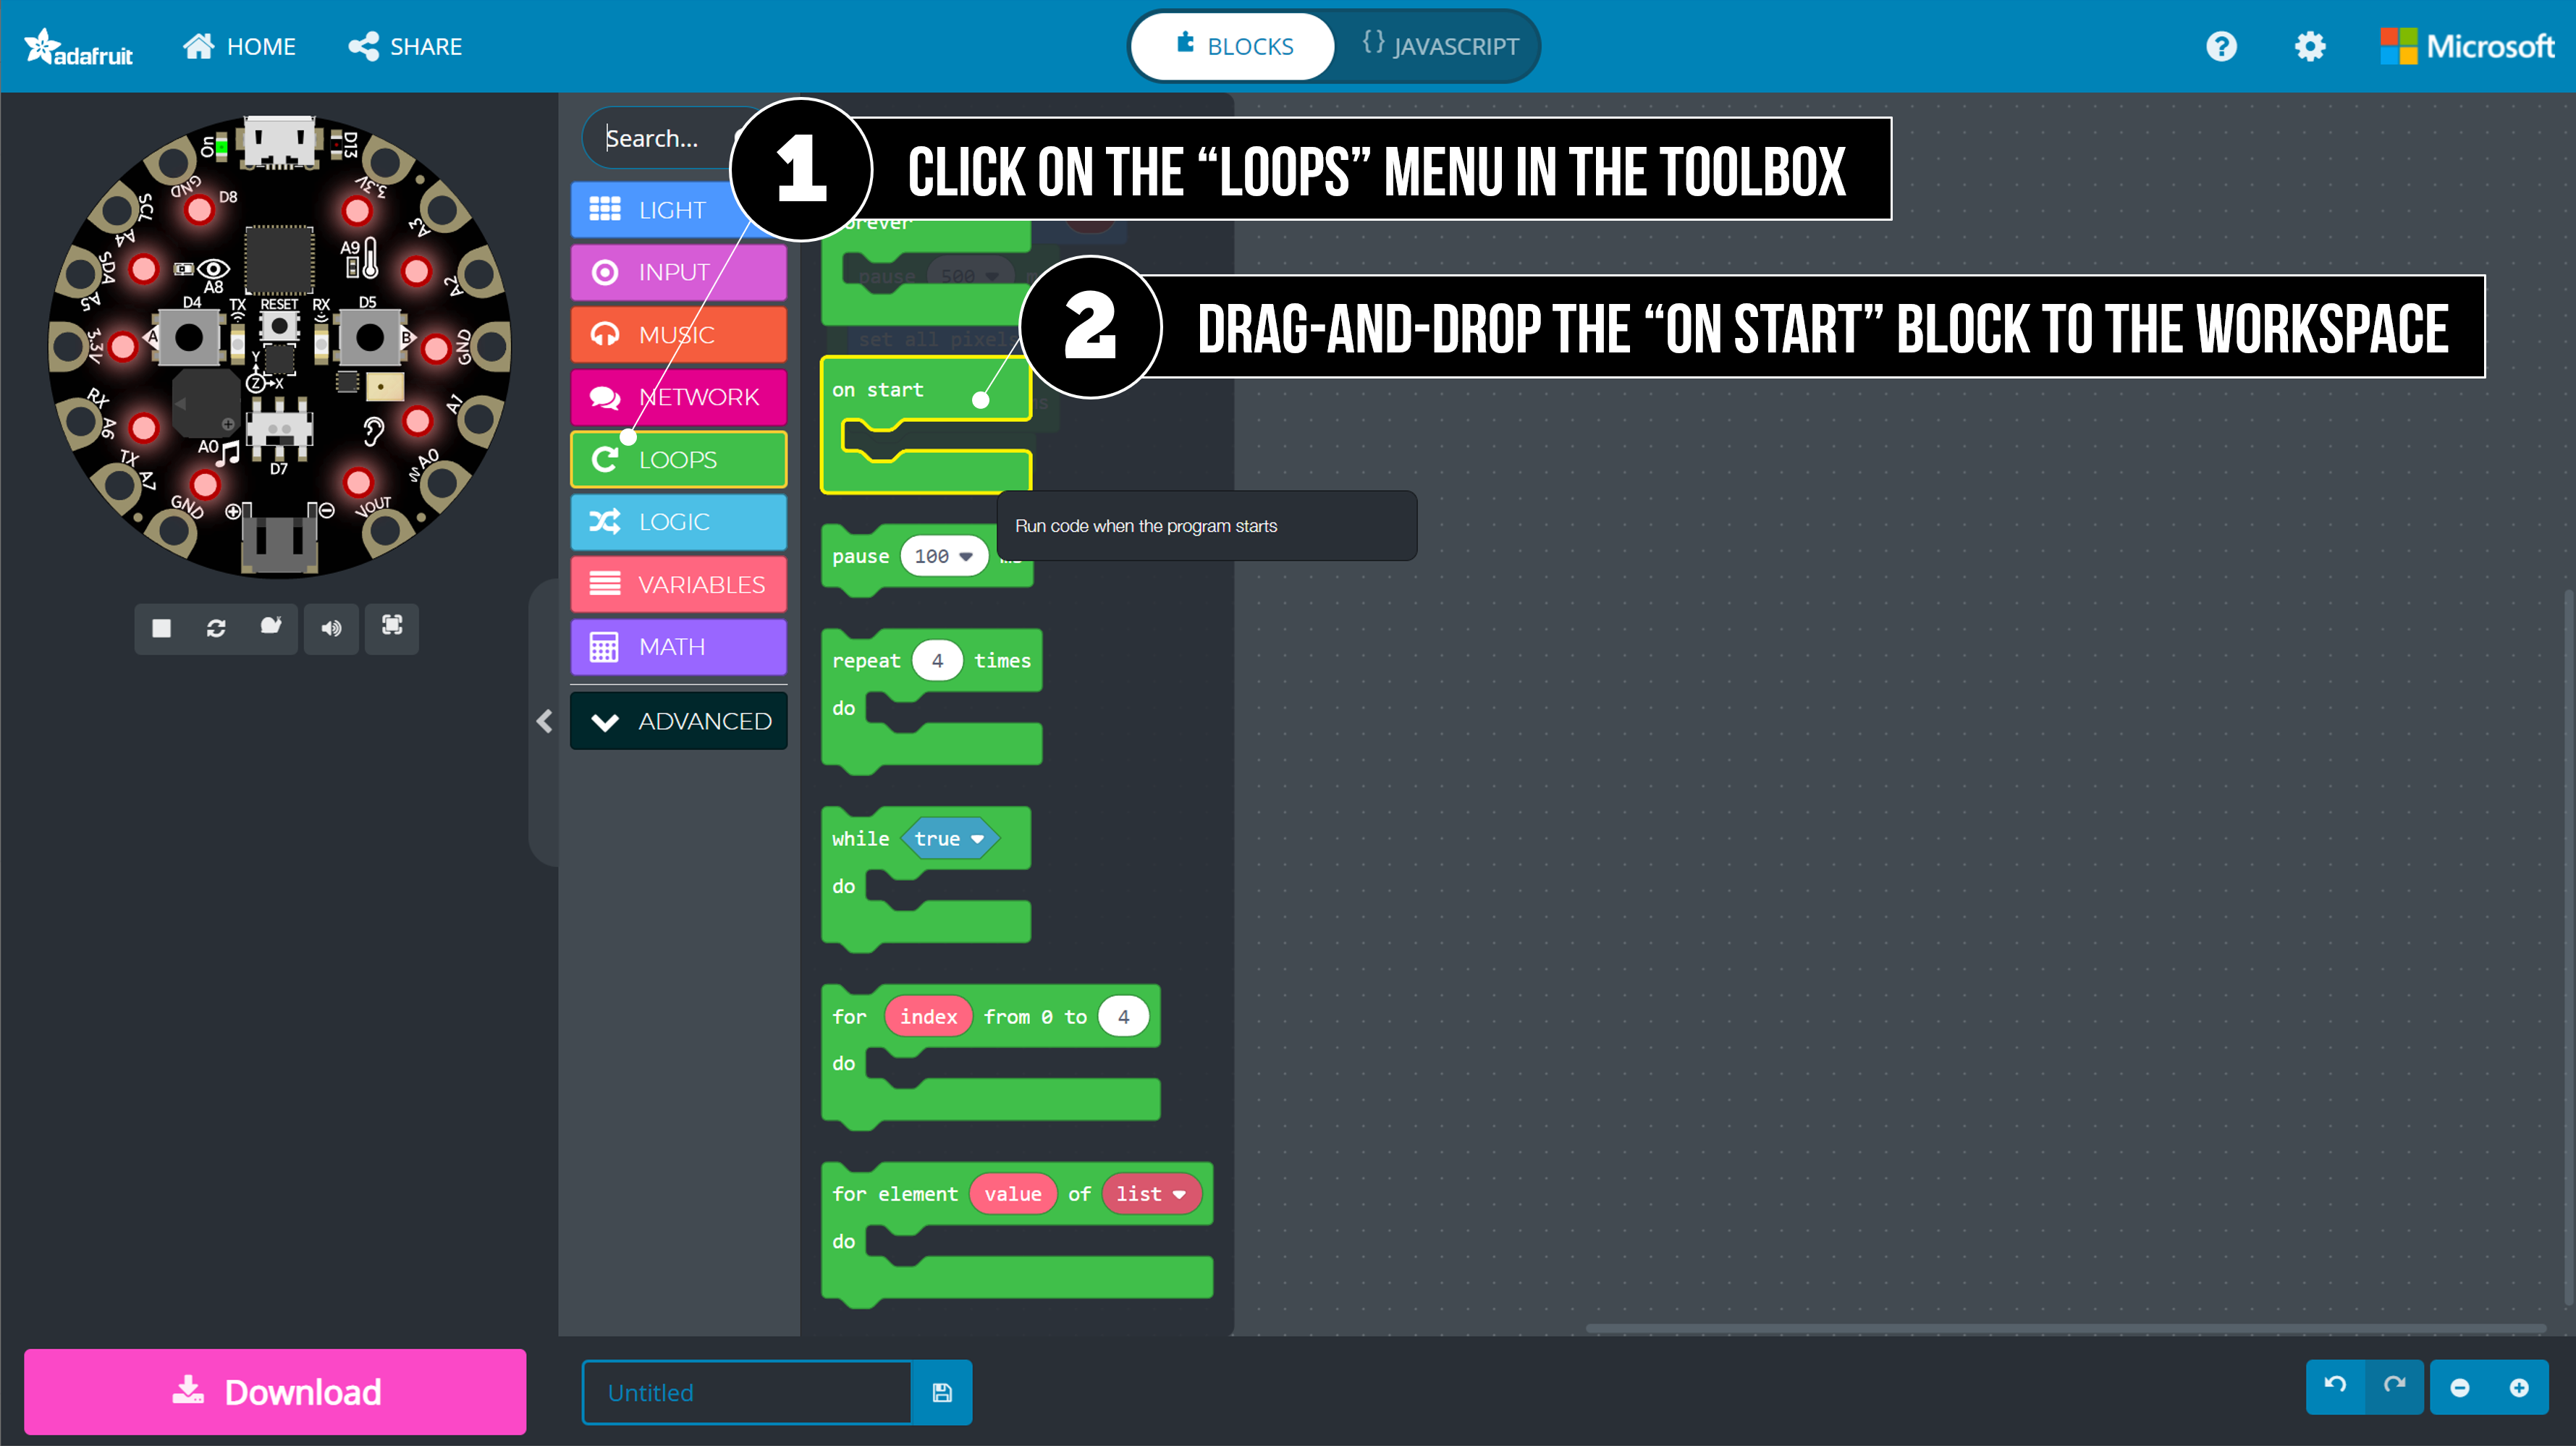 Figure. Drag-and-drop the
 on start block from the LOOPS toolbox menu.
Now your Blinky program should look like this. I’ve arbitrarily placed the on start block next to the forever block—you can put it wherever you want. Regardless of its position in the editor, the on start block will always run before the forever block.
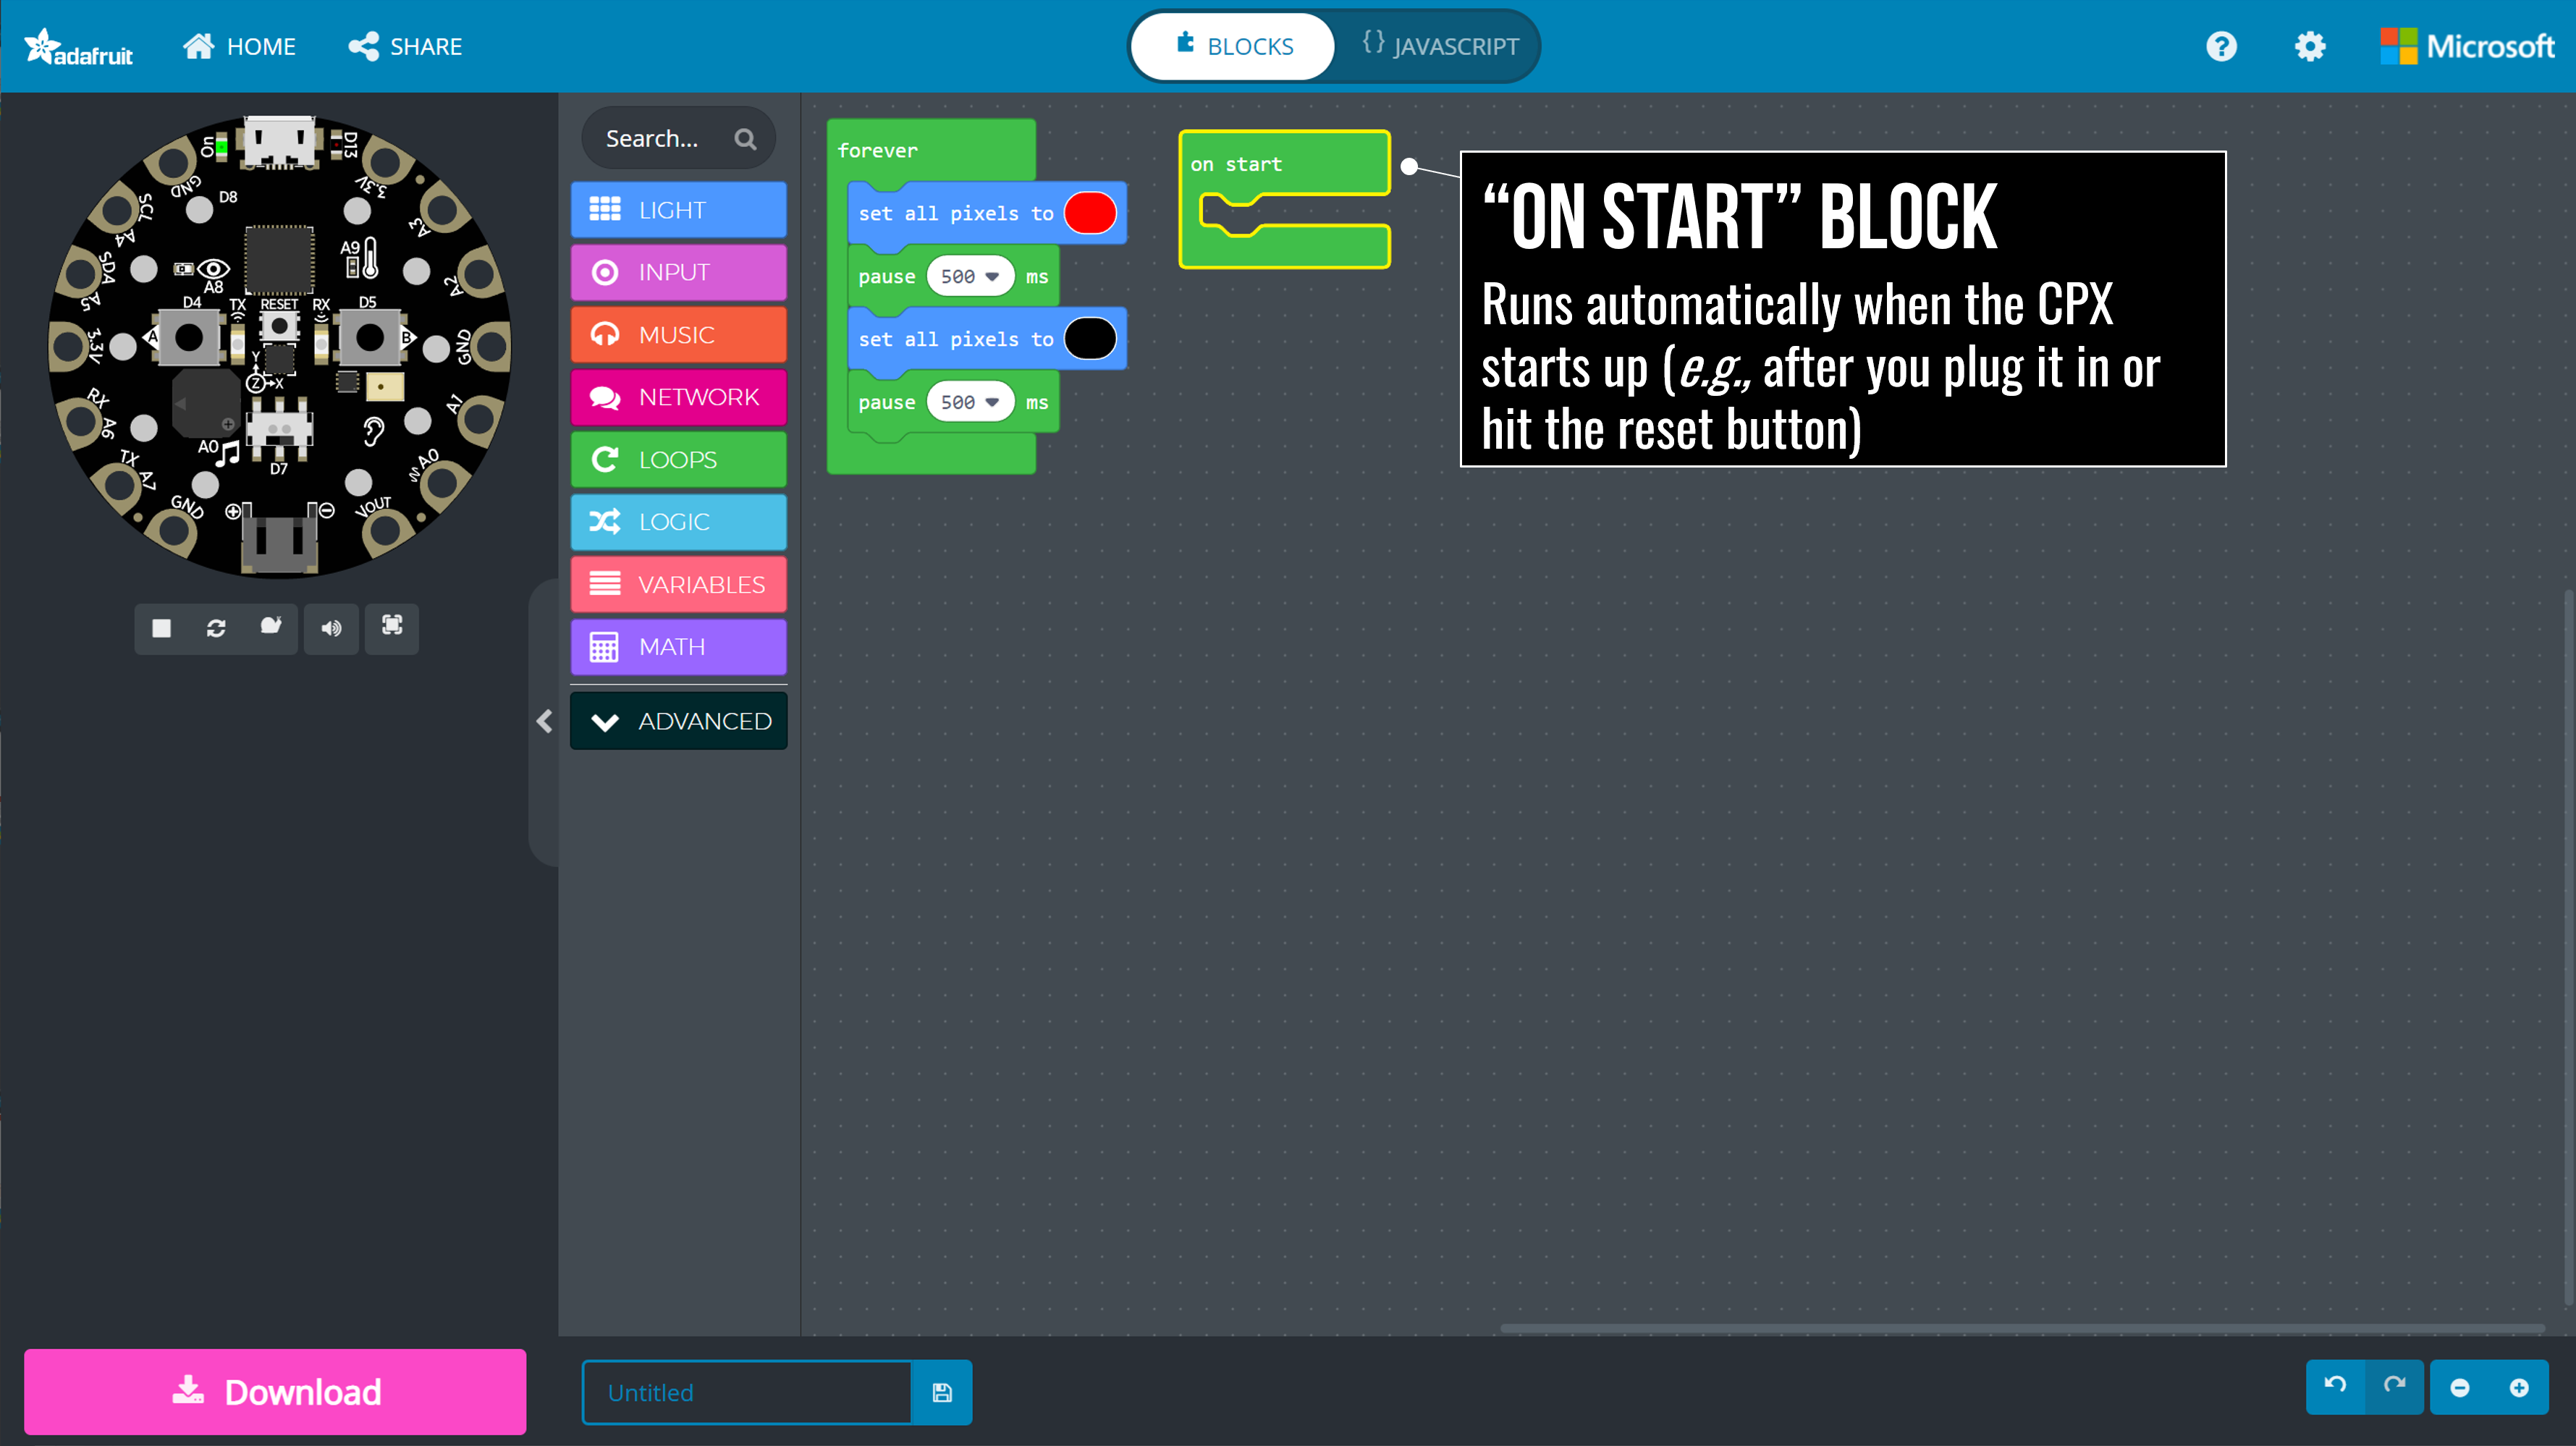 Figure. The
 on start block runs automatically when the program first starts.
Step 2: Adding sound
Thus far, we have only programmed one type of output, light, but there is also sound! For sound, we can use the MUSIC toolbox menu.
Let’s use the play sound block, which plays a preprogrammed sound like “power up” or “jump up” (these sounds may be familiar to you as some come from Super Mario!).
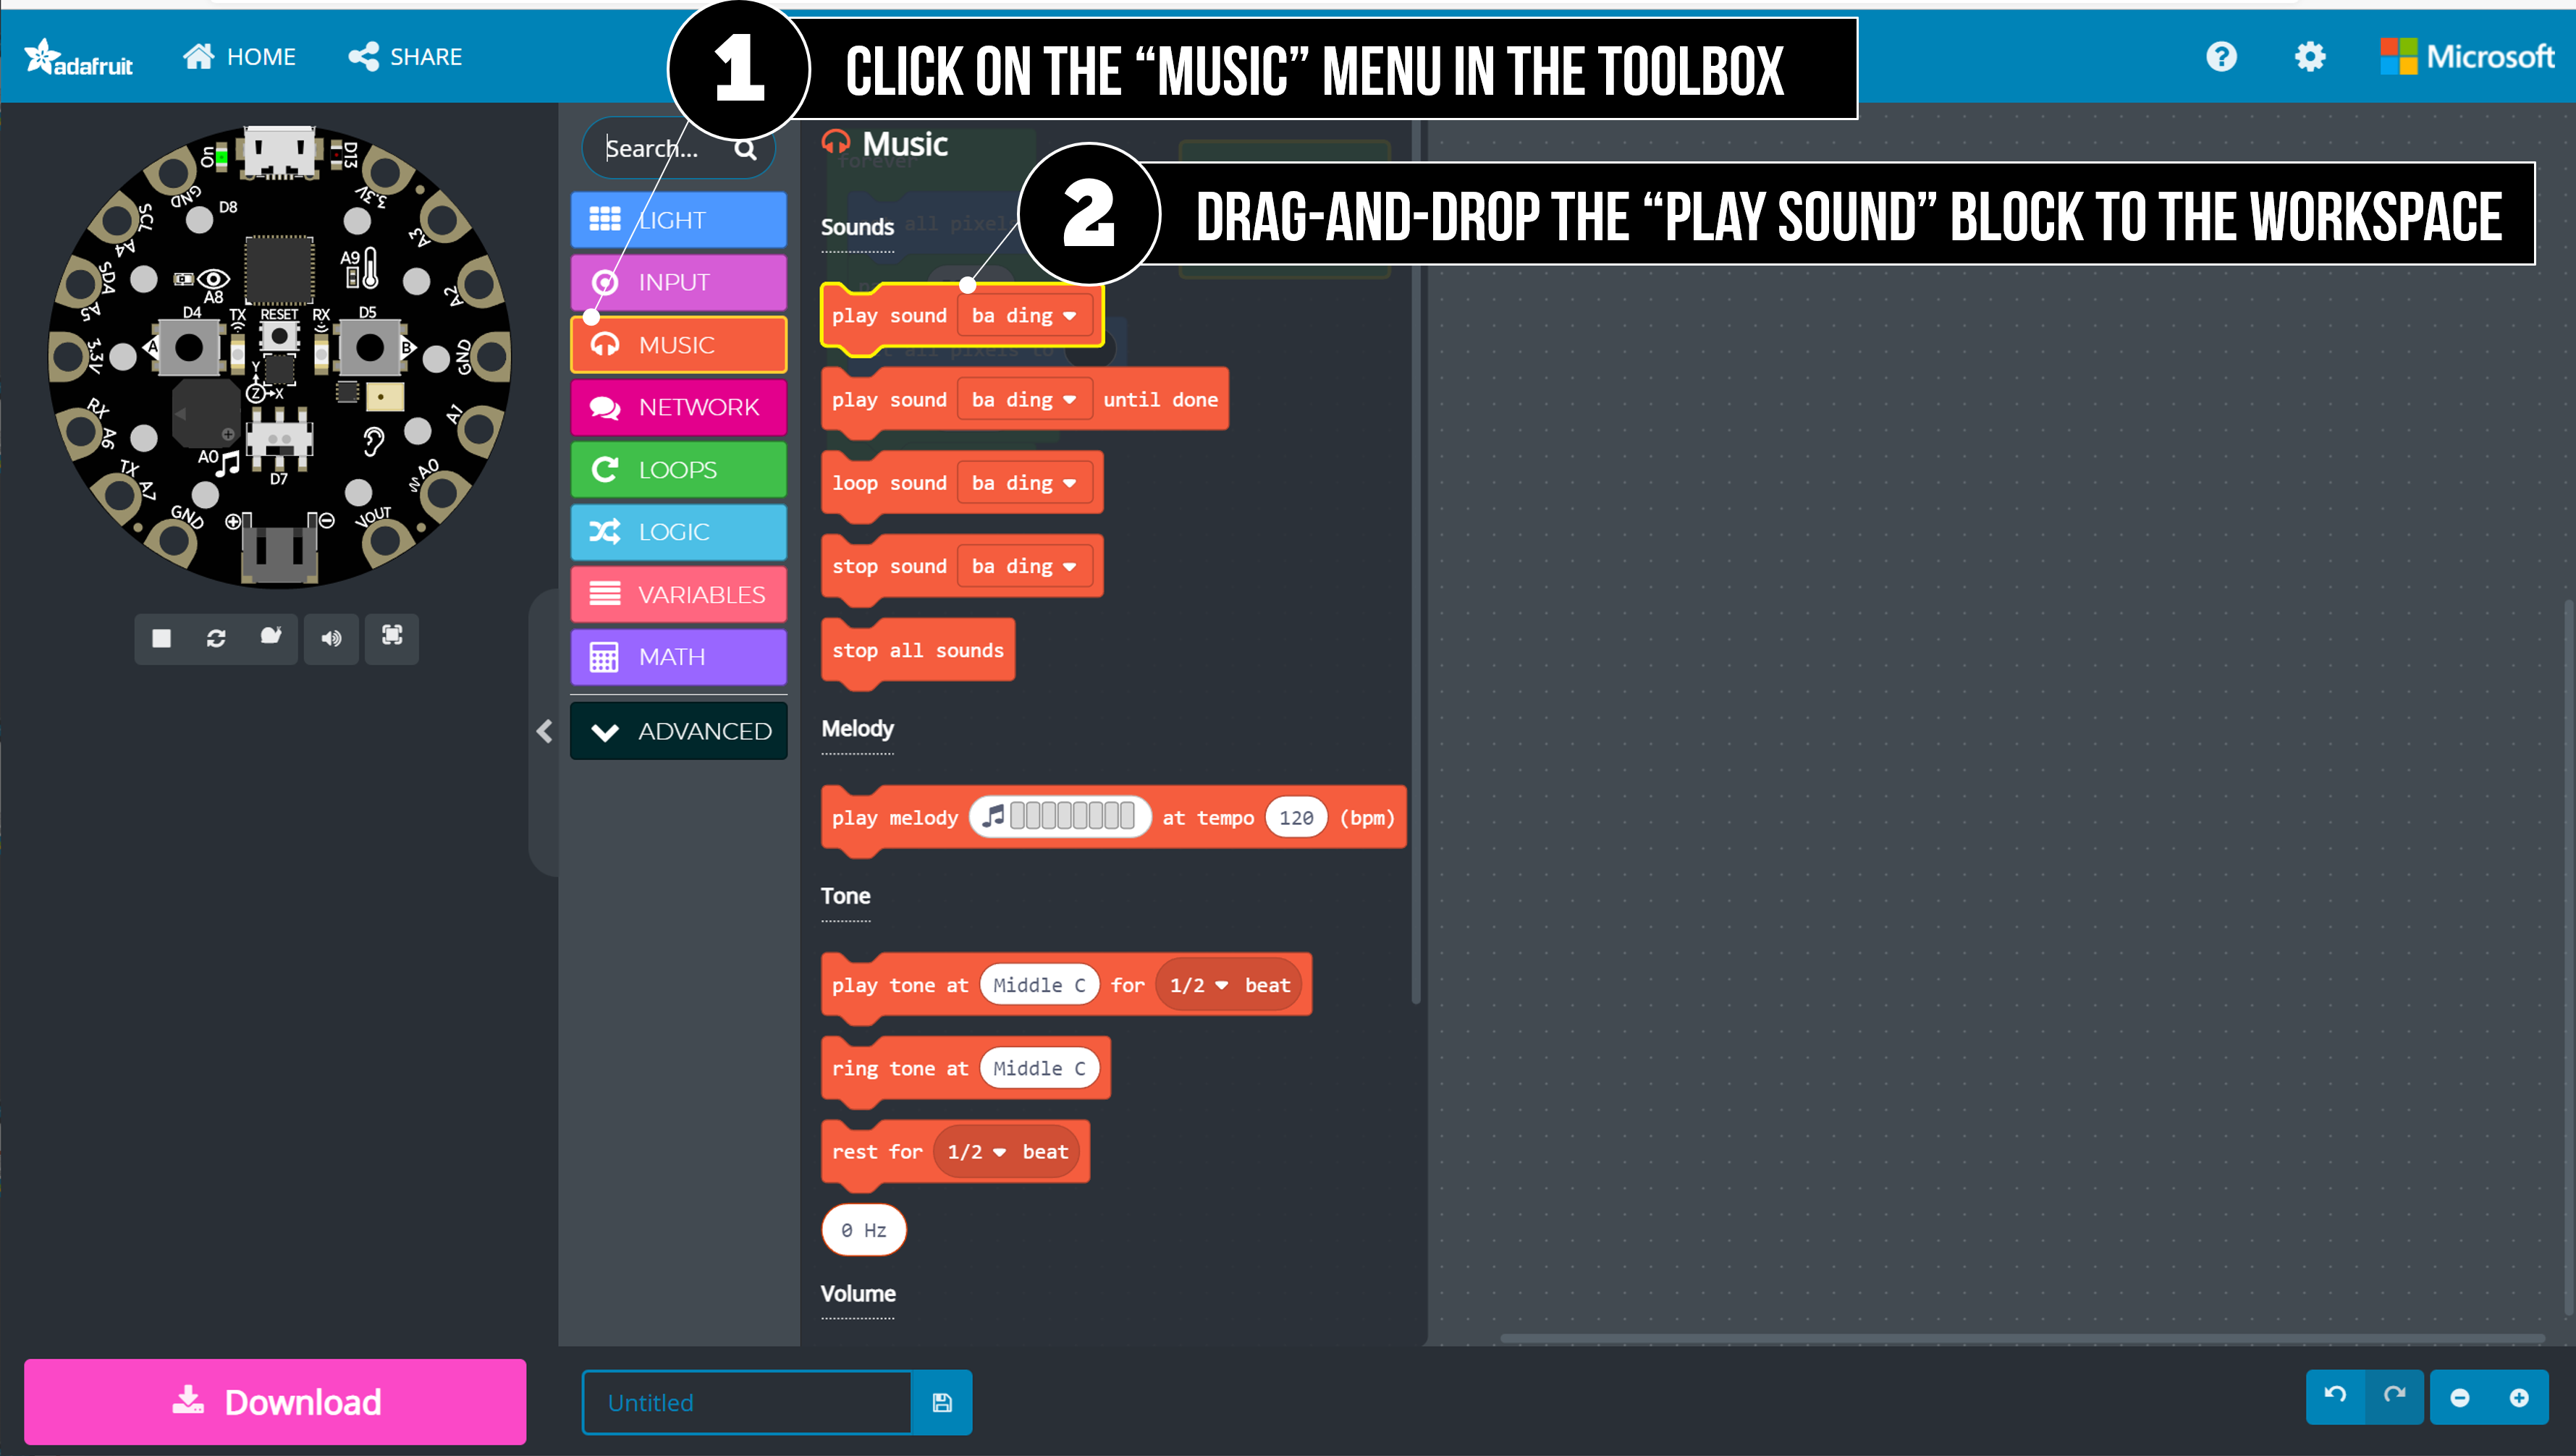 Figure. Drag-and-drop the
 play sound block from the MUSIC toolbox menu.
You are welcome to select any sound option. We’re going to use “power up.” As soon as you add this block, you should hear the sound play in the simulator (assuming your sound is on and you have speakers/headphones).
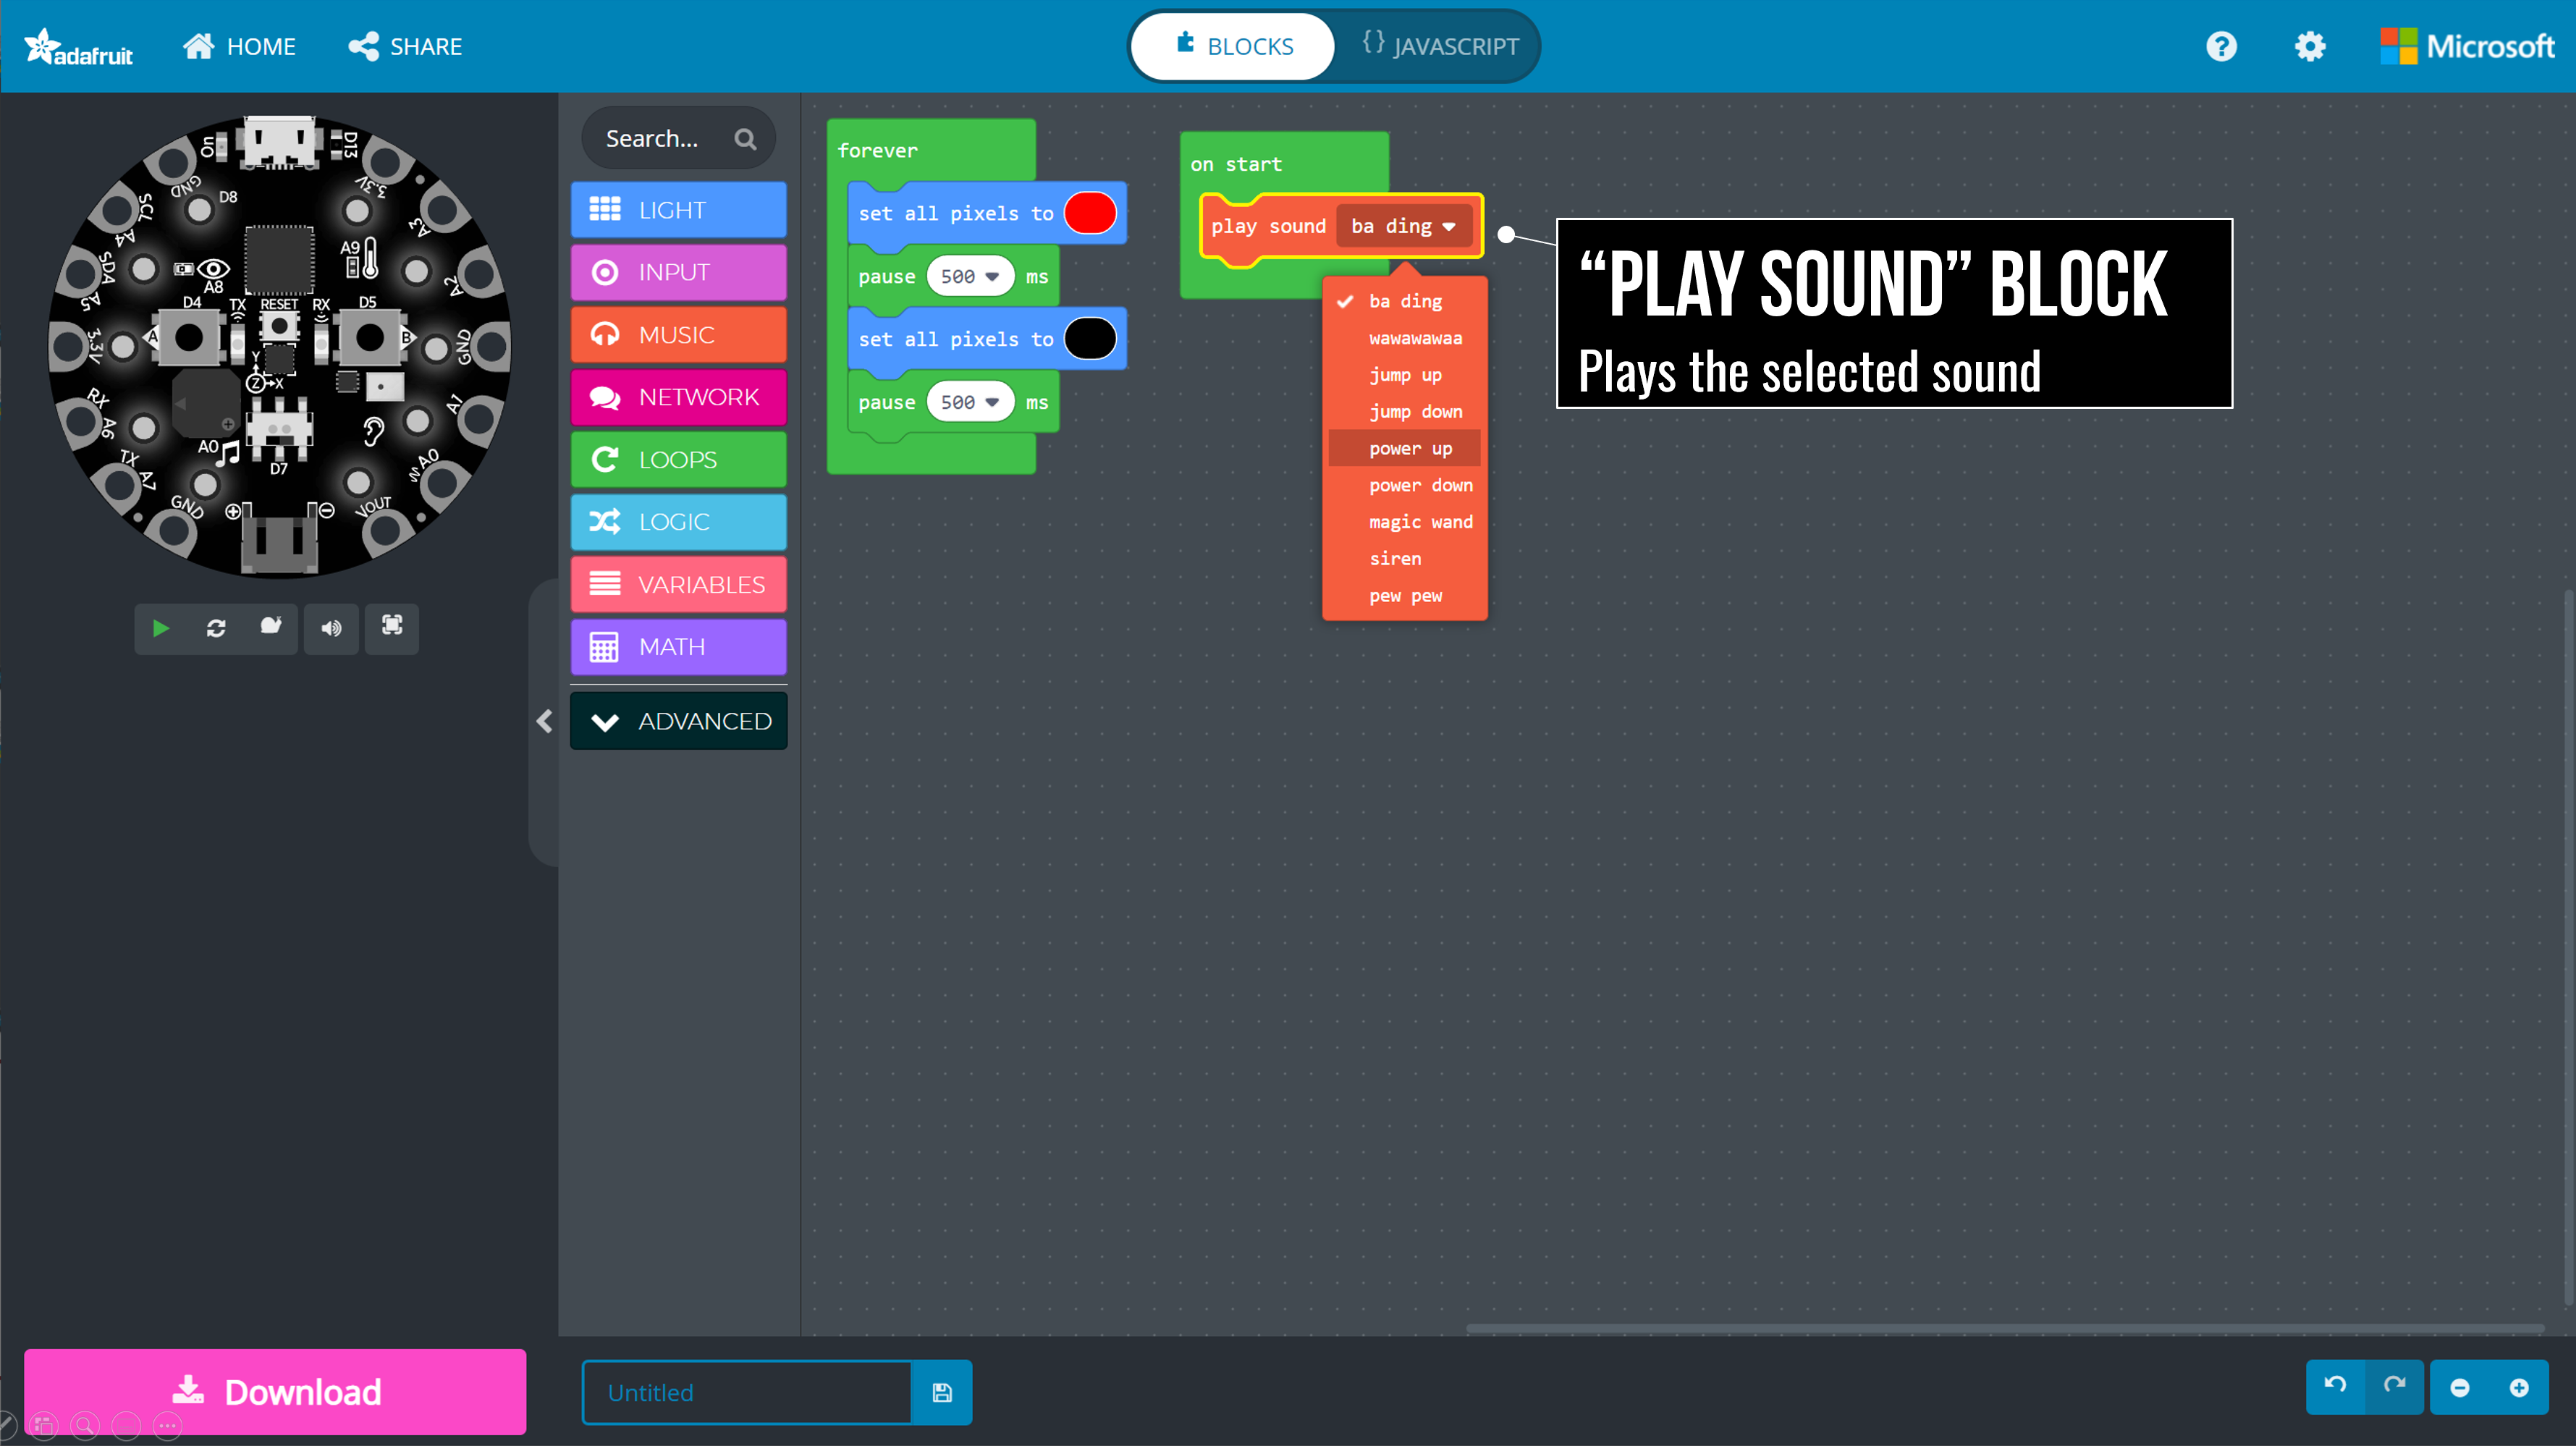 Figure. The
 play sound block plays the selected sound.
Step 3: The final program
You did it! The final program should look like this:
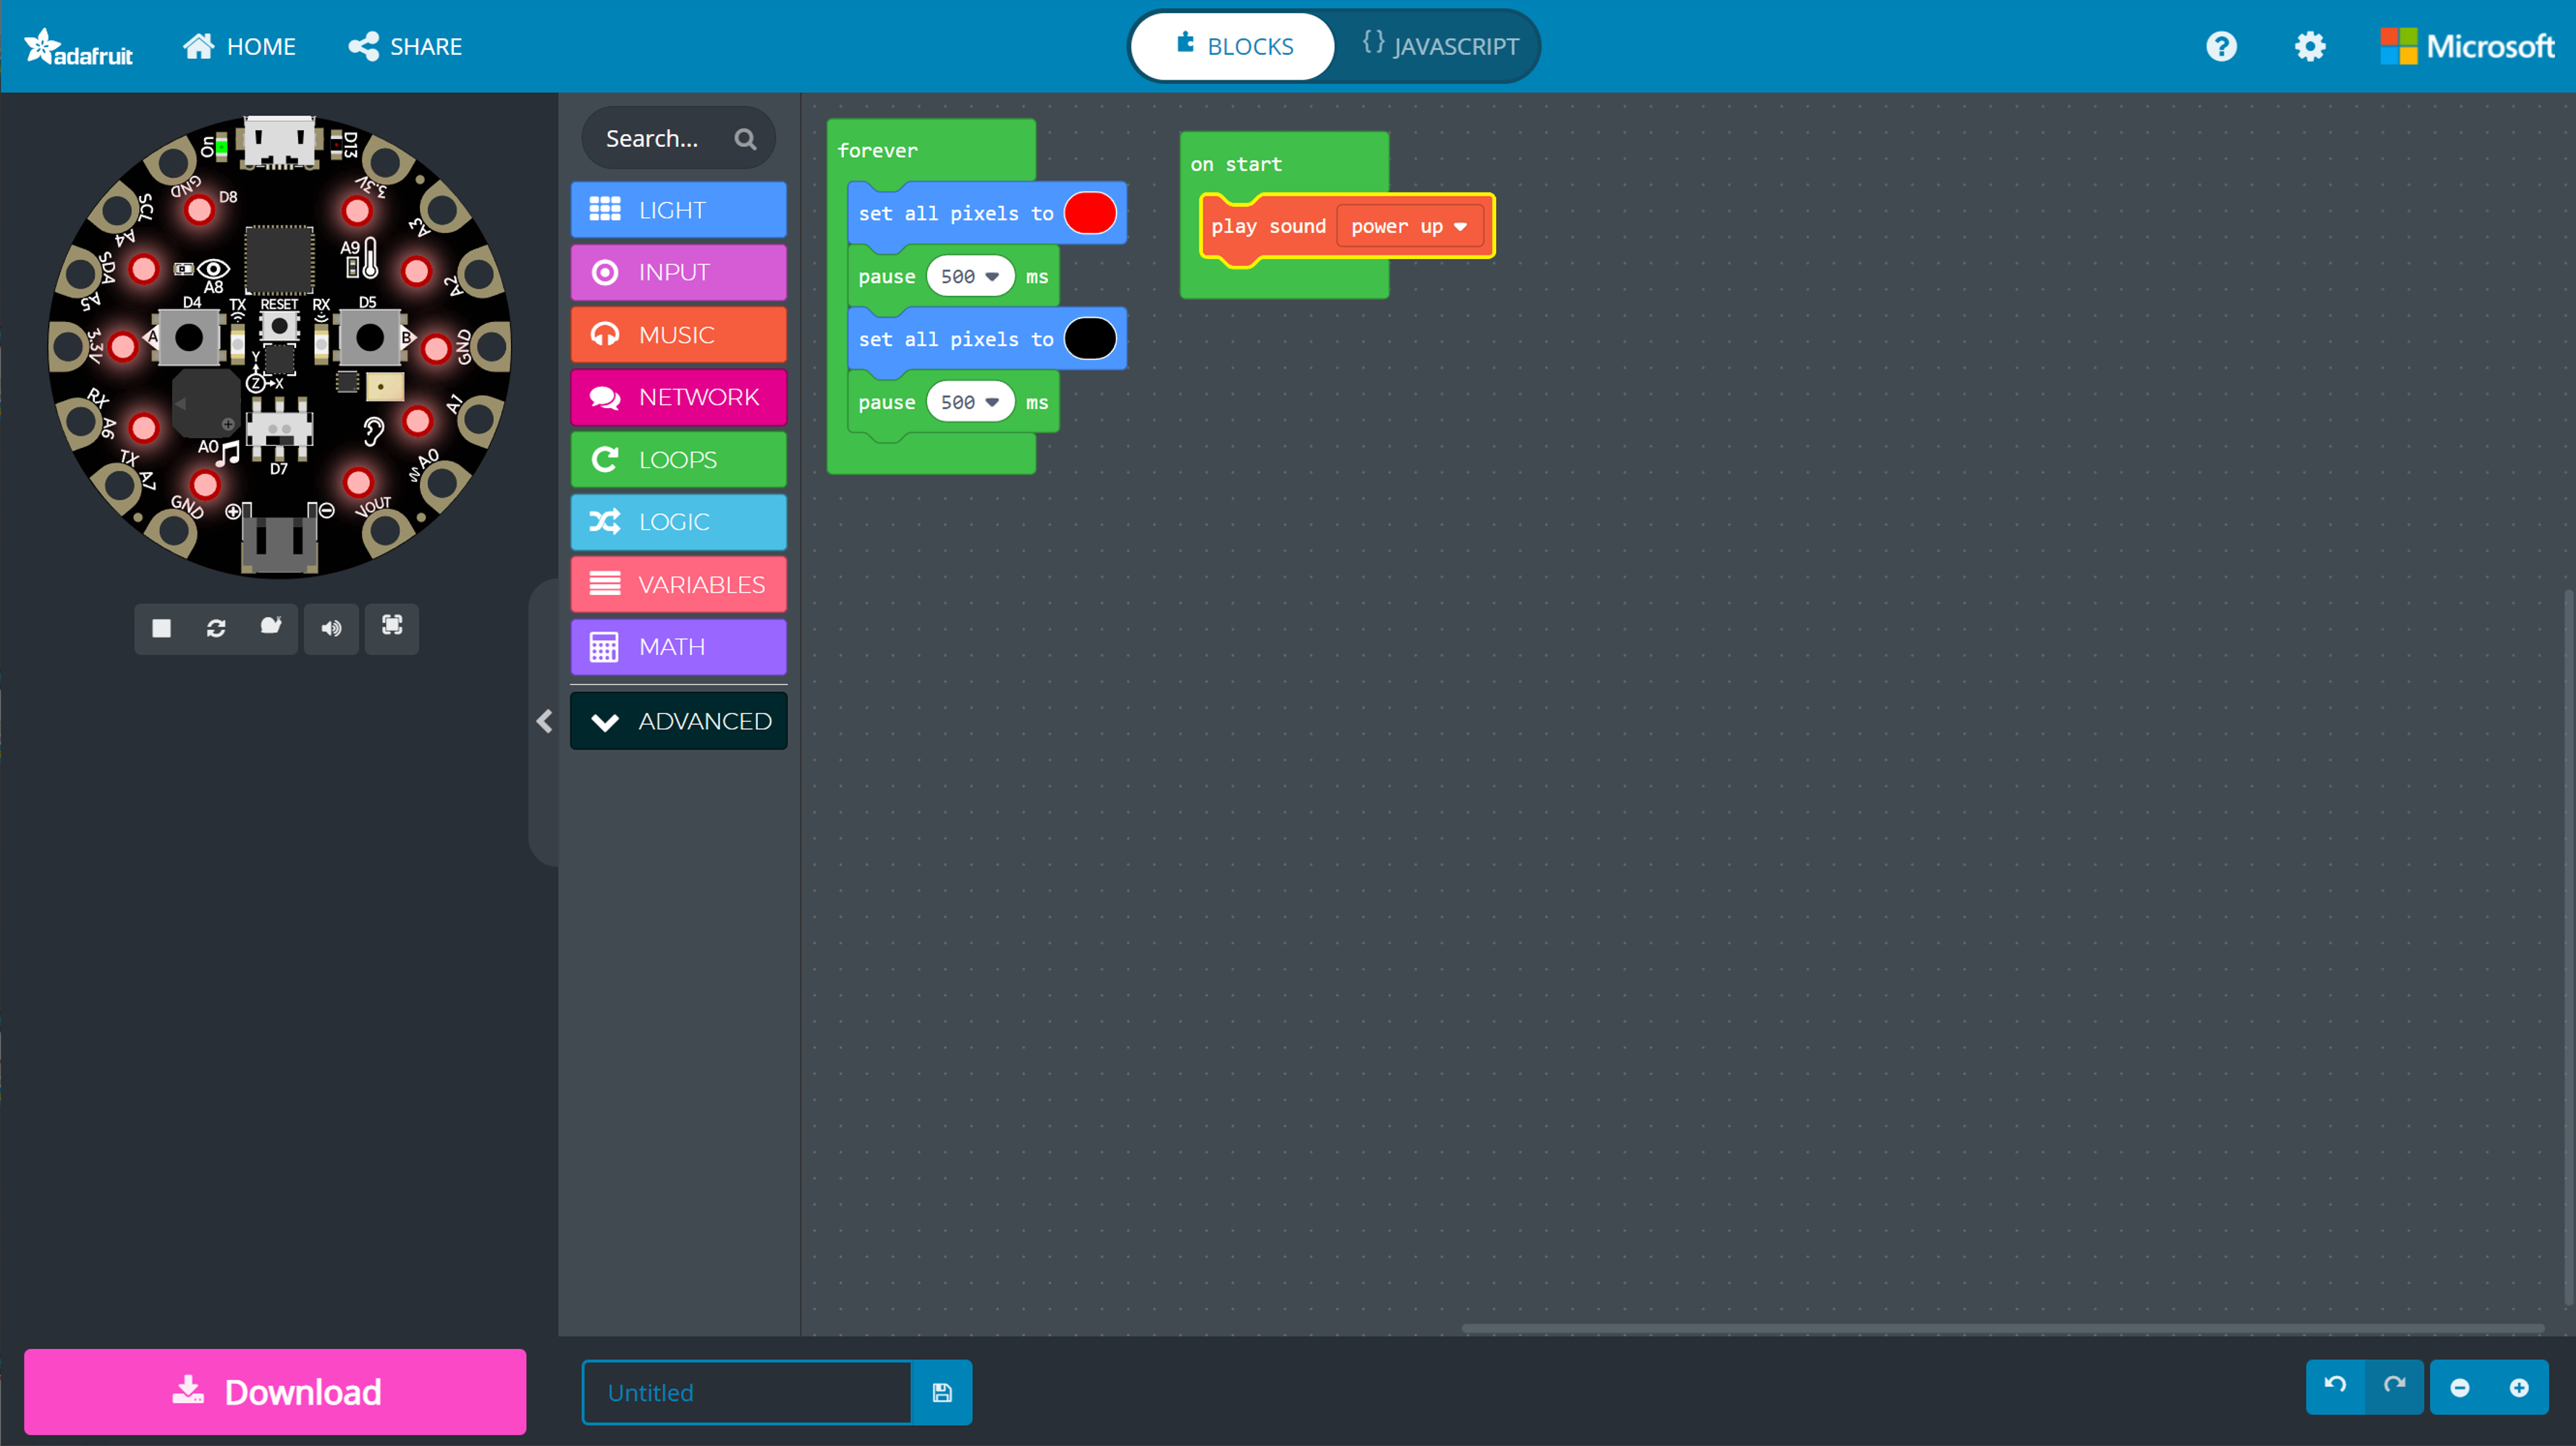 Figure. The final “Blinky with Sound” program in MakeCode. You can edit and play with our code here—we changed the color from red to blue.
Transferring our program to the CPX
Thus far, we’ve used the simulator to test and run Blinky. But the true power and fun of physical computing and the CPX is working with physical materials. So, we need to transfer Blinky from your laptop to the CPX.
There are two ways of transferring MakeCode programs to CPX:
- Manual download. By manually downloading the program and copying it over to the CPX (as if the CPX is a USB thumb drive).
- Direct download. By using an experimental WebUSB feature to directly download your program to the CPX. When it works, this feels very seamless. However, because this feature is experimental, it is a bit inconsistent—which can lead to frustration.
We’ll cover both below. We recommend at least trying the “direct download” approach and falling back on manual download when it doesn’t work.
Manual download
Video. Downloading a MakeCode program and transferring it to the CPX using a Mac.
Manually downloading your MakeCode program to the CPX is a 4-step process:
- Download. Click on the pink ‘Download’ button, which will download a
.uf2file to your downloads folder; - Plug in CPX. Plug in your CPX to your laptop/computer using a USB micro cable.
- Put CPX into programmable state. Click the ‘Reset’ button on the CPX. The CPX should glow green and mount a new “thumb drive” folder called CPLAYBOOT;
- Move .uf2 file onto CPLAYBOOT Drag-and-drop the downloaded
.uf2file onto CPLAYBOOT. When the file finishes copying, the CPX will auto-reset and begin running your program—which will also disconnect the CPX from your laptop/computer.
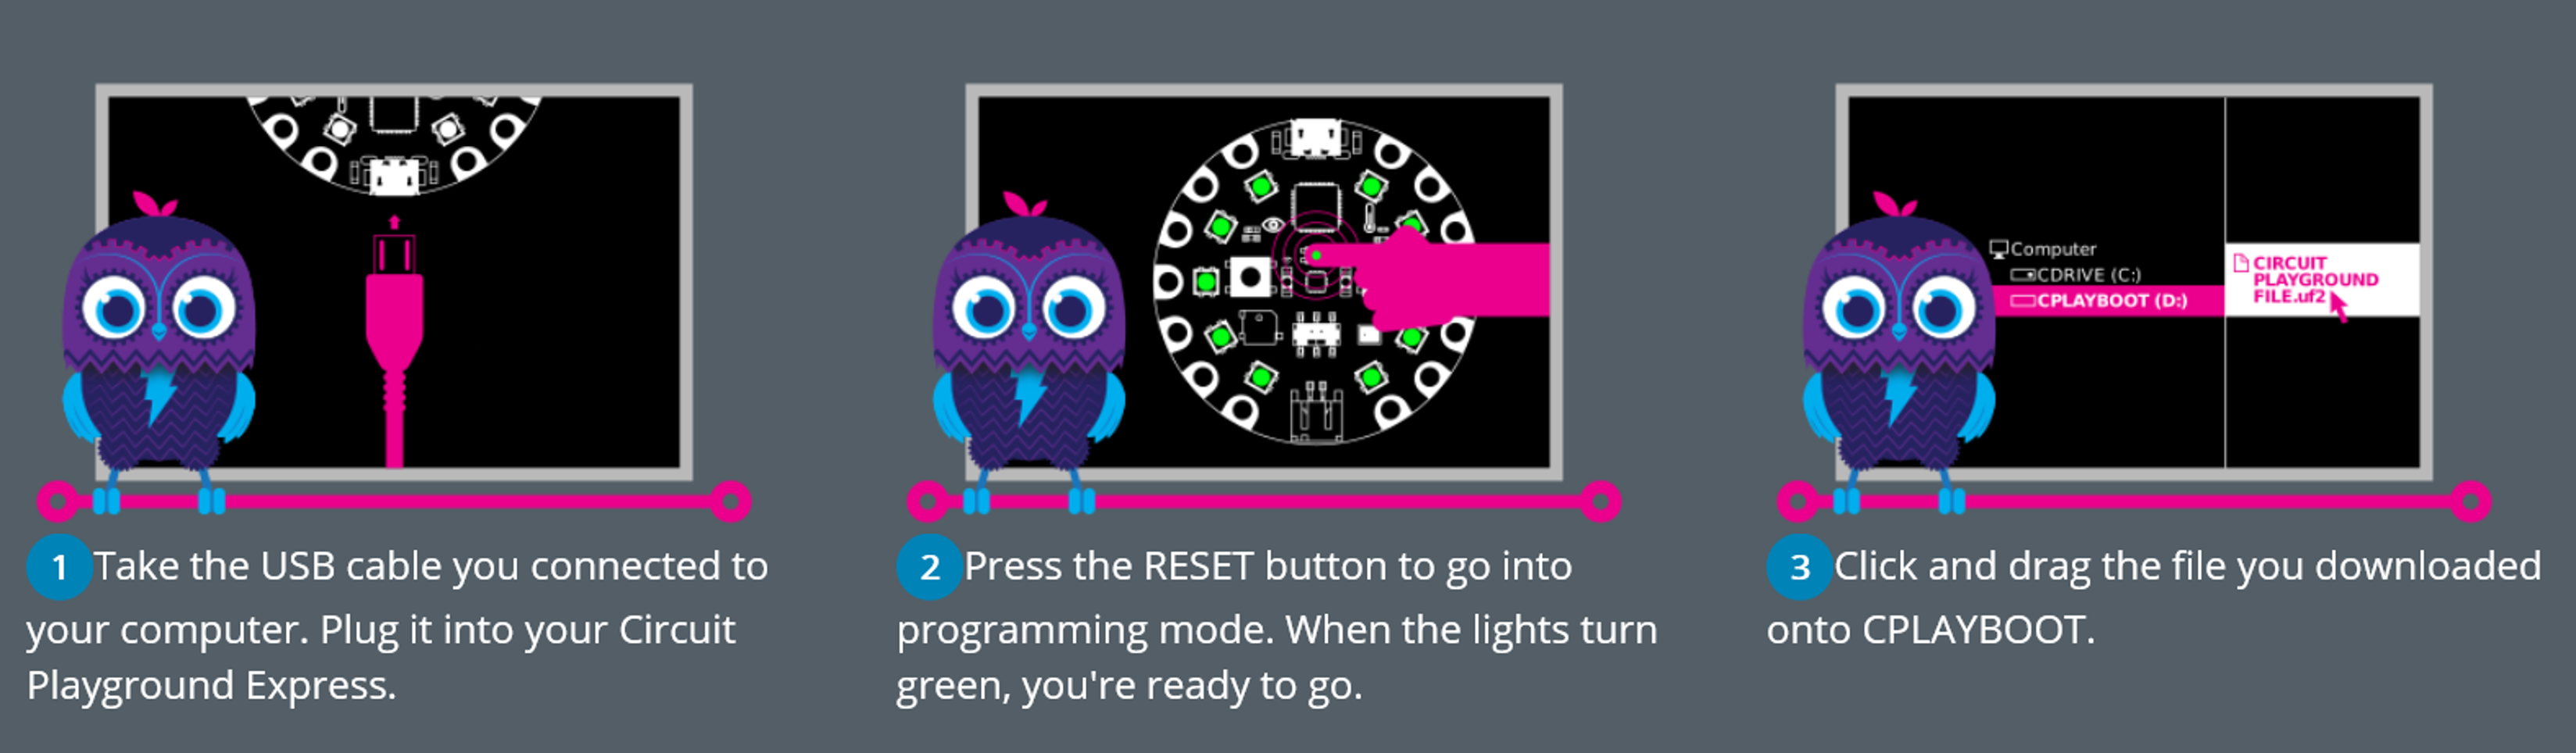
Figure. After you click the pink ‘Download’ button in MakeCode, the MakeCode interface shows this three-stage prompt for transferring the downloaded .uf2 file to the CPX.
We will show you how to do this for both Windows and Mac.
Manual download with Mac
Video. Downloading a MakeCode program and transferring it to the CPX using a Mac.
Manual download with Windows
Video. Manually downloading and transferring your MakeCode program onto the CPX using Windows (YouTube link)
Direct download using WebUSB
In this video, we walk you through how to directly download your MakeCode program onto the CPX using WebUSB. This is a far more ideal and seamless way to program the MakeCode but doesn’t always work reliably. You must use either Chrome or Microsoft Edge web browsers and should work for either Mac or Windows.
Video. Directly downloading your MakeCode program to the CPX using WebUSB (YouTube link)
Sharing our MakeCode program
If you want to share your program with others, click on the Share button in the navbar and copy/paste the provided URL. See the video below.
Video. To share your MakeCode program with others, click on the Share button in the navbar and copy/paste the url link. Code link.
Design Activity
We did it! We successfully built our first program in MakeCode, ran it in the simulator, and then downloaded it to our actual CPX hardware. We also learned about adding sound and sharing our program with others.
For this lesson’s design challenge, try seeing how many different ways you can build interesting light patterns with MakeCode using commands such show animation, photon, and more! Below, we’ve included a simple example but you can do so much more!
Video. A very simple playground of different NeoPixel animations built in to MakeCode Code link. We are also using console out commands to help us reference the various animations.
Next Lesson
In the next lesson, we’ll make our first interactive program: a button piano!