ESP32
Table of Contents
- Which boards do we use?
- How does the Arduino Uno or Leonardo differ from ESP32?
- Programming the ESP32
- ESP32 Fundamentals
- ESP32 Wireless
- What’s next?
Welcome 👋 to the ESP32 module! The ESP32 is a fast, low-cost, WiFi- and Bluetooth-enabled microcontroller that has become the platform for Internet of Things (IoT) projects. And the best part? You can program it with Arduino—so everything you learned in the Intro to Arduino series carries over!
In this module, you’ll learn how the ESP32 differs from the Arduino boards you’ve used before, and you’ll build projects that blink LEDs, fade lights with PWM, play tones, sense capacitive touch, connect to the cloud ☁️, and communicate wirelessly over Bluetooth 📡. Let’s go! 🚀
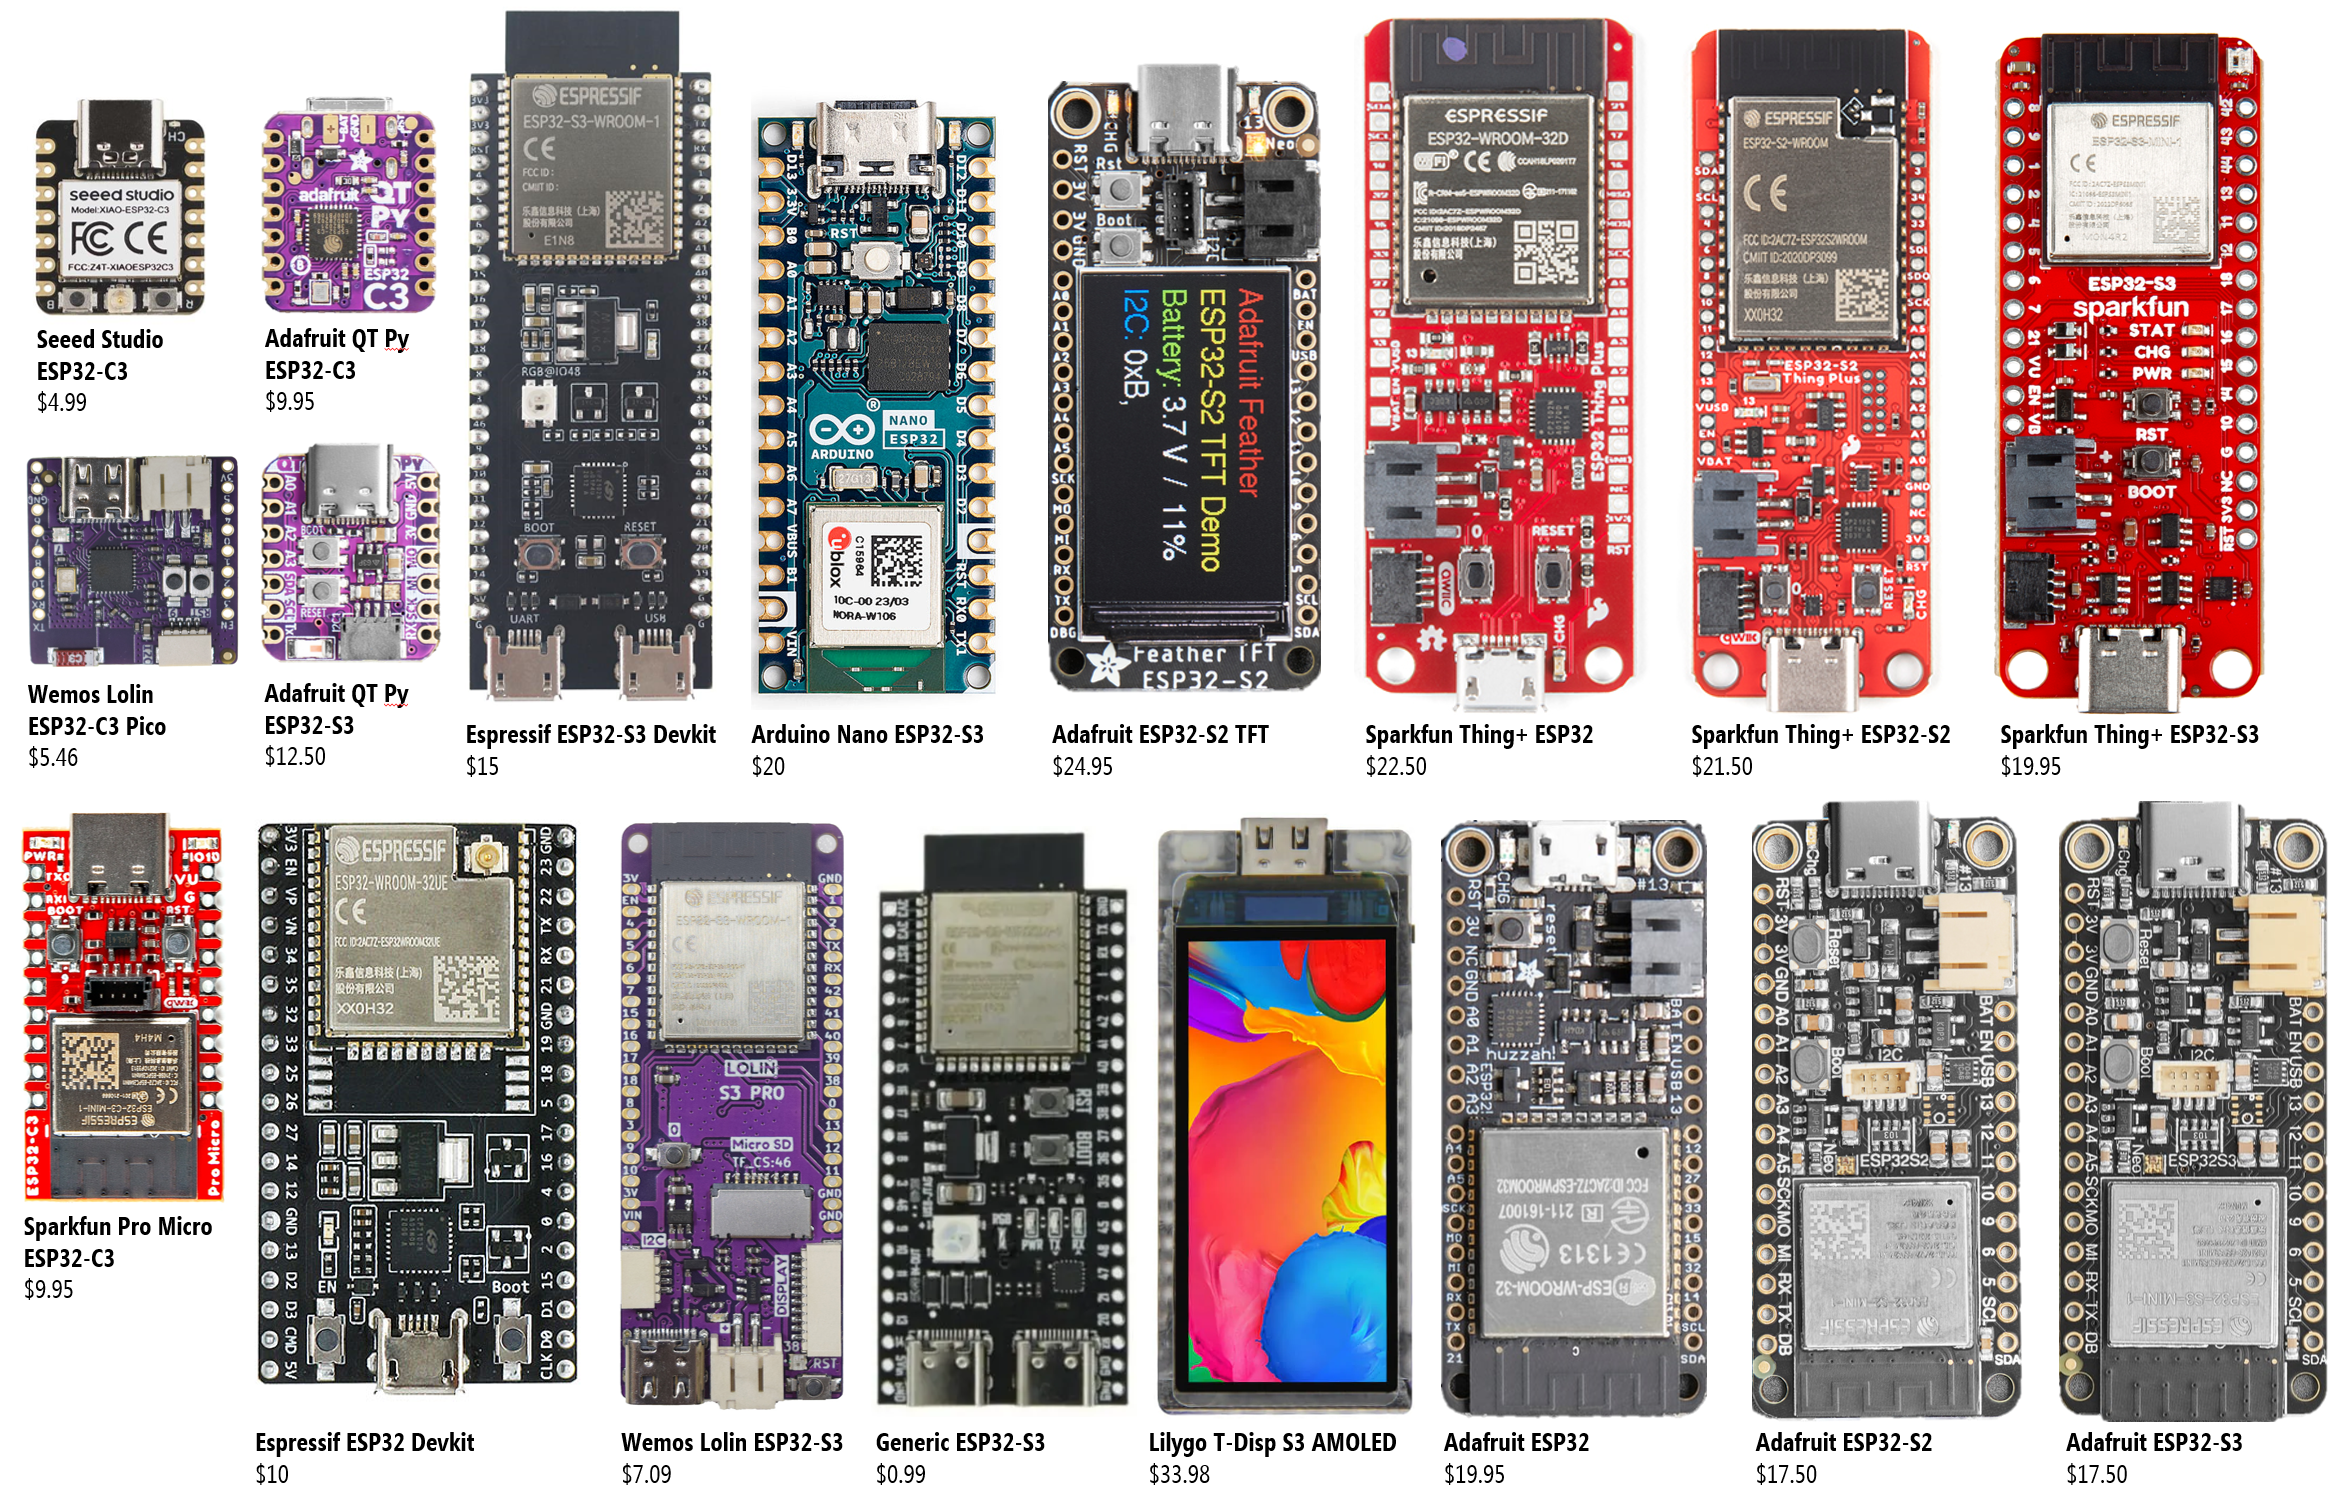 Figure. The ESP32 family includes dozens of variants from Espressif and third-party manufacturers. They are fast (up to 240 MHz dual-core), have built-in WiFi and Bluetooth, and many development boards cost around $10 USD!
The ESP32 lessons assume you have completed both our Intro to Electronics and Intro to Arduino tutorial series. While not absolutely necessary, we build on concepts from those modules—like voltage dividers,
digitalWrite,analogWrite, and PWM—without re-explaining them here. If this is your first time on our website, welcome 👋🏽—we recommend starting there!
The module is split into two sub-series:
- Fundamentals — getting set up with the ESP32 board, blinking LEDs, fading with PWM, analog input, tone generation, and capacitive touch. This is the place to start if you’re new to the ESP32.
- Wireless — what makes the ESP32 special: connecting to the cloud over WiFi, talking to your computer over Bluetooth Classic, and using Bluetooth Low Energy (BLE) for phone-friendly, low-power wireless projects.
Which boards do we use?
For our tutorial series, we use Adafruit’s ESP32 boards in the Feather form factor; however, you should be able to use almost any ESP32 board on the market and follow along (you might need to change pin numbers). Specifically, our lessons use:
-
The Adafruit ESP32-S3 Feather (4MB Flash, 2MB PSRAM) — our primary board for Spring 2026. Features native USB-C, WiFi, BLE 5.0, and an onboard NeoPixel.
-
The Adafruit Huzzah32 ESP32 Feather — uses the original ESP32. Our earlier videos and Fritzing diagrams reference this board, but all code transfers directly to the S3.
Because both boards share the Feather form factor and use the same ESP32 Arduino core, the lessons work with either board—you’ll just need to consult the correct pin diagram. We’ll note specific differences where they arise. See Lesson 1: Introduction to the ESP32 for detailed specs, pin diagrams, and a side-by-side comparison with the Arduino Uno.
You can find far cheaper ESP32 boards on AliExpress or Amazon—sometimes just a few dollars—and our lessons should work with them too. Adafruit boards cost more but offer reliable build quality, thorough documentation, and the Feather ecosystem of stackable expansion boards (“FeatherWings”).
Chips, modules, and development boards
Before we begin, it’s worth clarifying the differences between chips, modules, and development boards—since the terminology can be confusing and the layering actually explains the price differences you’ll see online.
- The chip: Espressif designs the ESP32-S3 chip (the bare SoC). Working with bare silicon is difficult: it requires custom printed circuit boards (PCBs), complex surface-mount soldering, and precise RF antenna tuning.
- The module: To simplify manufacturing, Espressif packages the chip into modules (like the ESP32-S3-WROOM-1). Modules add flash memory, an integrated antenna, and metal RF shielding. Crucially, they are pre-certified by the FCC, saving hardware designers from expensive regulatory testing. However, you still can’t easily plug a module into a laptop or a breadboard.
- The development board: This is where the maker companies like Adafruit and Sparkfun come in. They bridge the gap between industrial components and human-usable prototyping tools. They take the Espressif module and build a development board around it, adding the missing essentials: a USB connector, a USB interface for programming and serial communication, a 3.3V voltage regulator (since USB provides 5V), battery charging circuitry, and breadboard-friendly header pins.
That’s why an Adafruit ESP32-S3 Feather costs ~$18 while a bare Espressif module costs a few dollars. You’re paying for the hardware that makes the chip accessible, standard form factors (like the plug-and-play Feather ecosystem), and high-quality documentation.
Because your code targets the underlying ESP32 or ESP32-S3 chip, it runs identically across all these boards—only the pin layout and onboard peripherals differ. We discuss the specific pin diagrams for our boards in Lesson 1.
How does the Arduino Uno or Leonardo differ from ESP32?
If you’re coming from the Intro to Arduino series, here are the key things to know upfront:
The ESP32 runs on 3.3V power and logic, not 5V like the Arduino Uno and Leonardo. This affects how you interface with sensors and LEDs—and you can damage your board by applying 5V to a GPIO pin! We’ll cover this in detail in Lesson 1.
- Way more computational power: The ESP32 runs at up to 240 MHz with a 32-bit dual-core processor—15x faster than the 16 MHz, 8-bit ATmega chips in the Uno and Leonardo, with vastly more memory.
- WiFi and Bluetooth built in: No shields needed! This is what makes the ESP32 ideal for IoT projects.
- More pins, more PWM: The ESP32 has more GPIO pins, and all of them can do PWM (not just 6 like the Uno).
- 12-bit ADC: The ESP32’s analog-to-digital converter has 12-bit resolution (0–4095) compared to the Uno’s 10-bit (0–1023).
- Different PWM and tone APIs: The ESP32 Arduino library uses a different approach for PWM output and tone generation—we’ll walk you through it!
- Native USB (ESP32-S3): The ESP32-S3 has native USB support, so it can act as a keyboard, mouse, MIDI device, or disk drive—no external USB-to-serial converter needed.
- Capacitive touch sensing: The ESP32 has built-in capacitive touch hardware—no external components required.
Programming the ESP32
For our learning series, we program the ESP32 using Arduino (C/C++)—specifically, Espressif’s open-source Arduino core for the ESP32 family. This means most of your prior Arduino learning transfers directly (woohoo! 🎉). You can use the same Arduino IDE, the same setup()/loop() structure, and many of the same functions like digitalRead, analogRead, and Serial.print.
The tradeoff is that the Arduino core is a convenience layer on top of the ESP32’s native SDK. It doesn’t expose all of the chip’s features—you can see the supported libraries here—and it adds some overhead compared to programming the chip directly. For our purposes, though, Arduino is a good choice: it lets us focus on learning physical computing concepts rather than wrestling with a new toolchain.
That said, the ESP32 is completely independent of the Arduino ecosystem—just as you don’t have to use Arduino to program the ATmega328P (used in the Uno) or the ATmega32u4 (used in the Leonardo), you don’t have to use Arduino to program the ESP32. Here are some alternatives you may want to explore in the future:
- ESP-IDF (C/C++): Espressif’s official IoT Development Framework is a production-grade, FreeRTOS-based SDK that provides full access to the ESP32’s hardware. It’s what you’d likely use in industry—more powerful and efficient, but also more complex. If you want to try it, follow the ESP-IDF Getting Started guide.
- CircuitPython / MicroPython: Python-based alternatives that are great for rapid prototyping. See Adafruit’s CircuitPython guide for the ESP32-S3 Feather.
- PlatformIO: A professional IDE and build system that supports ESP32 with both Arduino and ESP-IDF frameworks, and integrates with VS Code.
ESP32 Fundamentals
🚦 Start Here! Begin with the Fundamentals series to get comfortable with the ESP32 board, its 3.3V logic, and its differences from the Arduino Uno/Leonardo. You’ll blink LEDs, fade with PWM (using the new LEDC API), read analog input with the 12-bit ADC, play tones, and use the ESP32’s built-in capacitive touch sensing—all foundational skills before moving on to wireless.
Start the Fundamentals lessons →
ESP32 Wireless
In the Wireless series, you’ll explore what makes the ESP32 truly special: building IoT projects with WiFi and Adafruit IO, wirelessly streaming sensor data over Bluetooth Classic SPP, and using Bluetooth Low Energy (BLE) to talk to iPhones, Android phones, and Chrome via Web Bluetooth.
All ESP32 code is open source and in this GitHub repository.
What’s next?
Once you’ve completed both sub-series, you’ll have a solid foundation for building WiFi-connected, Bluetooth-enabled, sensor-driven projects. Consider exploring more advanced topics like BLE HID devices (making your ESP32 act as a wireless keyboard or game controller), deep sleep for battery-powered projects, or building your own web server directly on the ESP32!