Lesson 6: ml5.js Serial
Table of Contents
- Machine learning frameworks
- Recognizing human poses with BodyPose
- Building our first ml5.js + Arduino app: NoseTracker
- Introducing FlappyNose
- Lesson Summary
- Exercises
- Resources
- Next Lesson
In this lesson, we will extend our learning on Web Serial and p5.js to incorporate a machine learning (ML) framework called ml5.js. While integrating machine learning into our designs may seem intimidating, just as p5.js makes it easier to play and experiment with interactive graphics in JavaScript so too does ml5.js make it easier to play and experiment with machine learning. It’s really quite amazing!
For example, with only a few lines of JavaScript code and some slight modifications to our FlappyBird.ino Arduino sketch (updated to FlappyBirdSerialIn.ino), we can play FlappyBird with our nose using a real-time web camera stream and ml5’s BodyPose library.
Video. Playing Flappy Bird on the Arduino Leonardo by tracking my nose position using p5.js, ml5.js, and Web Serial. The p5.js app is called NoseTracker (p5.js online editor, GitHub live page, GitHub code). The Arduino sketch is FlappyBirdSerialIn.ino. Note: this video was created using ml5.js v0.12 with PoseNet; the current lesson uses ml5.js v1.x with BodyPose, but the behavior is the same.
In this lesson, we’ll show how to do this and more. But first, let’s start with some background on machine learning frameworks before diving into ml5.js and ml5+Arduino more specifically.
In this lesson, you will learn:
- What ml5.js is and how it relates to TensorFlow.js
- How to use ml5’s BodyPose model for real-time pose estimation in the browser
- How to extract keypoint data (like the nose position) from detected poses
- How to transmit pose data to Arduino via Web Serial
- How to build a fun NoseTracker app and use it to play FlappyBird with your face!
- Important ethical considerations around ML training data and bias
Library version note: ml5.js underwent a major rewrite from v0.x to v1.x (released August 2024). The old
PoseNetAPI was replaced byBodyPose(using MoveNet and BlazePose models). If you find older tutorials online that useml5.poseNet(), those use the deprecated v0.x API. This lesson uses ml5.js v1.3.1 with the new BodyPose API. See the ml5.js v1.0 release blog post for details.
Machine learning frameworks
Video. In our MS course on Ubiquitous Computing, students build a real-time gesture recognizer from the “ground up” using an LIS3DH accelerometer, Arduino, and Python. We use the machine learning framework called scikit-learn. Full YouTube video.
In our Computer Science and Engineering Master’s course on Ubiquitous Computing, we teach a ~4-week module on filtering, interpreting, and classifying sensor data. Students learn and experience the full classification pipeline: collecting data, writing code to process and visualize that data, identifying and extracting unique features for classification, and writing code to classify those features. For example, students build custom accelerometer-based step trackers and 3D-gesture recognizers using Arduino and Python. See video above.
To get there, we cover topics in digital signal processing and signal classification, including cross-correlation, dynamic time warping, and frequency analysis before diving into heuristic-based classification, template matching, and supervised learning (e.g., support-vector machines). These topics alone are wide-ranging, dense, and worthy of their own courses—indeed, engineering departments typically offer multiple courses in DSP and machine learning. While our MS course provides a rapid tour with an applied perspective, there are still significant barriers to entry such as building familiarity with mathematical notation, technical nomenclature, and learning relevant toolkits/libraries.
For example, in our 4-week module, we use Python3, Jupyter Notebook and a variety of incredibly powerful but not particularly approachable signal processing and machine learning frameworks including NumPy, SciPy, pandas, sci-kit learn, and matplotlib. Whew! While these frameworks provide comprehensive libraries for processing, classifying, and visualizing data—and make it much easier to analyze and build ML systems—they have a relatively high bar for entry. As Daniel Shiffman emphasizes in his introduction to ml5:
Machine learning frameworks are commonly geared for people with advanced knowledge of calculus, linear algebra, statistics, data science, and several years of programming in a language like python or C++. While important for research and development of new machine learning models and architectures, starting from this point can turn away newcomers with other backgrounds. Rather than thinking creatively about how to use machine learning as an artistic platform, beginners may be overwhelmed by fine distinctions between scalars, vectors, matrices, operations, inputs layers, outputs, and more.
And what if we don’t need (or want) to train our own classifiers or deeply engage with signal analysis? What if we just want to play and experiment with pre-trained models and/or state-of-the-art classification techniques to create new interactive experiences? Fortunately, there are many emerging possibilities!
Making machine learning accessible
Since its inception, researchers have worked to make machine learning more accessible to creators such as musicians, artists, designers, and hobbyists. For example, in 2009, Fiebrink and colleagues created the Wekinator to allow “musicians, composers, and new instrument designers to interactively train and modify many standard machine learning algorithms in real-time.” Six years prior, Jerry Fails and Dan Olsen Jr. introduced Crayons, an interactive machine-learning model that enabled users to train, classify, and correct pixel-based classifications via sketching (see Figure below).
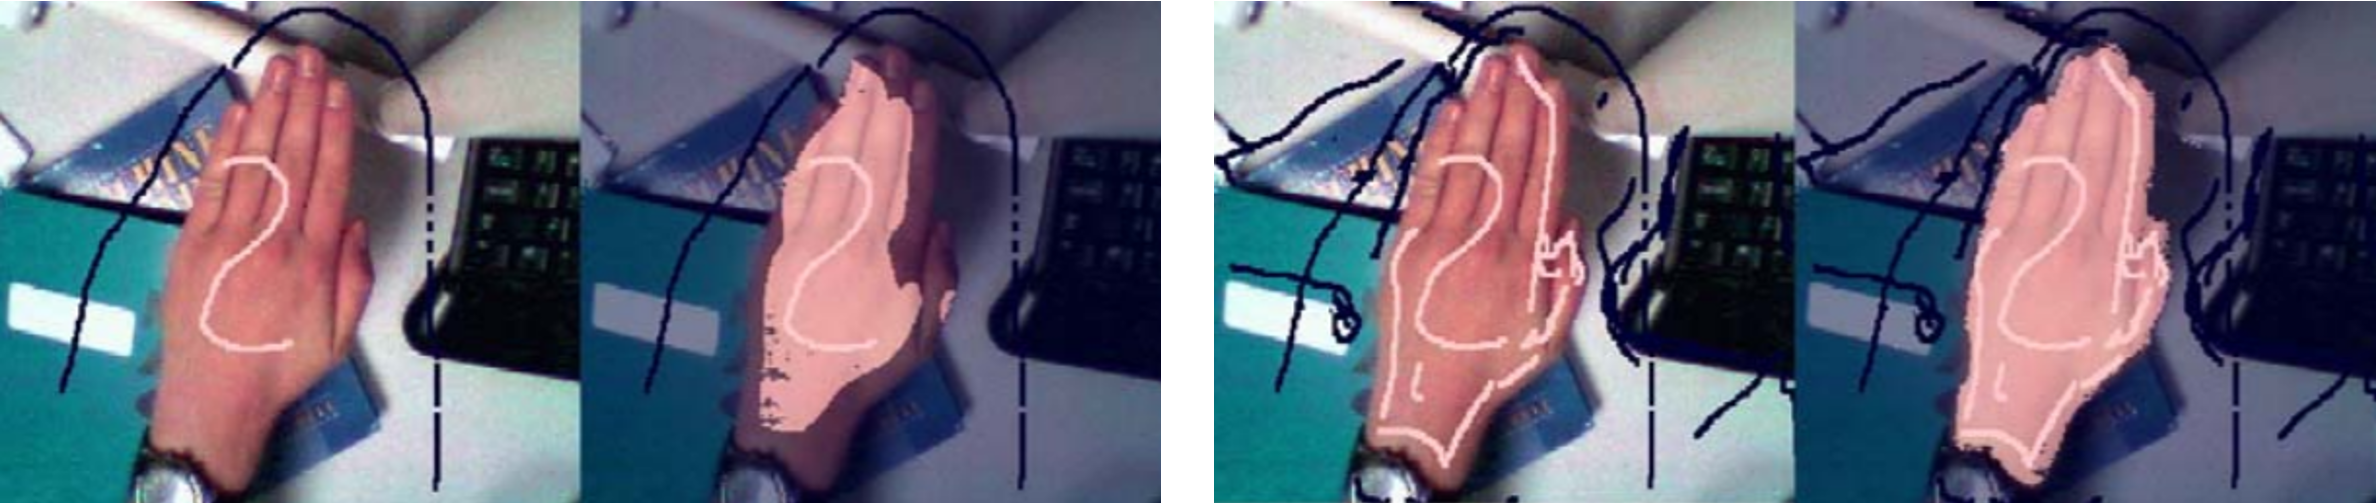 Figure. The Crayons’ interactive machine learning process for auto-segmenting pixel “blobs” in images. Users rapidly sketch over pixels to include and exclude from classification—in this case, segmenting a human hand—immediately see the ML model’s response (highlighted pixels) and then make corrections. See full video demo here.
As machine learning techniques have matured, so too have libraries to make them more accessible, including Google’s Teachable Machine, Runway ML, and ml5.js—all of which run in the web browser and work with JavaScript!
As a testament to these toolkits, machine learning is increasingly becoming another prototyping material. Just as we prototype with code, electronics, and crafts so too can we prototype with ML, unlocking new opportunities for computational creativity and new applications! However powerful, ML can also be dangerous and nefariously applied—governments using facial recognition to surveil without consent, models furthering systemic racial or gender bias, and/or technologists over-inflating ML’s abilities, endangering end-users and possibly leading to death. So, let’s approach these ML frameworks with caution—they are imperfect and probabilistic. As the Peter Parker principle states:
With great power comes great responsibility
Though this lesson will not dive deeply into ML, our hope is that it will serve as an accessible pathway to advance your understanding of how ML works, the importance of data and model training, and the socio-technical implications of creating ML-reliant technology. For example, we’ll be using the ml5 BodyPose library to recognize human bodies—how well do you think this model works across different body types, ages, and skin colors? The answer will be based on the training set for the neural net model. If the training set is largely composed of images of tall, skinny, middle-age white males in business casual clothing and perfect ambient lighting conditions with solid backgrounds, it’s unlikely that BodyPose will work well across other demographics, body types, skin colors, and environments. It’s important that we constantly think about how our ML systems are trained, where the data comes from, and how well the ML systems will perform across contexts.
Friendly machine learning on the web: ml5.js
Video. ml5.js’s pose estimation model performing real-time body tracking, built on TensorFlow.js. Note: this video uses the older PoseNet model from ml5 v0.x; the current version uses BodyPose with MoveNet/BlazePose, which offers improved accuracy and performance.
In this lesson, we will be using ml5.js, which provides an easy-to-use wrapper library around Google’s TensorFlow.js and is designed to work well with p5.js (hence, the ‘5’ in the name!).
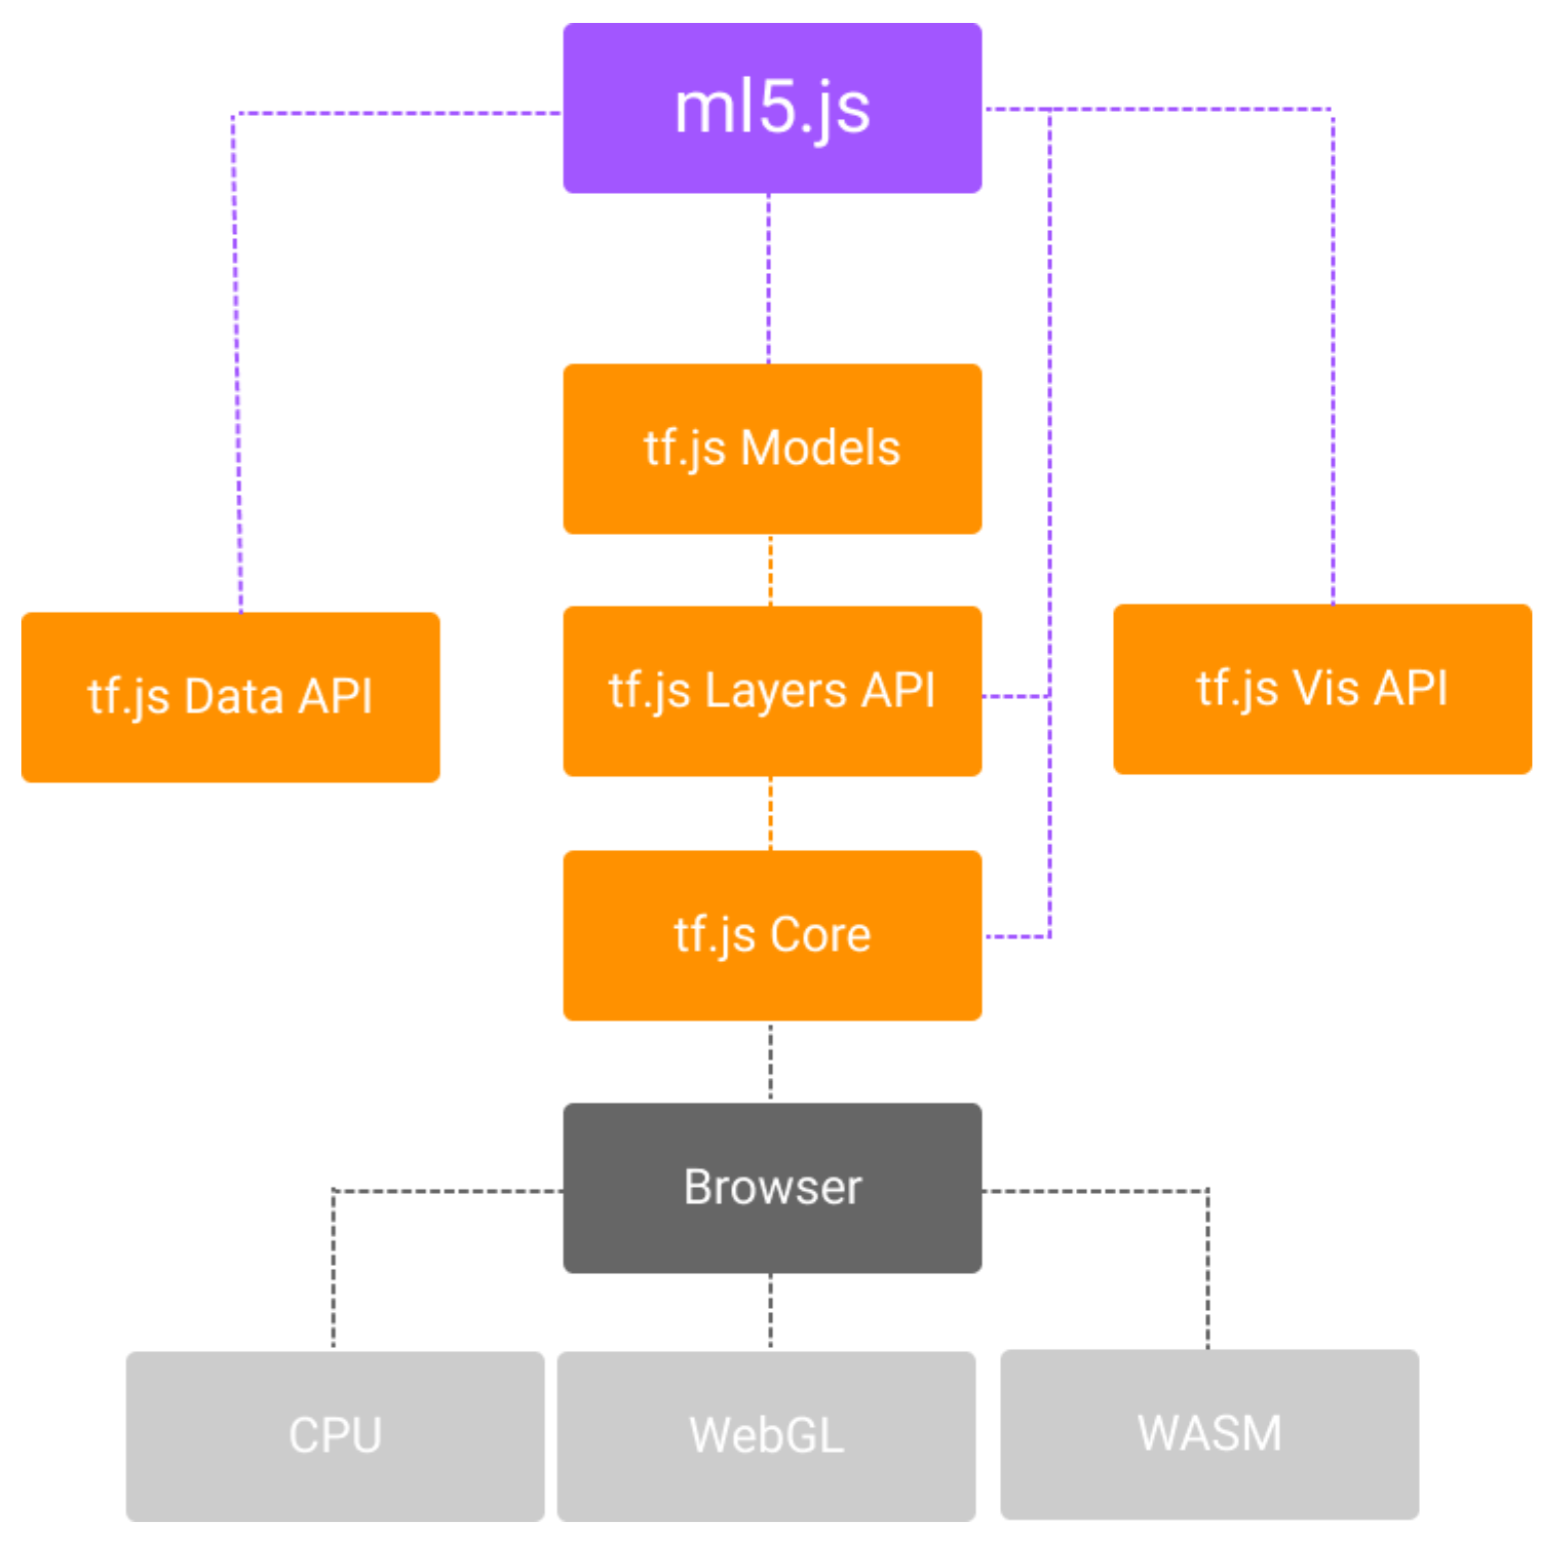
Figure. ml5.js is built on top of Google’s TensorFlow.js. It uses TensorFlow models, layers, and data API but abstracts them into a novice-friendly programming interface. Diagram from Yining Shi’s “Machine Learning for the Web” course at ITP, NYU (link)
As the ml5 About Page states:
ml5 is not just about developing machine learning software, it is about making machine learning approachable for a broad audience of artists, creative coders, and students. The library provides access to machine learning algorithms and models in the browser, building on top of TensorFlow.js with no other external dependencies
You can read more about ml5’s history here. ml5.js is open source on GitHub.
Getting started with ml5.js
To get started with ml5.js, we recommend reading the official ml5.js Reference documentation and watching some of Daniel Shiffman’s Coding Train YouTube videos on ml5.js, which includes wonderful tutorials on BodyPose detection, HandPose, FaceMesh, image classification, sound classification, and more!
Video. The first video in Shiffman’s Coding Train YouTube series on “Beginner’s Guide to Machine Learning with ml5.js”. We highly recommend all Coding Train videos!
Why not embedded machine learning?
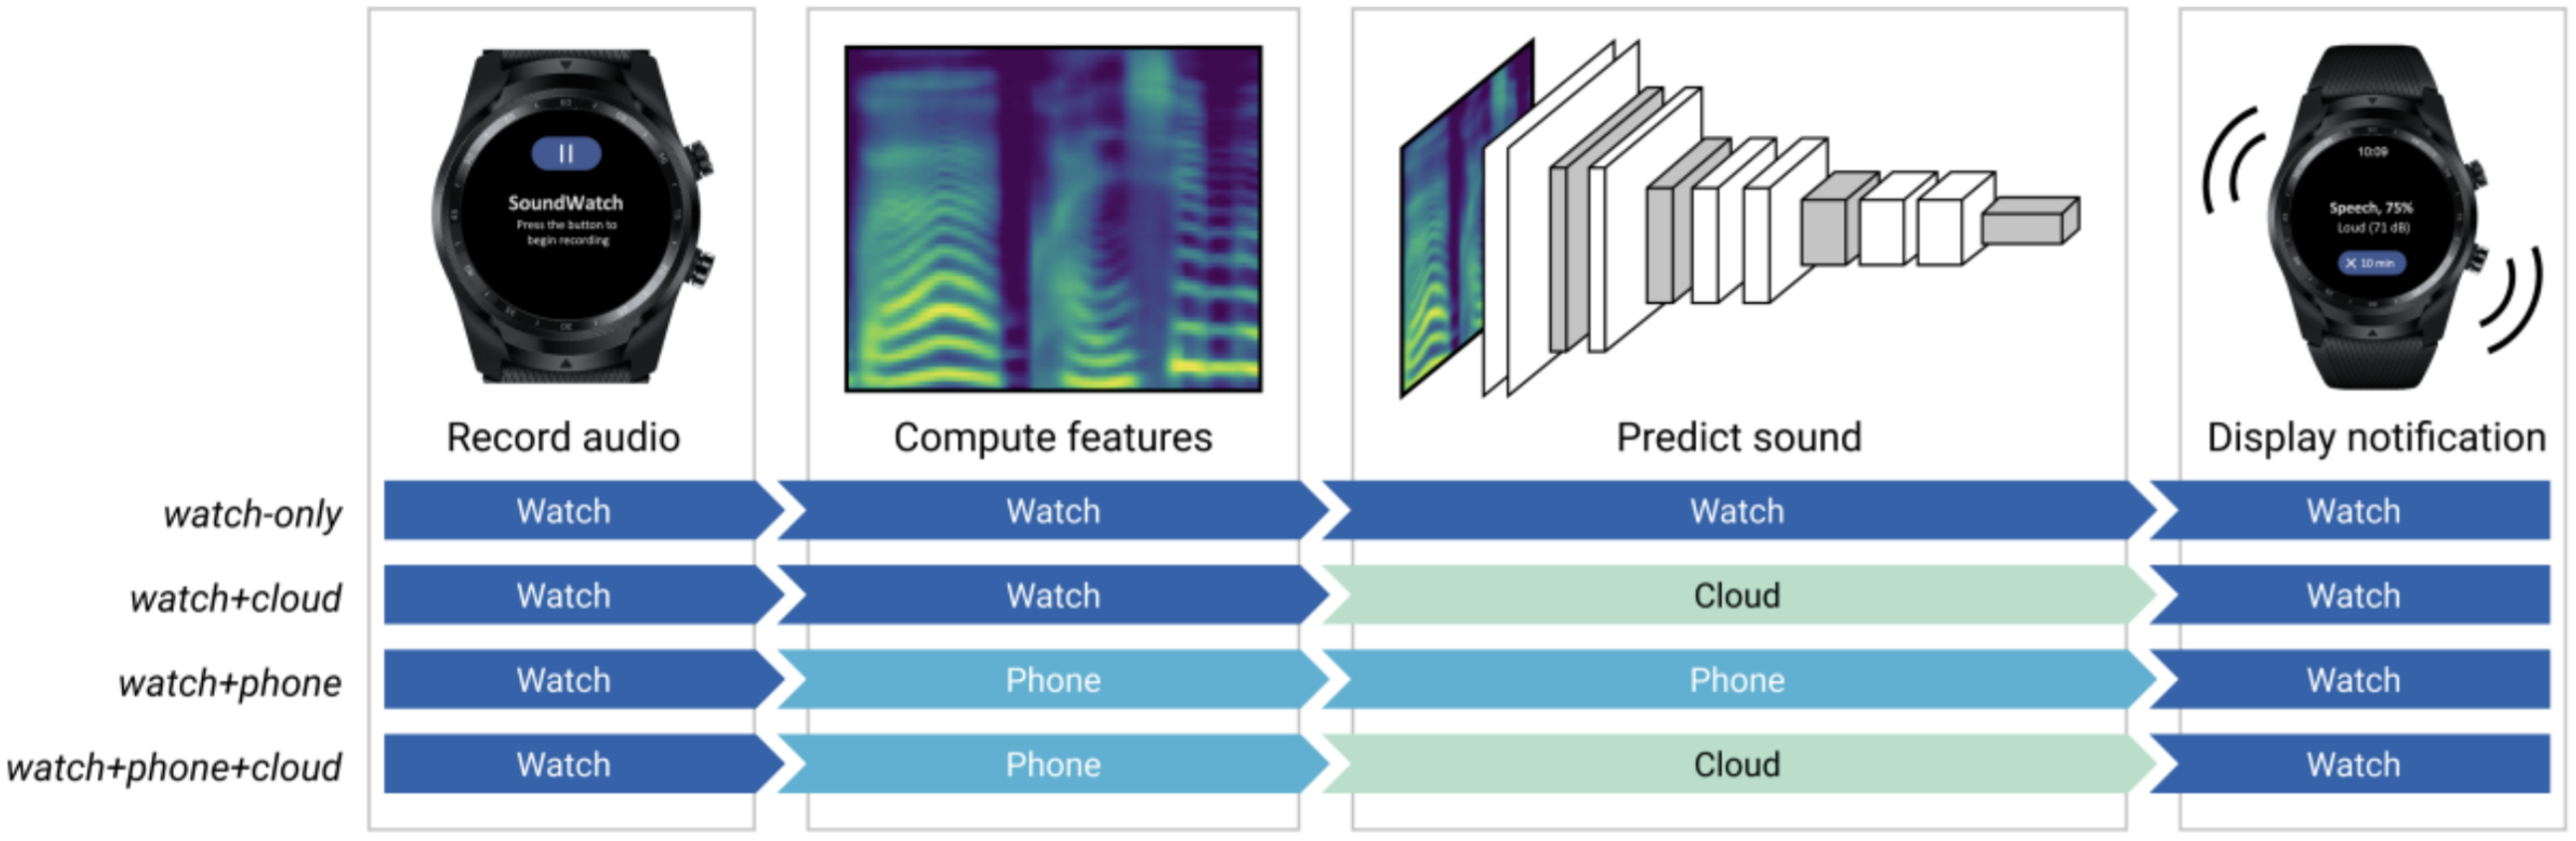 Figure. There are many possibilities for how to architect embedded/IoT ML systems depending on power, computation, and latency requirements. In our ASSETS’20 paper for SoundWatch, for example, we explore four different ML architectures: watch-only, watch+phone, watch+phone+cloud, and watch+cloud.
As this is a physical computing course, one may rightly ask: why not teach embedded machine learning where the ML model runs locally on the Arduino or IoT device rather than on a computer or in the cloud? This is a great question with a multifold response:
- First, when initially learning ML—even in the applied sense—we think the desktop provides a more approachable learning environment. The tools are more mature, it’s easier to visualize and understand the data and the ML model, and it’s easier to debug and iterate.
- While new ML frameworks like TensorFlow Lite are designed specifically for mobile and low-resource devices, the community is still small with commensurately few examples. And, again, running a model directly on Arduino increases training, testing, and iterating complexity. We should start simply and grow outward!
- Finally, even “smart” IoT or wearable devices that use machine learning often rely on cloud-based APIs for classification. The device itself might preprocess the data or extract features for the cloud but the full classifier runs off-device. For example, our SoundWatch system classifies and visualizes sounds in real-time on a smartwatch for people who are d/Deaf or hard of hearing. In our ASSETS’20 paper, we explore four different classification architectures: watch-only, watch+phone, watch+phone+cloud, and watch+cloud. There are many possibilities for how to architect embedded/IoT ML systems depending on power, computation, and latency requirements.
In this lesson, we will not be classifying sensor streams off the Arduino but rather classifying web camera data with ml5.js and transmitting derived information to Arduino via Web Serial.
Recognizing human poses with BodyPose
In this section, we will use p5.js to capture a real-time webcam stream and ml5.js to recognize objects in that stream—specifically the human body and key body parts therein.
Recognizing parts of the human body in images/video is a type of computer vision problem called “pose estimation.” Importantly, pose estimation does not recognize who is in an image or video, it simply identifies whether there are humans and, if so, provides data about their body parts (e.g., an x,y position of an ankle or nose). This has long been a challenging computer vision problem. Prior work often relied on specialized cameras, like the Microsoft Kinect, to capture and identify human poses.
In 2018, Google released PoseNet for TensorFlow.js, enabling real-time pose estimation in the browser. Since then, the models have improved significantly. ml5.js v1.x now uses BodyPose, which wraps Google’s MoveNet and BlazePose models. These newer models are faster, more accurate, and support 3D coordinates.
MoveNet vs BlazePose: ml5’s BodyPose supports two underlying models. MoveNet is faster and great for real-time applications (this is the default). BlazePose provides 33 keypoints with 3D coordinates but is slower. For our serial communication examples, MoveNet works great.
The BodyPose data structure
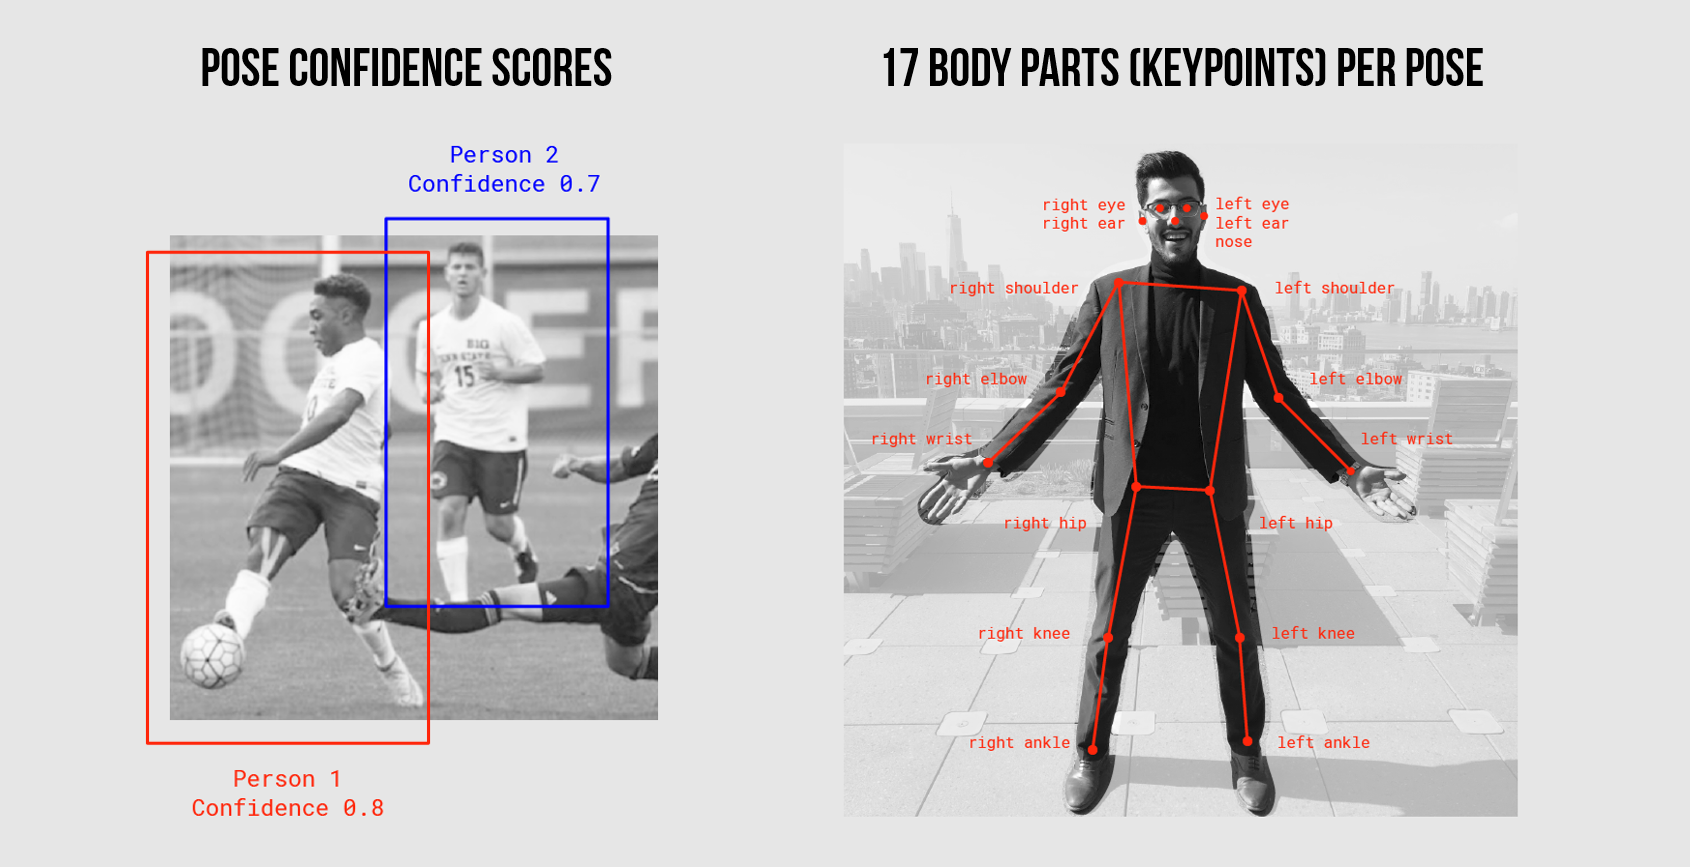 Figure. Overview of body pose detection showing keypoints on detected human figures. Images from “Real-time Human Pose Estimation in the Browser with TensorFlow.js”. Note: the MoveNet model used in ml5.js v1.x detects 17 keypoints, same as the original PoseNet.
ml5’s BodyPose returns an array of detected poses—one per human detected in a frame. For each detected person, you receive an array of keypoints. Each keypoint has a name, an x and y position (in pixels), and a confidence score (0 to 1). There are 17 keypoints with MoveNet: nose, left_eye, right_eye, left_ear, right_ear, left_shoulder, right_shoulder, left_elbow, right_elbow, left_wrist, right_wrist, left_hip, right_hip, left_knee, right_knee, left_ankle, right_ankle.
The data structure looks like this:
// poses is an array of detected people
[
  {
    // Each pose has a keypoints array and named shortcuts
    keypoints: [
      { x: 320, y: 150, confidence: 0.95, name: "nose" },
      { x: 305, y: 138, confidence: 0.91, name: "left_eye" },
      { x: 335, y: 140, confidence: 0.89, name: "right_eye" },
      // ... 17 keypoints total
    ],
    // Named shortcuts for convenience
    nose: { x: 320, y: 150, confidence: 0.95 },
    left_eye: { x: 305, y: 138, confidence: 0.91 },
    right_eye: { x: 335, y: 140, confidence: 0.89 },
    // ...
  },
  // Additional detected people...
]
v0.x vs v1.x data structure: If you’re looking at older tutorials, note that the old PoseNet API returned
poses[0].pose.nose.x(nested under aposeproperty). The new BodyPose API is flatter:poses[0].nose.x. The keypoint names also changed slightly (e.g.,leftEye→left_eye).
To make this more concrete, here’s a screenshot of our Skeleton app with Chrome’s dev tools showing a pose and skeleton object.
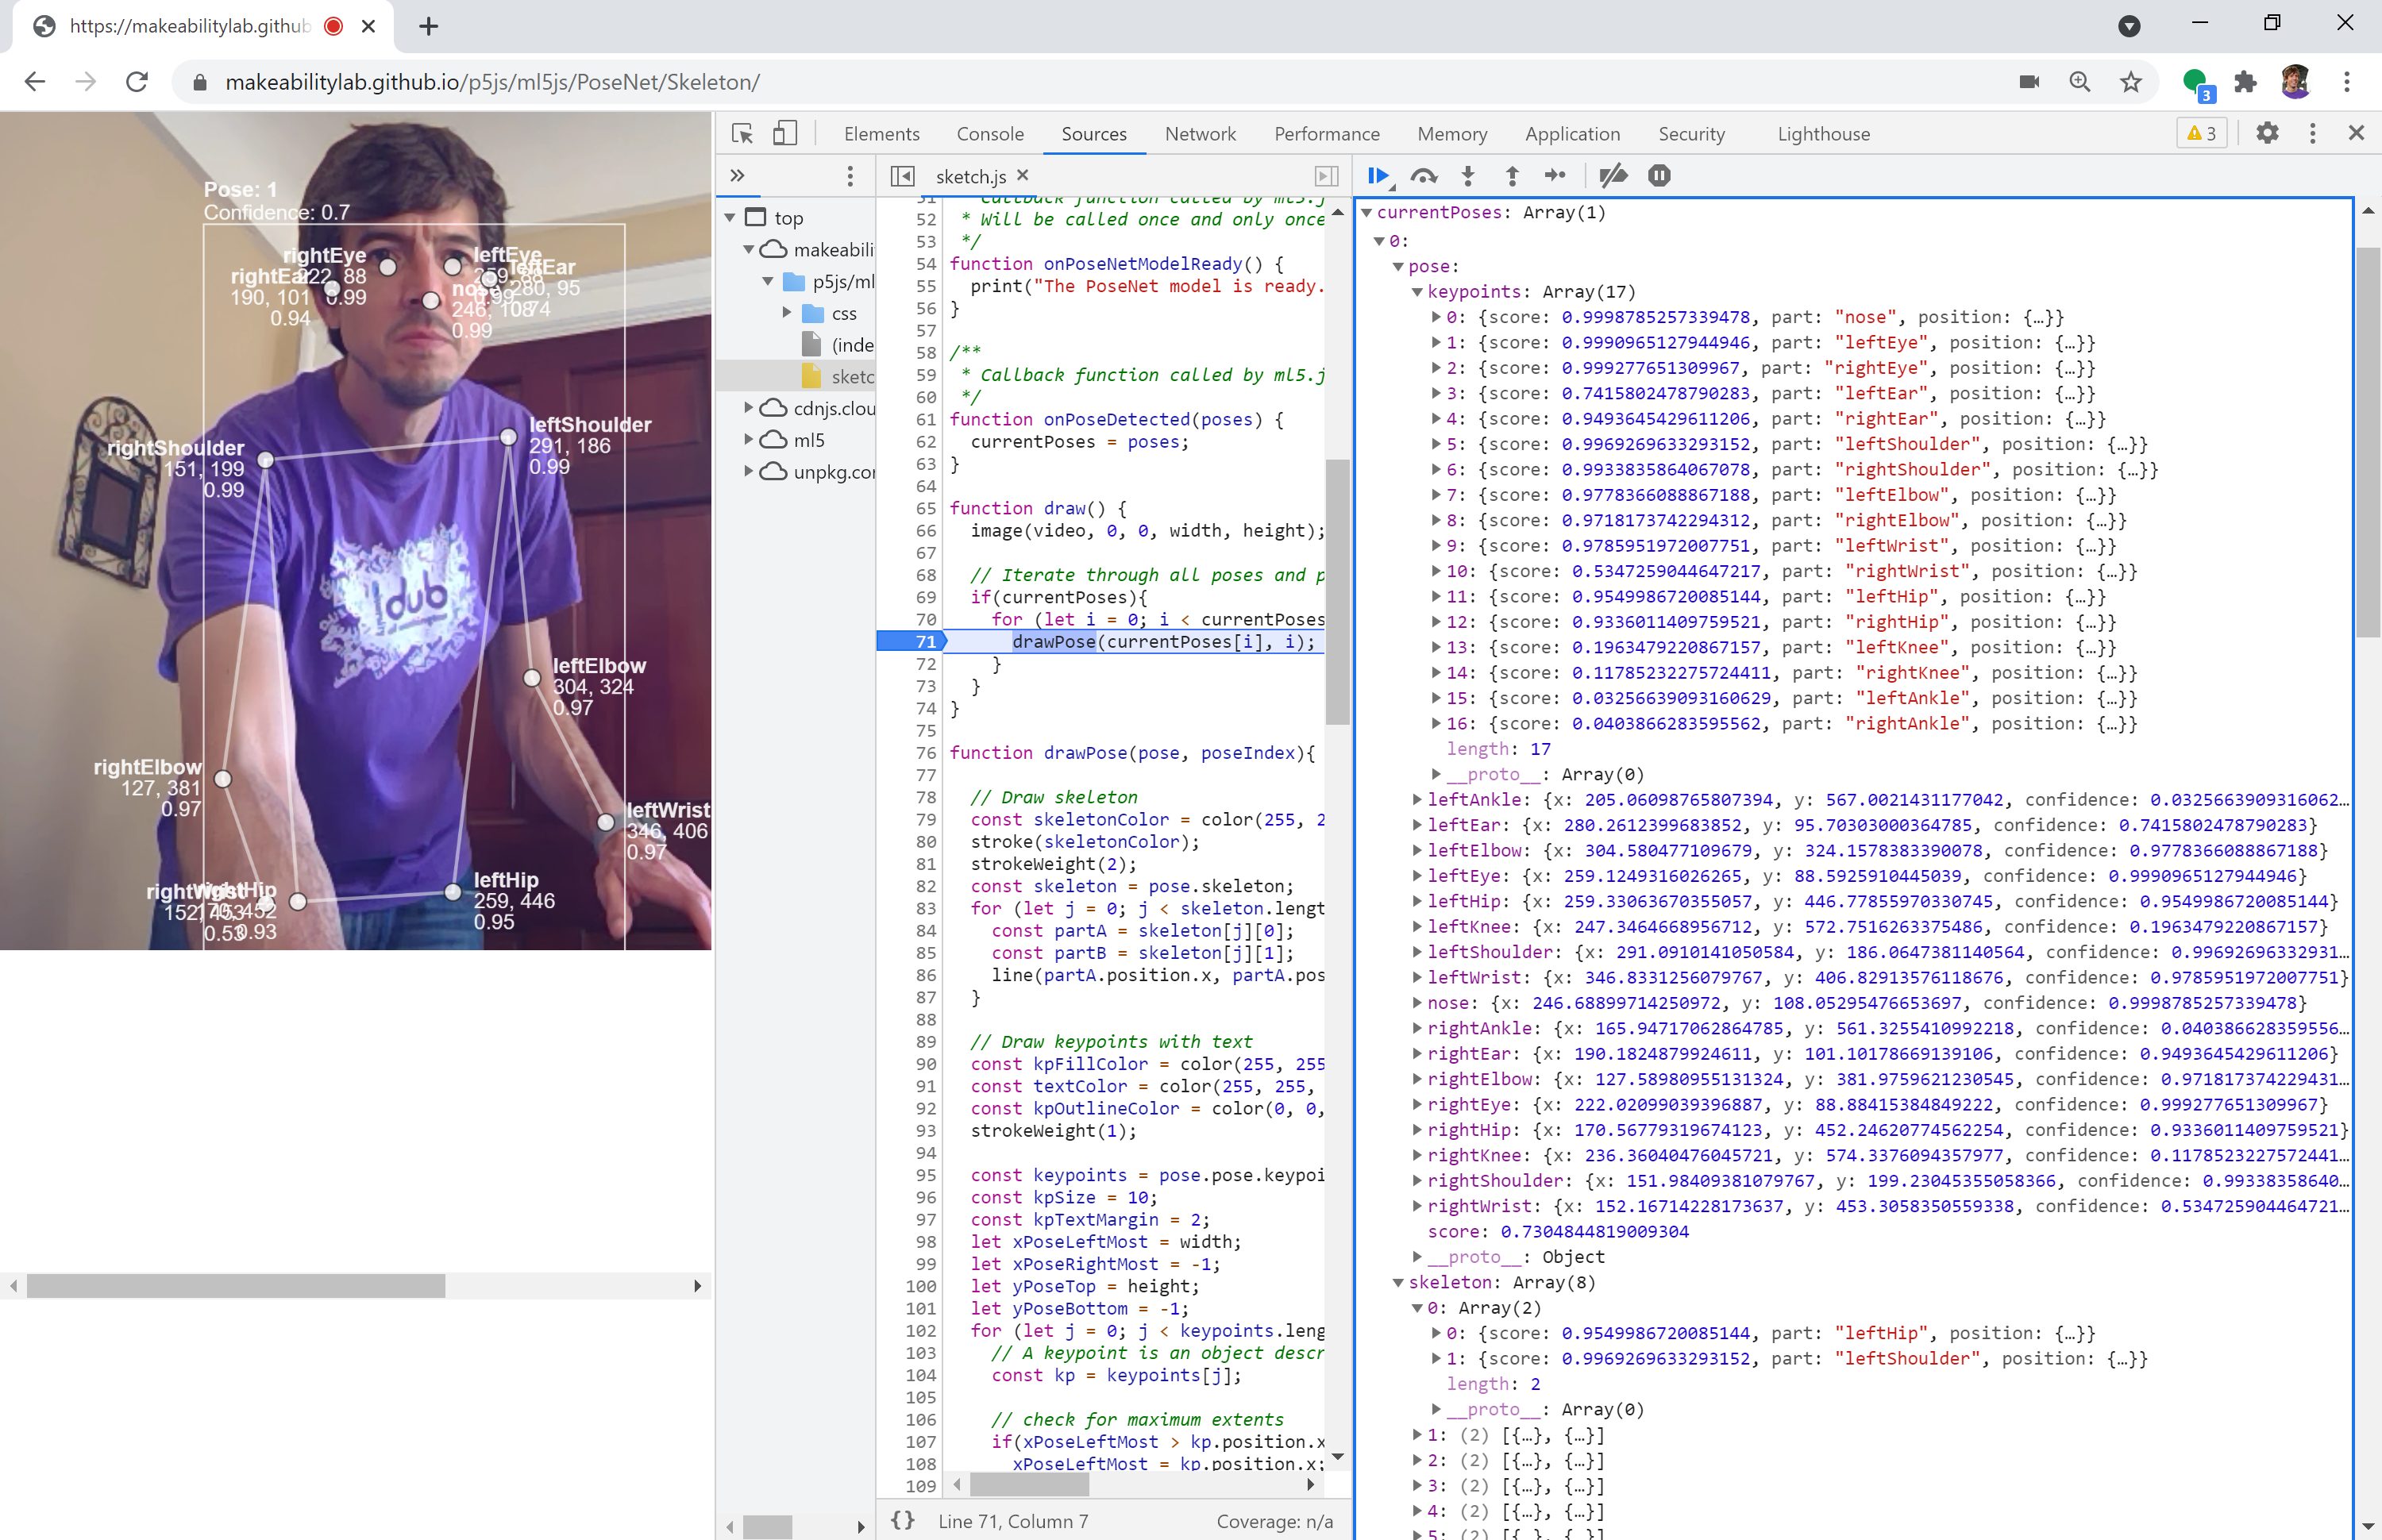 Figure. Examining the pose data structure for a single recognized person using Chrome DevTools. This screenshot shows the v0.x PoseNet data structure, where keypoints are nested under
 pose.keypoints and named shortcuts like pose.nose. In BodyPose v1.x, the structure is flatter: keypoints are directly on the pose object (e.g., poses[0].nose.x instead of poses[0].pose.nose.x), and names use underscores (e.g., left_eye instead of leftEye). To try this yourself: open a BodyPose sketch in your browser, open dev tools (Ctrl+Shift+I on Windows, Cmd+Option+I on Mac), click on the Sources tab, set a breakpoint in draw(), and inspect the poses variable in the Watch panel.
Example p5.js + ml5.js BodyPose demo
To demonstrate the ml5.js BodyPose API, we created a simple application called Skeleton that renders:
- a bounding box around each detected human showing a confidence
score - all 17 keypoints with
x,yposition and keypoint-specific confidencescores - the
skeletondata for each pose
Here’s a video demonstration:
Video. This video demonstrates ml5 pose estimation via the Skeleton application. We are drawing each of the 17 recognized keypoints along with the x,y position and confidence scores. The code is available on GitHub here. Note: this video was created using ml5 v0.x with PoseNet; the current BodyPose API produces the same keypoints with improved accuracy.
OK, now we’re ready to start building an ml5.js + Arduino application together!
Building our first ml5.js + Arduino app: NoseTracker
Let’s build a p5.js + ml5.js application that tracks the nose position of a human and sends that position over serial to an Arduino. As always, we’ll build this up step-by-step.
Start by copying our SerialTemplate and rename the folder to NoseTracker.
Add in ml5.js
To use ml5.js, we need to add the library to our index.html. Add the following <script> tag in the <head>, alongside the p5.js and serial.js libraries we already have:
<head>
  <script src="https://cdn.jsdelivr.net/npm/p5@1.11.13/lib/p5.js"></script>
  <script src="https://cdn.jsdelivr.net/gh/makeabilitylab/js@main/dist/makelab.serial.iife.js"></script>
  <script src="https://unpkg.com/ml5@1.3.1/dist/ml5.min.js"></script>
  <link rel="stylesheet" type="text/css" href="css/style.css">
  <meta charset="utf-8">
</head>
We’re pinning to ml5.js v1.3.1 to ensure the API doesn’t change unexpectedly. This is especially important for ml5.js, which underwent a major breaking change from v0.x to v1.x. Always pin your library versions in course projects!
Initialize the webcam and BodyPose model
Next, let’s set up the webcam and ml5’s BodyPose model. In the v1.x API, we initialize BodyPose in preload() (so the model is ready before setup() runs), then start continuous detection with detectStart() in setup():
let video;
let bodyPose;
let poses = [];

function preload() {
  // Load the BodyPose model (MoveNet by default)
  bodyPose = ml5.bodyPose();
}

function setup() {
  createCanvas(640, 480);
  video = createCapture(VIDEO);
  video.hide(); // hide raw video element (we'll draw it to the canvas)

  // Start continuous pose detection on the video stream
  bodyPose.detectStart(video, onPosesDetected);
}

function onPosesDetected(results) {
  poses = results;
}
detectStart()vs the old.on('pose')pattern: In ml5 v0.x, you subscribed to pose events withposeNet.on('pose', callback). In v1.x, you callbodyPose.detectStart(video, callback), which internally manages the detection loop. This is simpler and prevents accidental recursive loop issues.
Draw nose keypoint
Now, let’s have some fun! Let’s draw a red “nose” at the nose keypoint.
function draw() {
  background(100);
  image(video, 0, 0); // draw the video to the canvas

  for (let human of poses) {
    // Draw a red circle at the nose keypoint
    if (human.nose) {
      fill("red");
      noStroke();
      circle(human.nose.x, human.nose.y, 40);
    }
  }
}
Here’s a video demo:
Video. Video demonstration of using ml5 to track and draw on top of body part keypoints. Based on this Coding Train “Hour of Code with p5.js and PoseNet” by Daniel Shiffman. Note: this video was created with ml5 v0.x PoseNet; the BodyPose API produces the same visual result.
Make yourself into a muppet
To make this a bit more fun, we can muppetify ourselves by adding in some eyes. This is like making a basic Snapchat or Instagram face filter! We’ll also modularize our code by creating drawNose and drawEye functions.
function draw() {
  image(video, 0, 0); // draw the video to the canvas
  for (let human of poses) {
    if (human.nose) {
      drawNose(human.nose.x, human.nose.y);
    }
    if (human.left_eye) {
      drawEye(human.left_eye.x, human.left_eye.y);
    }
    if (human.right_eye) {
      drawEye(human.right_eye.x, human.right_eye.y);
    }
  }
}

function drawNose(x, y) {
  fill("red"); // red nose
  noStroke();
  circle(x, y, 35);
}

function drawEye(x, y) {
  noStroke();

  fill(255); // white of eye (the sclera)
  const eyeWidth = 40;
  const pupilWidth = 15;
  circle(x, y, eyeWidth);

  fill(0); // black pupils
  circle(x, y, pupilWidth);
}
And another video demo to show what we’ve created thus far! Notice how the pose model will recognize pictures of humans as well as real, physical humans in the webcam stream (but not pictures of seals!).
Video. Video demonstration of turning oneself into Elmo using ml5 pose detection. To demonstrate the multi-pose recognizer, I used a book cover with a human face. The video also shows how the book cover of a seal is not recognized. Note: this video was created with ml5 v0.x PoseNet; the BodyPose API works the same way.
Add in web serial code
Finally, let’s add code to transmit the nose’s location over Web Serial. Just as we’ve done in previous lessons, rather than transmit the raw x,y pixel location, we will transmit a normalized version between [0, 1] inclusive for both x and y. We do this in the onPosesDetected callback:
function onPosesDetected(results) {
  poses = results;

  // If serial is open and we have at least one person, transmit nose position
  if (serial.isOpen() && poses.length > 0) {
    const human = poses[0];

    if (human.nose) {
      // Normalize nose position as fraction of canvas dimensions
      let noseXNormalized = human.nose.x / width;
      let noseYNormalized = human.nose.y / height;

      let outputData = nf(noseXNormalized, 1, 4) + ", " + nf(noseYNormalized, 1, 4);
      serial.writeLine(outputData);
    }
  }
}
Connect to web serial device
Our template code, SerialTemplate, provides two different connection mechanisms—both are already coded so you need not do anything here. But, to review, the two different connection approaches are:
First, if you’ve never connected to a particular web serial device before, you can click on the canvas where you’ll be greeted by a connection dialog:
function mouseClicked() {
  if (!serial.isOpen()) {
    try {
      serial.connectAndOpen(null, serialOptions);
    } catch (error) {
      console.error("Serial connection failed:", error);
    }
  }
}
Second, if you’ve previously approved the web serial device, it will auto-connect as soon as you run the app. This is done in setup():
serial.autoConnectAndOpenPreviouslyApprovedPort(serialOptions);
We’re done with the JavaScript app
That’s it for the p5.js app. The full code is available in the p5.js online editor or on GitHub (live page, code).
Building the Arduino side
There are lots of creative possibilities for how our Arduino might use pose data. For now, we’re just going to draw a face icon on the OLED display at the incoming x,y position. The Arduino code is identical regardless of which ml5 version the p5.js app uses—it just receives normalized x,y coordinates over serial.
The OLED circuit
The circuit is similar to many we’ve built for our web serial lessons. Simply, wire up the OLED using I2C connections.
| Arduino Leonardo Wiring | ESP32 Wiring |
|---|---|
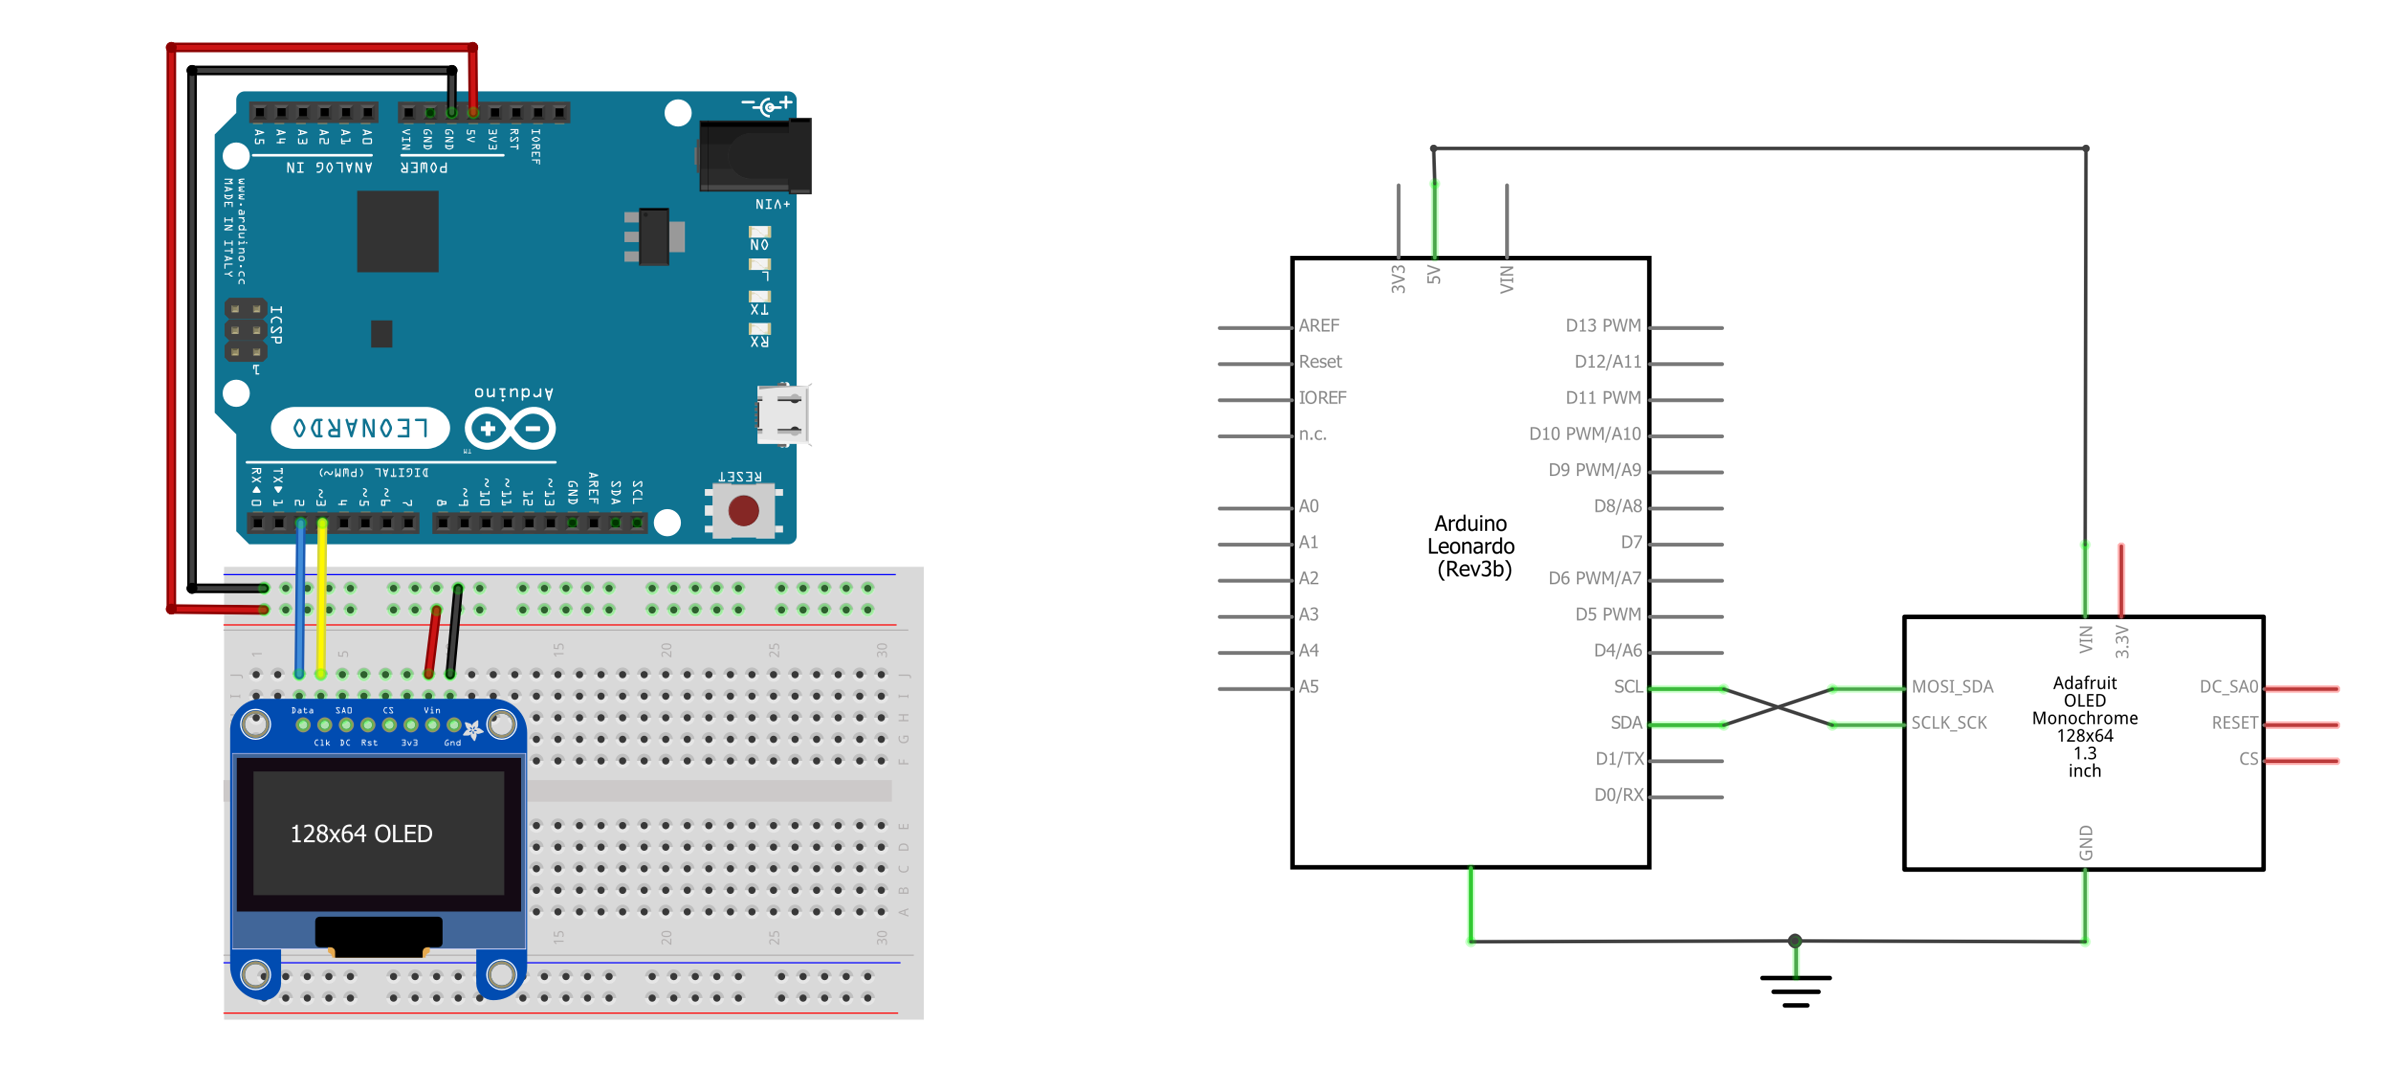 | 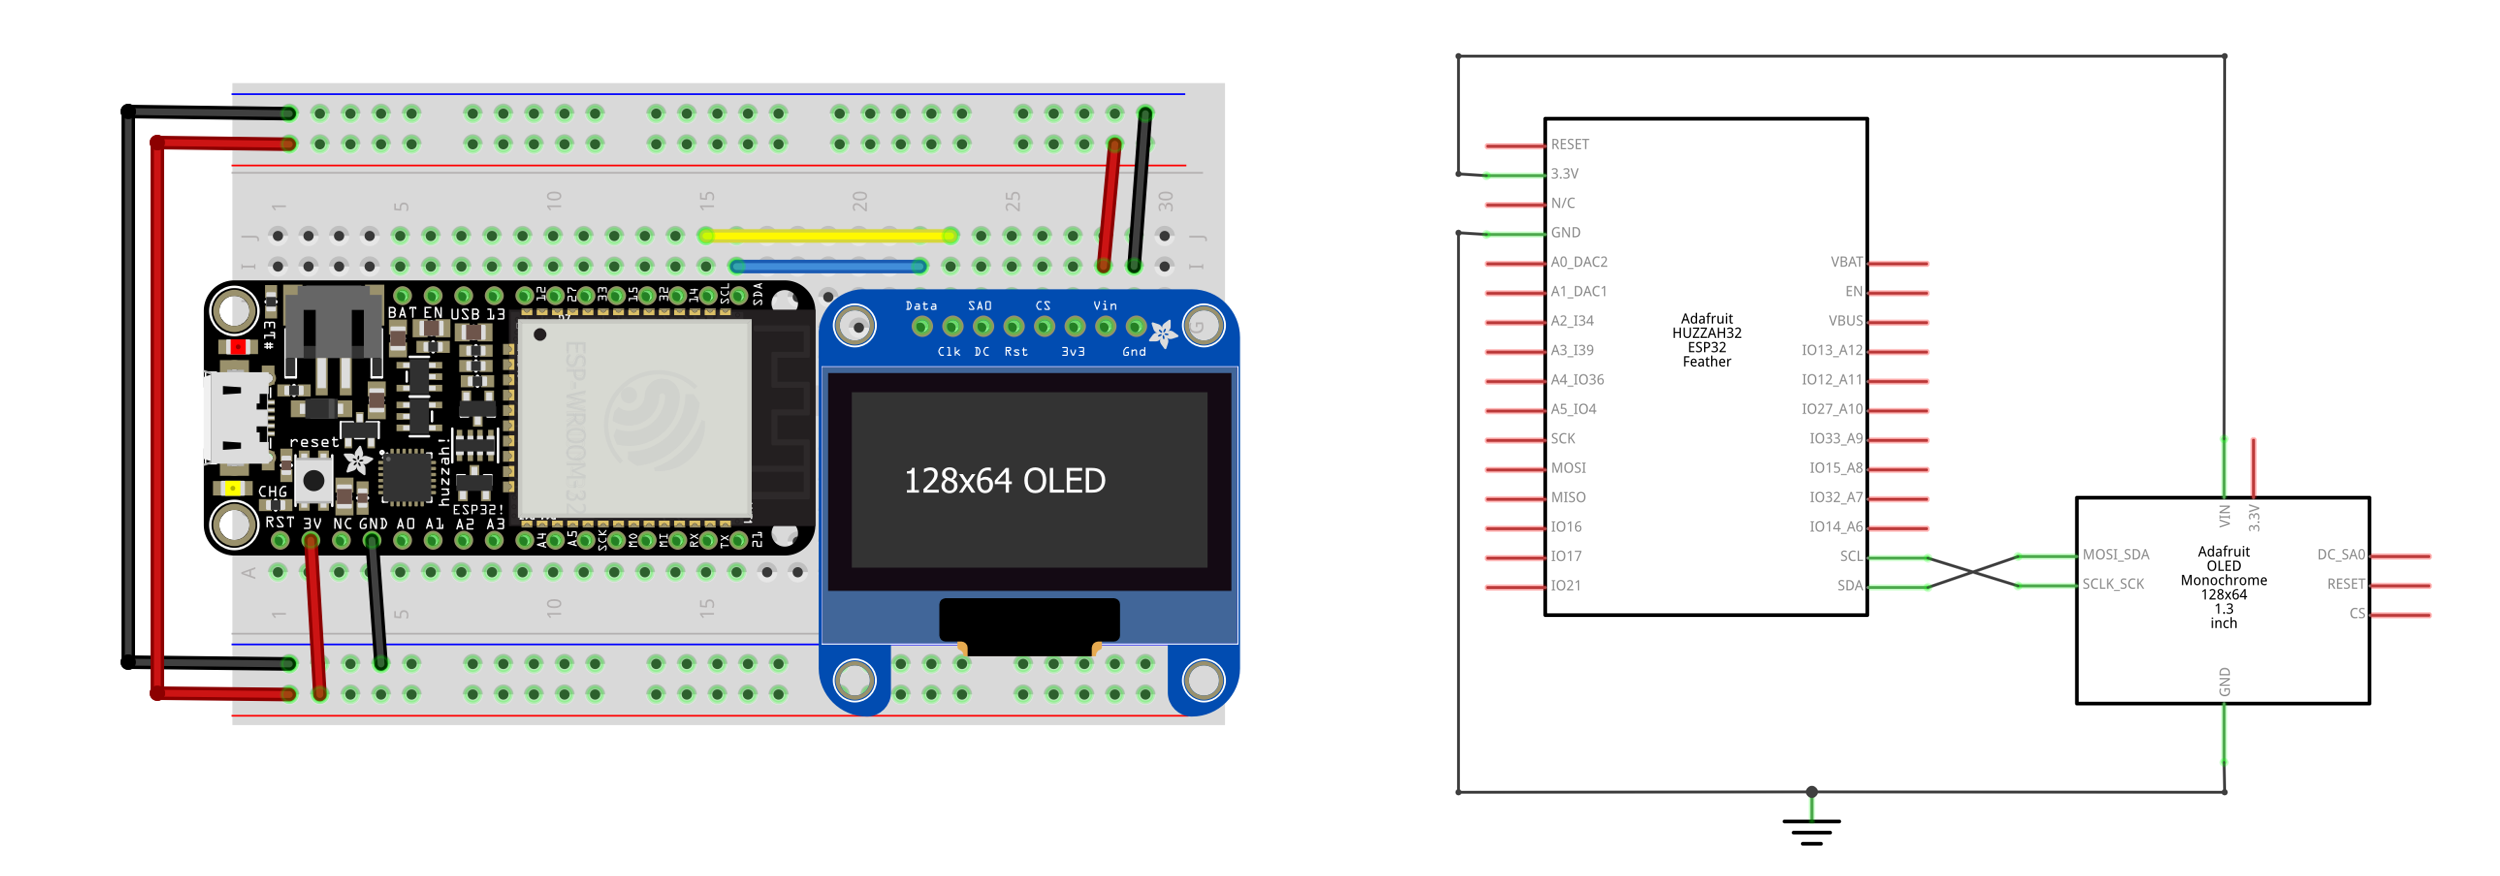 |
Figure. Two example wirings for the OLED display, which we describe in detail in the OLED lesson. You can right-click on the images and select “Open Image in a New Tab” to enlarge.
The Arduino code
The NoseTracker Arduino code is similar to previous lessons. We simply need to:
- Parse incoming serial data into x,y floats
- Convert the x,y normalized positions into OLED pixel positions
- Draw a face at the x,y pixel positions
- Echo data back to our p5.js app for debugging purposes
For the face, rather than drawing one using shape primitives (e.g., drawCircle calls), we’re going to use the built-in face icon from the default font set (which is char index 2):
_display.drawChar(x, y, (unsigned char)2, SSD1306_WHITE, SSD1306_BLACK, CHAR_SIZE);
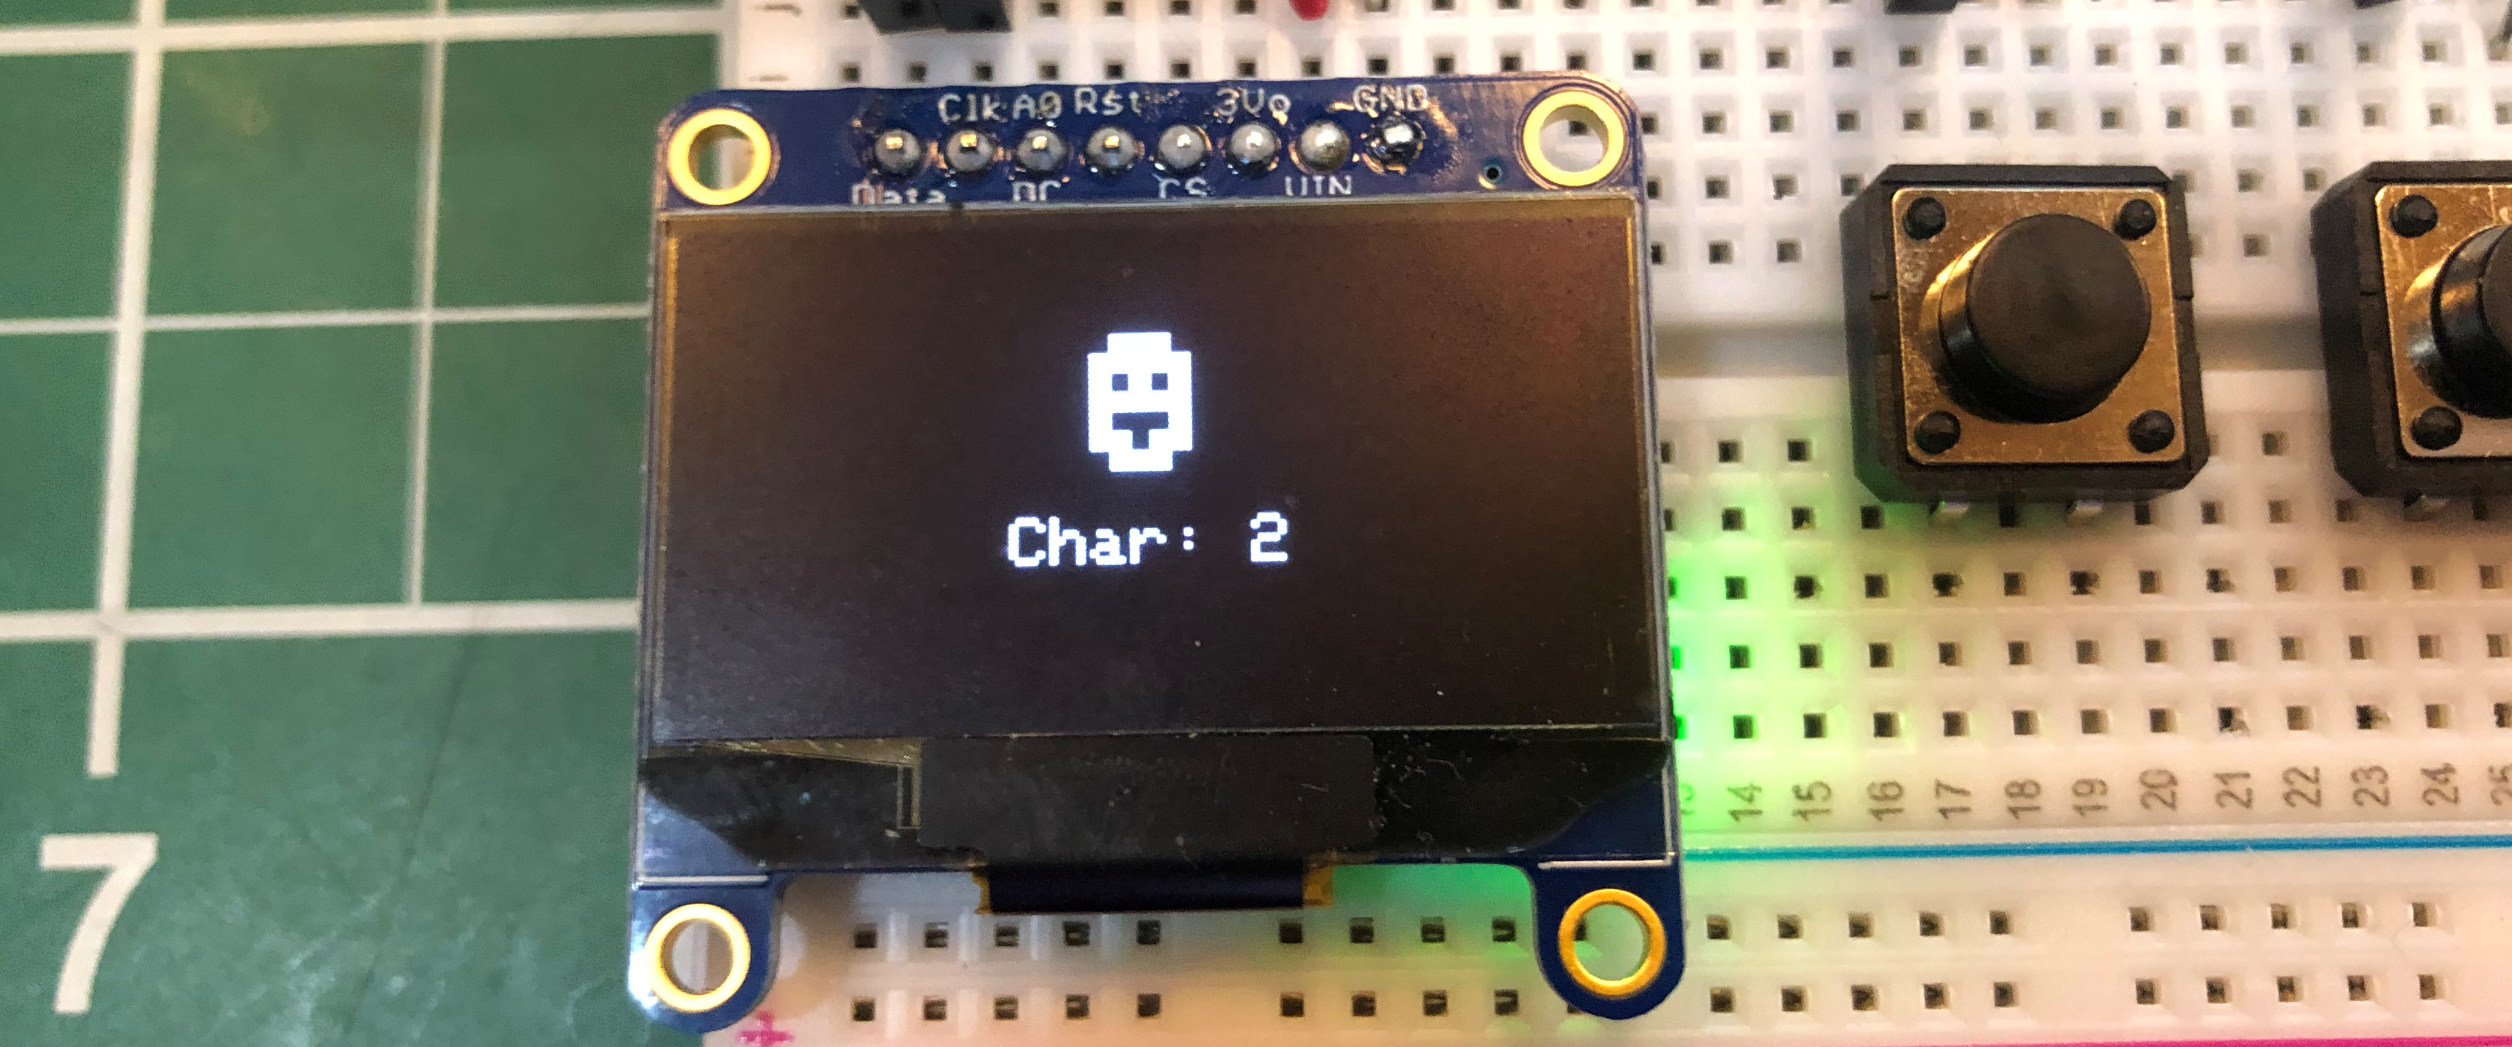 Figure. A close-up image of the face icon we’ll use from the default character set.
Parsing the incoming serial data
First, declare some global variables related to face drawing.
const int CHAR_SIZE = 3;           // set font size to 3
const int DEFAULT_CHAR_WIDTH = 5;  // default font is 5 pixels wide at size 1
const int DEFAULT_CHAR_HEIGHT = 8; // default font is 8 pixels tall at size 1

int _charWidth = DEFAULT_CHAR_WIDTH * CHAR_SIZE;   // calculate char width at char size
int _charHeight = DEFAULT_CHAR_HEIGHT * CHAR_SIZE;  // calculate char height at char size

float _faceX = 0; // normalized x position of face
float _faceY = 0; // normalized y position of face
Now, in loop() look for incoming serial data. If serial data exists, read and parse it into x,y floats.
void loop() {
  // Check to see if there is any incoming serial data
  if(Serial.available() > 0){
    // Read data off the serial port until we get to the endline delimiter ('\n')
    String rcvdSerialData = Serial.readStringUntil('\n');

    // Parse out the comma separated string
    int indexOfComma = rcvdSerialData.indexOf(',');

    if(indexOfComma != -1){
      String strXLocation = rcvdSerialData.substring(0, indexOfComma);
      _faceX = strXLocation.toFloat();

      String strYLocation = rcvdSerialData.substring(indexOfComma + 1, rcvdSerialData.length());
      _faceY = strYLocation.toFloat();
    }

    // Echo the data back on serial (for debugging purposes)
    Serial.print("# Arduino Received: '");
    Serial.print(rcvdSerialData);
    Serial.println("'");
  }

  _display.clearDisplay();
  drawFace(_faceX, _faceY); // draw the face
  _display.display();
  delay(DELAY_MS);
}
Drawing the face
We could really draw anything we want at the received x,y position—an animated sprite, a shape, etc. In this example, we’ll simply draw a face.
void drawFace(float xFrac, float yFrac){
  int x = xFrac * (_display.width() - _charWidth);
  int y = yFrac * (_display.height() - _charHeight);

  _display.drawChar(x, y, (unsigned char)2, SSD1306_WHITE, SSD1306_BLACK, CHAR_SIZE);
}
And that’s it, the full code is available on GitHub as NoseTrackerSerialIn.ino.
Video demonstration of NoseTracker
Here’s a longer video demonstration of the full p5.js + Arduino NoseTracker app:
Video. The full NoseTracker demo. The p5.js code is available in the p5.js online editor or on GitHub (live page, code). The Arduino code is on GitHub as NoseTrackerSerialIn.ino. You can ignore the two momentary buttons on the breadboard—we don’t use them here. Note: this video was created with ml5 v0.x PoseNet; the behavior with BodyPose v1.x is the same.
Introducing FlappyNose
Using the same p5+ml5 code, NoseTracker (live page, code), we can build lots of interesting physical computing experiences. As one example, we can modify the FlappyBird.ino code we introduced in our OLED Lesson to use serial input rather than digital input (a button press) to control flapping. We’ll call this new incarnation: FlappyNose! 🐦
In this case, we draw a menu screen that asks the user to select the “flapping” control—either serial or button. If serial is selected, the Arduino sketch expects a text-encoded comma-separated line of x,y positions—just like what the NoseTracker page transmits—however, we only use the y position in the game to set the “bird” position. See the video below.
Video. A full demonstration of “FlappyNose”. Watch me get a high score of 33 after a few tries. :) The p5.js app is available on the p5.js online editor or in GitHub (live page, code). The Arduino sketch is FlappyBirdSerialIn.ino. Note: this video was created with ml5 v0.x PoseNet; the behavior with BodyPose v1.x is the same.
Lesson Summary
In this lesson, you learned how to use ml5.js—a beginner-friendly machine learning library—with p5.js and Arduino to create interactive, ML-powered physical computing experiences. Here are the key takeaways:
- ml5.js is a friendly wrapper around TensorFlow.js that makes machine learning accessible to artists, designers, and students. It’s designed to work seamlessly with p5.js.
- BodyPose (which replaced PoseNet in ml5.js v1.0) uses MoveNet or BlazePose to detect 17 body keypoints in real-time from a webcam feed—right in the browser, with no data sent to the cloud.
- The
detectStart()API pattern continuously runs pose detection and calls your callback with results. This is simpler and more robust than the old event-based approach. - We built NoseTracker, which extracts the nose keypoint position, normalizes it to [0, 1], and transmits it over Web Serial to an Arduino that displays a face icon on the OLED at the corresponding position.
- The Arduino code is model-agnostic—it just receives normalized x,y coordinates. This means you can swap the ML model (BodyPose, HandPose, FaceMesh) without changing any Arduino code.
- ML bias and ethics matter. Pre-trained models reflect their training data. Models trained mostly on one demographic may not work well for others. Always consider who your technology includes and excludes.
Exercises
Exercise 1: Modify the NoseTracker to track a different keypoint—such as the wrist—and use it to control the face icon on the OLED. How does changing the tracked keypoint affect the interaction experience?
Exercise 2: Add confidence-based filtering to the NoseTracker. Only send data to Arduino when the nose keypoint confidence is above 0.5. Display the current confidence level on the p5.js canvas.
Exercise 3: Extend the NoseTracker to send two body parts as a comma-separated string (e.g., "noseX, noseY, wristX, wristY\n"). On the Arduino side, draw both a face icon (for the nose) and a circle (for the wrist).
Exercise 4: Create a “wave detector” app. Track the wrist keypoint and detect when the user waves (large side-to-side motion). When a wave is detected, send a signal to the Arduino that triggers an LED blink or a buzzer tone.
Resources
-
ml5.js Official Documentation, ml5.js
-
ml5.js v1.0 Release Blog Post, Processing Foundation
-
BodyPose with MoveNet, The Coding Train (Daniel Shiffman)
-
Beginner’s Guide to Machine Learning with ml5.js, The Coding Train YouTube playlist
-
Machine Learning for the Web, Yining Shi’s course at ITP, NYU
Next Lesson
In the next lesson, we’ll explore ml5’s HandPose model for hand tracking and build an Arduino app controlled by hand gestures. 🖐️